Underwater Settings for the Sony RX 100

Sony RX 100 settings for Macro
- Manual mode, F8, 1/500th, ISO 100;
- Zoom out
- Auto white balance, flash on forced flash mode
- Strobe on TTL, or set it to manual power; adjust strobe power as needed
- A wet diopter is highly recommended for macro when using the RX-100
- Shoot at F2.8 to try to get some better bokeh and a blurred background
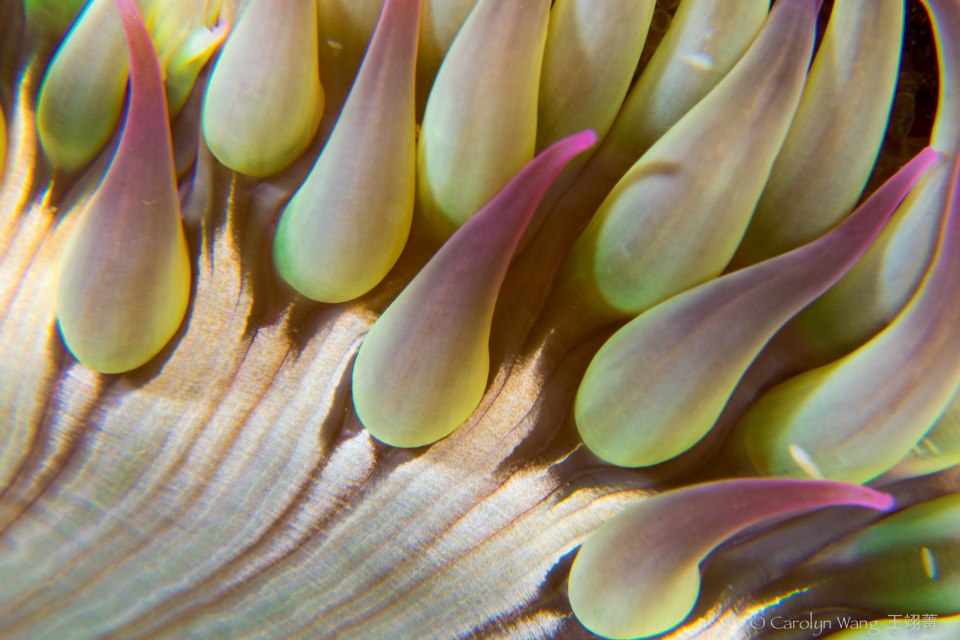
Anemone – Manual, ISO 100, F11, 1/500
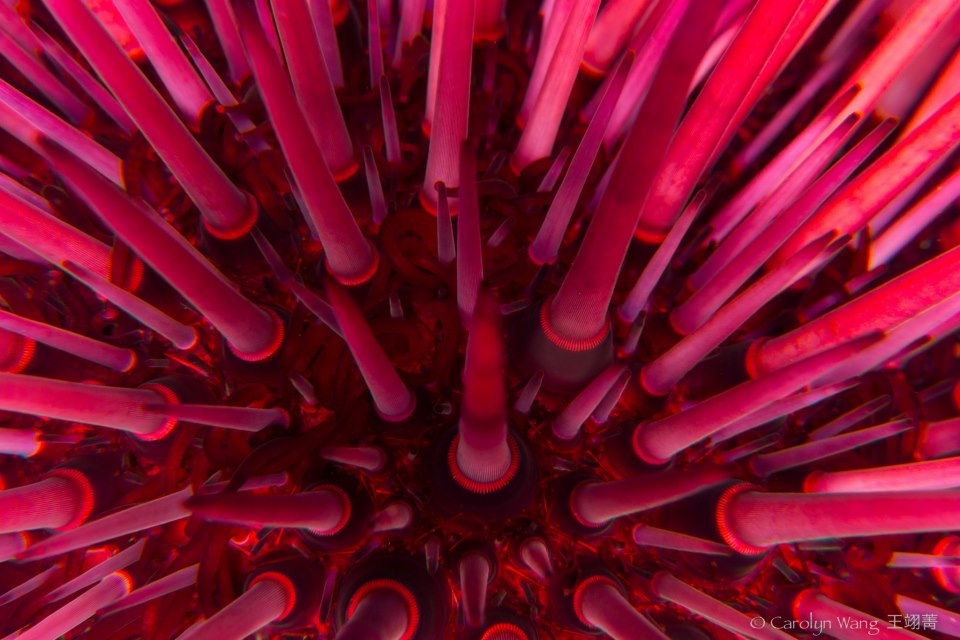
Urchin – ISO 100, F11, 1/500
When using a diopter like the Dyron 67mm or Subsee macro lens
- Zoom all the way in
- Shoot at F11 for maximum depth of field
- Use a good focus light like the Sola 800 to help the camera focus
Sony RX100 Settings for Wide-Angle and Fish
- Manual mode, F6.3, 1/125th, ISO 100
- Zoom out
- ** Adjust shutter speed as needed to control background exposure
- Auto white balance, flash on forced flash mode
- Strobe on manual power; adjust strobe power as needed
- When shooting into the sun, you will need to increase your aperture to F11 and/or increase your shutter speed to 1/1000th or faster.
If you don’t have an external strobe / flash
You are shooting with the internal flash. I highly recommed using a diffuser with the internal flash.
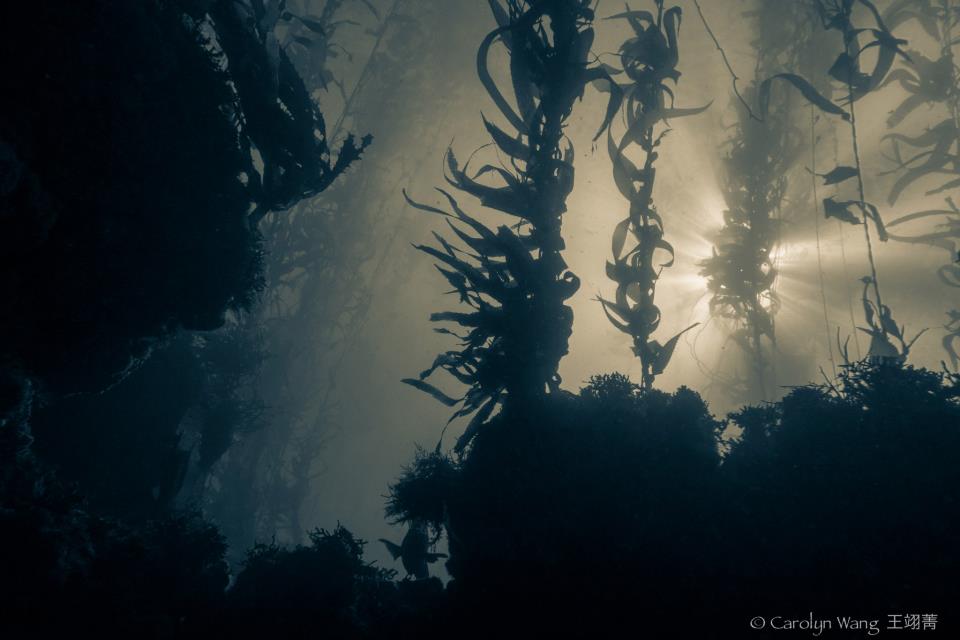
Kelp Forest – ISO 200, F5.6, 1/500
RX 100 Battery Advice
To be safe, it is always recommended to change the batteries after 3 dives. There’s nothing worse than going down on your third dive only to have the camera die after 10 minutes.
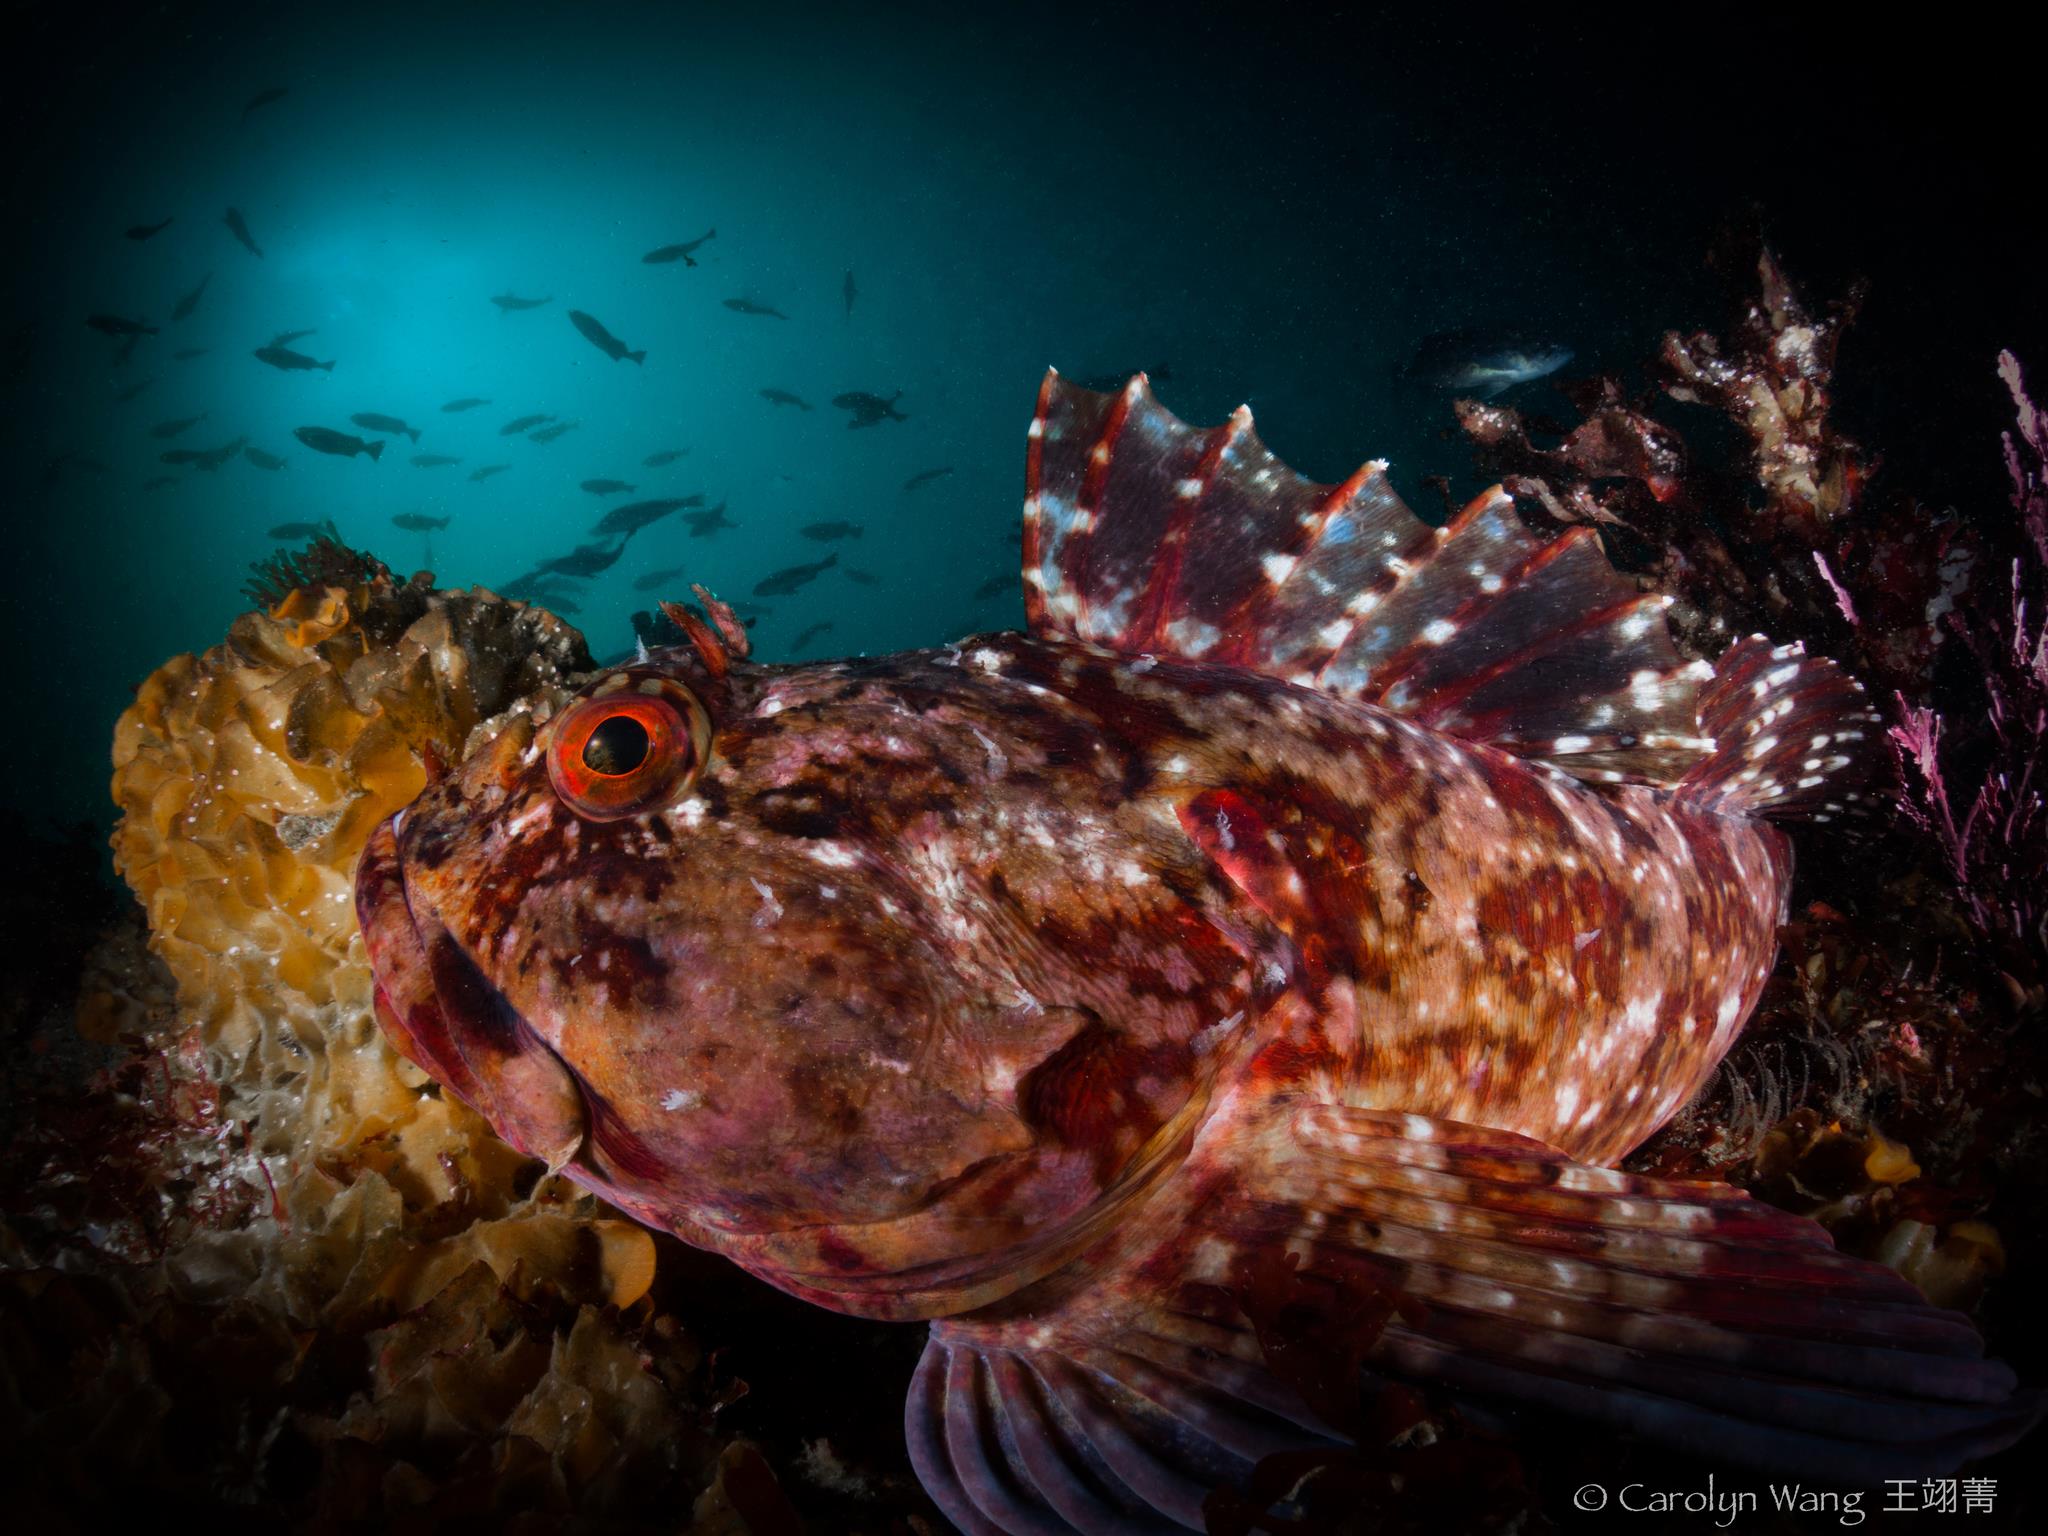
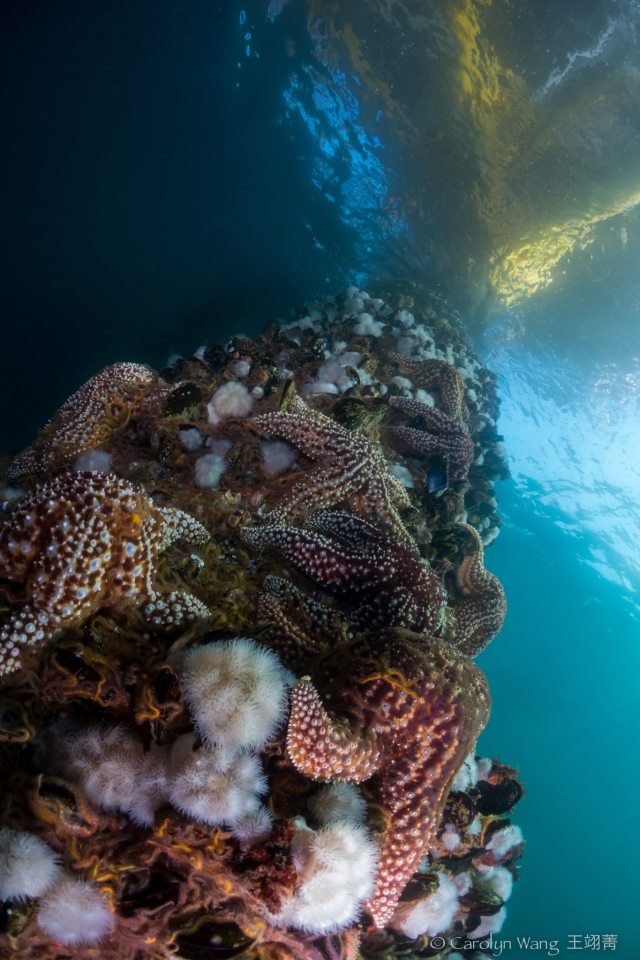
ISO 100, F8, 1/160
Suggested RX100 Menu Settings in General
Quick Menu Info – what to change from defaults
- Look into changing your auto-focus area to center spot focusing or flexible spot
- Turn AF illuminator off, unless you have a clear housing and no focus light
- Check out the peaking level feature for macro
Detailed Menu info
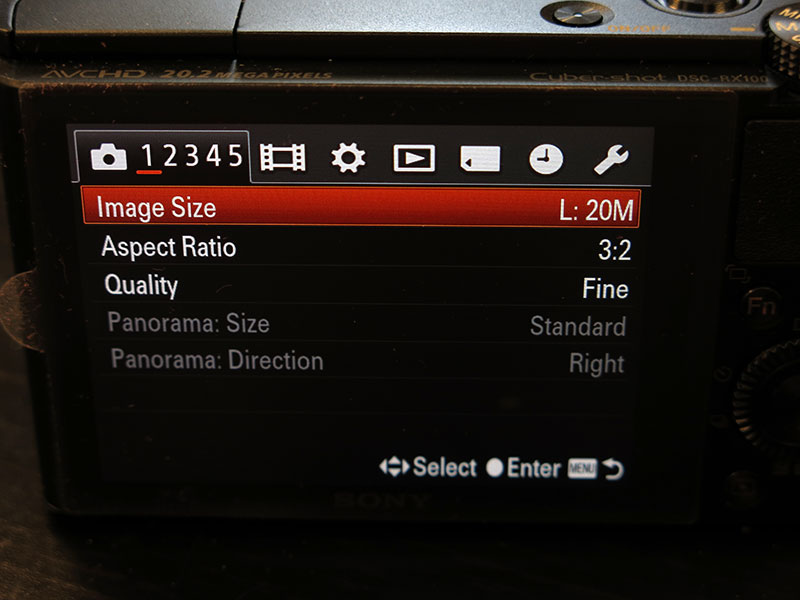
Camera Menu #1
Image Size – (Menu – Camera 1 – [Image Size] ) – L: 20M
Larger images contain more pixels, which means more detail. This should automatically be set to Large if you change your Quality to RAW (see below)
Aspect Ratio – (Menu – Camera 1 – [Aspect Ratio] ) – 3:2
Set aspect ratio to 3:2 to mimic standard film. This is recommended in case you want to print images in the future as most photo prints are based on this ratio.
Quality – (Menu – Camera 1 – [Quality] ) – RAW or RAW+J
I advise to shoot raw if it’s available. You may need extra software to process your images but it is worth it. The flexibility of a raw file to be changed cannot be underestimated. If you want to shoot JPEGS while shooting raw, then use RAW+J. Both of these should also set your image size to Large.
Panorama: Size – (Menu – Camera 1 – [Panorama: Size] ) – IGNORE
Not used underwater
Panorma: Direction – (Menu – Camera 1 – [Panorama: Direction] ) – IGNORE
Not used underwater
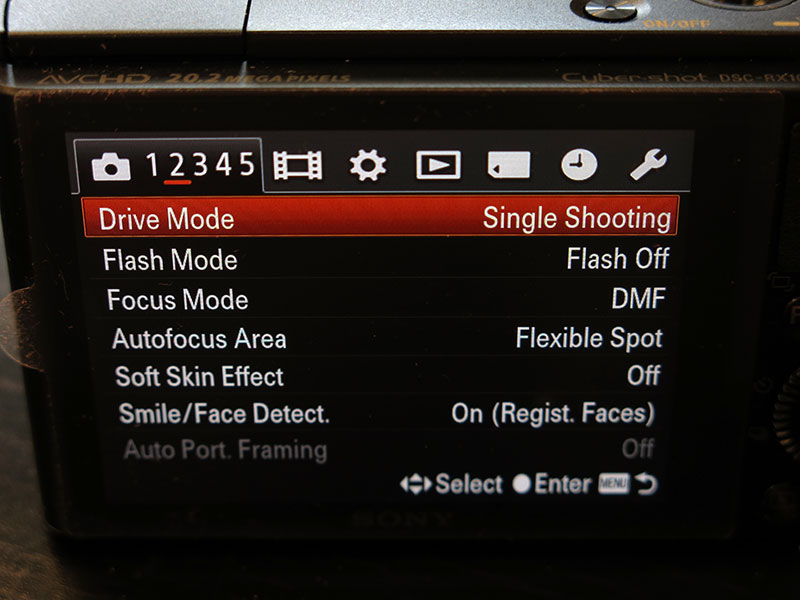
Camera Menu #2
Drive Mode – (Menu – Camera 2 – [Drive Mode] ) – Single Shooting
Single Shooting is the only way to go for underwater photography as it gives you more control over every image you take and, more importantly, gives your strobes a chance to recharge for the next shot.
Continuous might be useful for shooting fast moving subjects.
Note: Continuous, aks Tracking, focus can cause problems when attempting to compose images as the focus will be shifting from subject to subject as you adjust the framing. Best to stick with Single-shot.
Flash – (Menu – Camera 2 – [Flash Mode] ) – DEPENDS
Set this to OFF for ambient light shots. Set this to “Fill Flash” for using a strobe or the internal flash.
Focus Mode – (Menu – Camera 2 – [Focus Mode] ) – Single-shot
Single-shot is what we recommend as a base line setting. Continuous focus might be good if shooting fish but in our experience many of the fish are too fast for you to adapt to their movement.
Note: this camera will automatically refocus on the subject when you move the camera, which helps it focus faster. DMF mode is very cool when used with peaking levels.
Autofocus Area – (Menu – Camera 2 – [Autofocus Area] ) – Center
I always shoot with center item focusing. I know exactly where the camera will take the focus from and then I can compose the image once I have locked the focus by adjusting what is where in the frame.
That being said, you can set this to flexible spot, which allows you to move the focus point by pressing the center button of the rear control wheel and then the direction in which you wish to move the focus point.
Soft Skin Effect – (Menu – Camera 2 – [Soft Sking Effect] ) – OFF
No need for this underwater
Smile/Face Detect – (Menu – Camera 2 – [Smile/Face Detect] ) – OFF
These two are not needed underwater and may mess with your settings. YOU want to be in control, not the camera.
Auto Port. Framing – (Menu – Camera 2 – [Auto Port. Framing] ) – OFF
Leave this off as well.
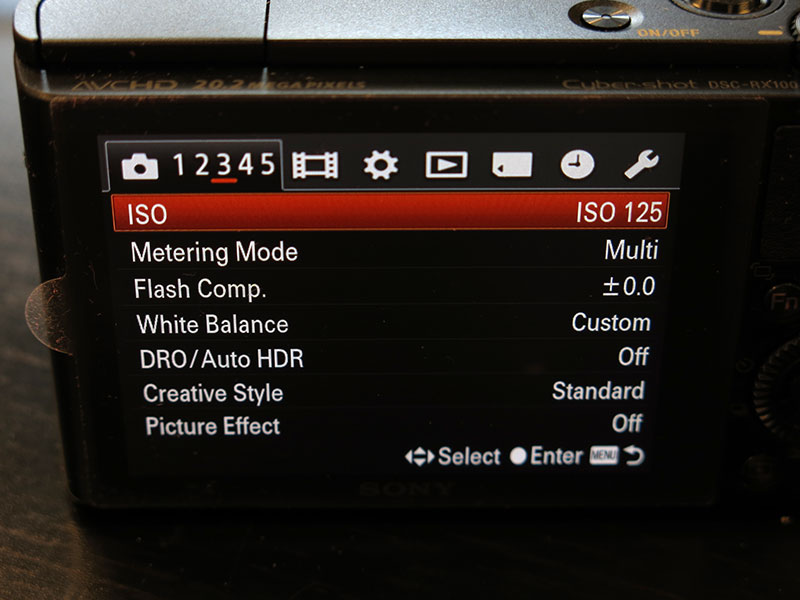
Camera Menu #3
ISO – (Menu – Camera 3 – [ISO] ) – 100
In general you want your ISO to be set as low as possible to produce as fine a quality as you can get. Sometimes a low light situation dictates a change in your ISO, but start at a base of 100 and adjust as needed from there.
Note: The higher you raise your ISO, the more noise you will see in your images. For ambient light photos, you will want to raise the ISO. Read more about ISO underwater
Metering Mode – (Menu – Camera 3 – [Metering Mode] ) – Multi
Set your metering mode to Multi so that it creates a well-balanced exposure from the entire frame of the image, not just a small portion.
Flash Compensation – (Menu – Camera 3 – [Flash Comp] ) – 0.0
You will either be shooting without a flash (ambient light) or with strobes on your housing. Neither of these will make use of a stronger/weaker flash so just leave it at the default.
White Balance – (Menu – Camera 3 – [White Balance] ) – AUTO
When shooting with strobes, keep your white balance set to auto.
DRO / Auto HDR – (Menu – Camera 3 – [DRO / Auto HDR] ) – OFF
Anything like HDR that is done in the camera can be done with much more control on a computer after the dive.
Creative Style – (Menu – Camera 3 – [Creative Style] ) – Standard
Again, creative effects can be added with much more control after you’ve taken your images. Better to add something to an image later then want to remove it later and not be able to do so.
Picture Effect – (Menu – Camera 3 – [Picture Effect] ) – Off
See the resons above for DRO /HDR & Creative Style.
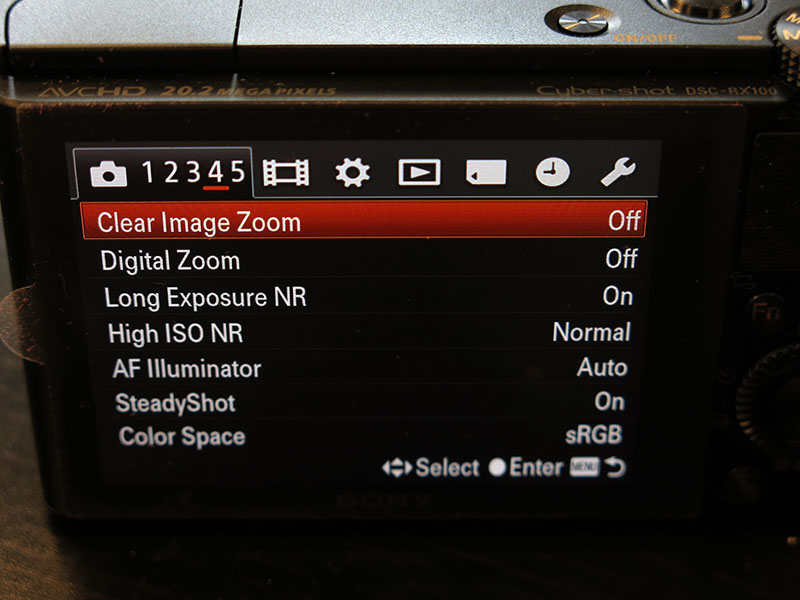
Camera Menu #4
Clear Image Zoom – (Menu – Camera 4 – [Clear Image Zoom] ) – OFF
As this setting doesn’t work in RAW mode (which we recommend you shoot in), you might as well keep this setting set to OFF. This basically adds a little bit of zoom to your optical zoom without decreasing the image quality too badly.
Digital Zoom – (Menu – Camera 4 – [Digital Zoom] ) – OFF
This adds even more zoom than the Clear Image Zoom but your image quality will degrade much worse. It’s best to keep both Clear Image Zoom and Digital Zoom set to off.
Long Exposure Noise Reduction – (Menu – Camera 4 – [Long Exposure NR] ) – On
Not used underwater. The default is set to ON and it’s safe to leave it there. This reduces noise on exposures over 1/3 seconds in length. Odds are good you won’t be making this long of an exposure underwater.
High ISO Noise Reductoin – (Menu – Camera 4 – [High ISO NR] ) – Normal
This setting is not available for RAW images so if you shoot raw you won’t need to worry about it. It sets the priority of noise reduction while taking images. The concern of setting this to high is that the camera might not allow you to take more images while it is processing the noise reduction.
AF Illuminator – (Menu – Camera 4 – [AF Illuminator] ) – OFF
This function emits a red light to assist the camera in focusing. Keep off unless you are using a clear housing and are not using a focus light.
SteadyShot – (Menu – Camera 4 – [SteadyShot] ) – ON
Keep this set ON to help prevent as much camera shake in your images as possible.
Color Space – (Menu – Camera 4 – [Color Space] ) – sRGB
sRGB is the defualt setting. Adobe RGB is for applications or printers that support color management and DCF2.0 option color space. Using some applications or printers that do not support them may result in or print images that do not faithfully reproduce the color.

ISO 100, F5.6, 1/500
Camera Menu #5
Shooting Tip List – (Menu – Camera 5 – [Shooting Tip List] ) – see description
Displays all shooting tips installed on the camera. Look through the table of contents and select the tip you want to read.
Write Date – (Menu – Camera 5 – [Write Date] ) – OFF
Selects whether to include a shooting date on the still image
Scene Selection – (Menu – Camera 5 – [Scene Selection] ) – see description
This is only used when the dial is set to SCN (scene selection) and tells the camera which scene you’re shotting. Since you should be shooting manual or program, you shouldn’t have any need of this.
Memory Recall – (Menu – Camera 5 – [Memory Recall] ) – desired number
When the mode dial is set to [Memory recall], follow the steps below to make new selections if you want to recall other settings.
Memory – (Menu – Camera 5 – [Memory] ) – desired number
Allows you to register up to three often-used modes or camera settings in the camera. You can recall the settings using [Memory recall].
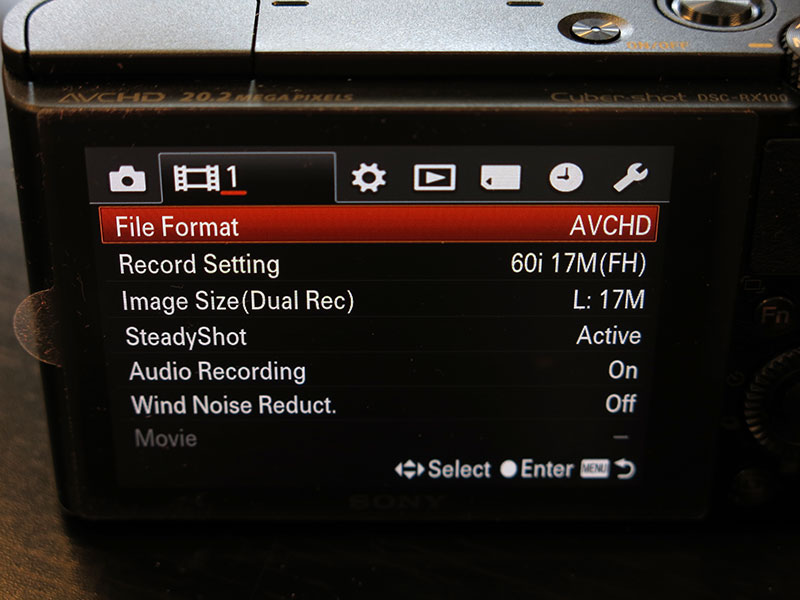
Video List #1
File Format – (Menu – Video 1 – [File Format] ) – AVCHD
AVCHD format is theoretically a better format but does not work on Apple computers. If you’re working with an Apple, select MP4
Record Setting – (Menu – Video 1 – [Record Setting] ) – Default
This will depend on whether you selected AVCHD or MP4 above. In any case, most users will get buy with the default for either.
Image Size (Dual Rec) – (Menu – Video 1 – [Image Size] ) – Large (17M)
This setting sets the size of an image taken while a move is shooting. The default is set to a larger image and we recommend staying with the default.
SteadyShot – (Menu – Video 1 – [Steady Shot] ) – Active
Setting this to active reduces the amount of camera shake and is highly recommended for video.
Audio Recording – (Menu – Video 1 – [Audio Recording] ) – On
Assuming you’ll want to hear what you’re shooting, keep this set to On.
Wind Noise Reduction – (Menu – Video 1 – [Wind Noise Reduct.] ) – Off
This should only be used if the wind is blowing strongly and you need to record audio. If turned on, recorded sounds might be difficult to hear.
Movie – (Menu – Video 1 – [Movie] ) – Program or Manual
When set to program mode, the camera will automatically adjust exposure as you move the camera. If you want full control, set it to manual but be aware that you will need to adjust exposure as you move the camera.
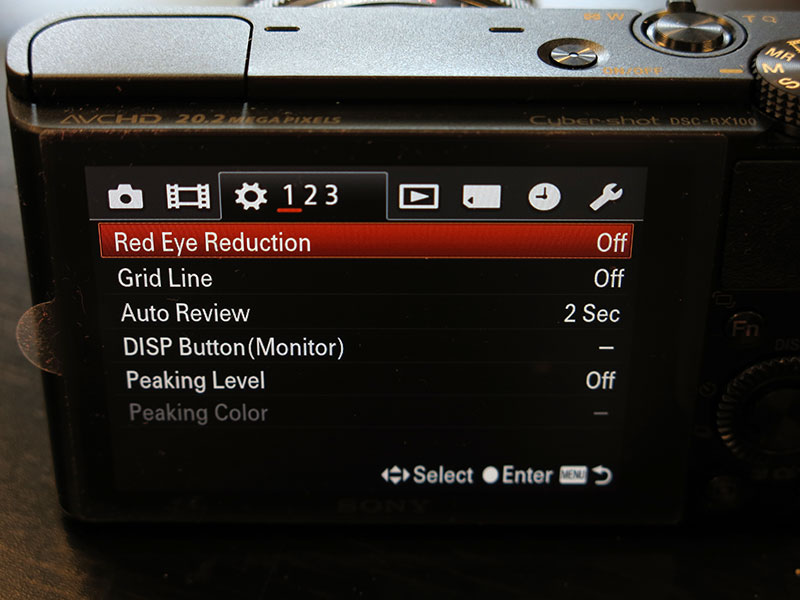
Gear Menu #1
Red Eye Reduction – (Menu – Gear Menu 1 – [Red Eye Reduction] ) – OFF
Do not use red eye reduction as it may interfere with strobe function.
Grid Line – (Menu – Gear Menu 1 – [Grid Line] ) – OFF
This shows gridlines on the display. We recommend keeping this turned off but this is really a user preference.
Auto Review – (Menu – Gear Menu 1 – [Auto Review] ) – 2 seconds
We like 2 seconds, although some people may want it set off, or set to 5 seconds.
DISP Button (Monitor) – (Menu – Gear Menu 1 – [DISP Button (Monitor)] ) – User preference
This changes what is shown on the display. Options are: graphic display, display all info, no display info, level, and histogram.
Peaking Level – (Menu – Gear Menu 1 – [Peaking Level] ) – OFF / High
For general usage, keep this set to off as you won’t make use of it and it may interfer with your image taking. Macro shooters, however, may want to try this: 1) set peaking level to high, 2) set peaking color to yellow, 3) set focus mode to DMF. This will show you exactly what is in focus and allow you to move the focus range with a visual reference.
Peaking Color – (Menu – Gear Menu 1 – [Peaking Color] ) – Yellow
We’ve found yellow to be the best color for this feature, but it really comes down to personal preference.
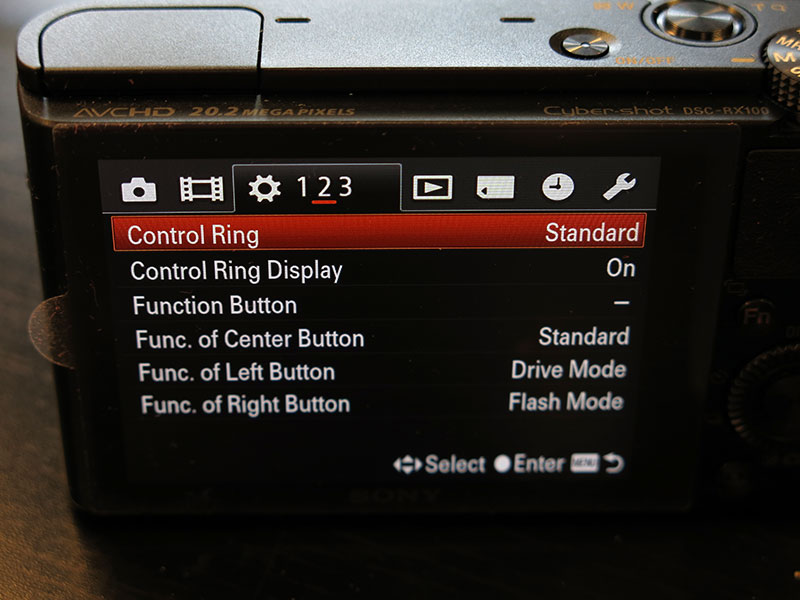
Gear Menu #2
Control Ring – (Menu – Gear Menu 2 – [Contrl Ring] ) – Standard
Keep this set to standard to keep the function of the control ring optimized based on your shooting mode.
Control Ring Display – (Menu – Gear Menu 2 – [Control Ring Display] ) – ON
Sets whether or not to display the animation.
Function Button – (Menu – Gear Menu 2 – [Function Button] ) – see description
This allows you to change what options are available when you hit the “Fn” button on the back of the camera while shooting. There are 7 slots here where you can put menus you might access often, such as white balance or exposure compensation.
Function of Center Button – (Menu – Gear Menu 2 – [Func. of Center Button] ) – standard
Allows you to select frequently used functions and assign them to the center button on the control wheel. The default “Standard setting” sets the function assigned to the center button on the control wheel as different depending on the [Autofocus Area] setting.
Function of Left Button – (Menu – Gear Menu 2 – [Func. of Left Button] ) – ISO, Auto Focus or White Balance
Allows you to select frequently used functions and assign them to the left button.
We suggest you reprogram this to ISO, auto focus or white balance as the default is set to drive mode.
Function of Right Button – (Menu – Gear Menu 2 – [Func. of Right Button] ) – see description.
Allows you to select frequently used functions and assign them to the right button.
Default mode is set to Flash mode. Just set this to a function you use frequently.
MF Assist – (Menu – Gear Menu 2 – [MF Assist] ) – On
Enlarges the image on the screen automatically to make manual focusing easier in Manual Focus or DMF mode.
Focus Magnification Time – (Menu – Gear Menu 2 – [Focus Magnif. Time] ) – 2 seconds
Enlarges the image for 2 seconds when using the MF Assist mode. Adjust as needed.
Face Priority Tracking – (Menu – Gear Menu 2 – [Face Priority Tracking] ) – OFF
Although you shouldn’t be using face tracking mode, just keep this turned off.
Face Registration – (Menu – Gear Menu 2 – [Face Registration] ) – Ignore
Complicated face tracking function – just ignore this.
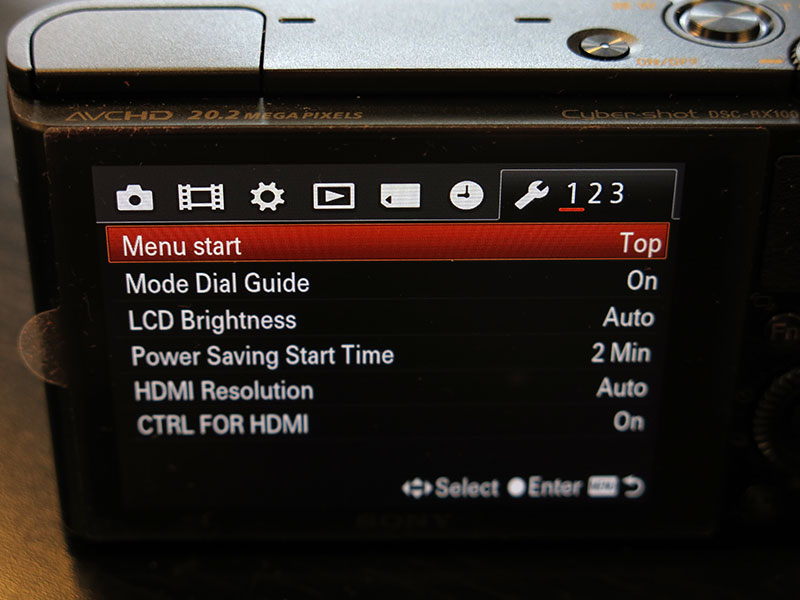
Wrench Menu #1
Menu Start – (Menu – Wrench Menu 1 – [Menu Start] ) – as desired
Allows you to select whether to always display the first screen of the menu or to display the screen of the item previously set.
Mode Dial Guide – (Menu – Wrench Menu 1 – [Mode Dial Guide] ) – as desired
Sets whether to display the mode dial guide (description for each shooting mode).
LCD Brightness – (Menu – Wrench Menu 1 – [LCD Brightness] ) – Auto
Set manually to a lower brightness to save battery power; set to SUNNY if you are having trouble in bright sunny water
Power Saving Start Time – (Menu – Wrench Menu 1 – [Power Saving Start Time] ) –
HDMI Resolution – (Menu – Wrench Menu 1 – [HDMI Resolution] ) – as desired
When you connect the camera to a High Definition (HD) TV with HDMI terminals using an HDMI Cable (sold separately), you can select HDMI Resolution to output images to the TV.
CTRL FOR HDMI – (Menu – Wrench Menu 1 – [CTRL FOR HDMI] ) – as desired
This setting allows (TV) remote control of a camera that is connected to a “BRAVIA” Sync TV using the HDMI Cable (sold separately).
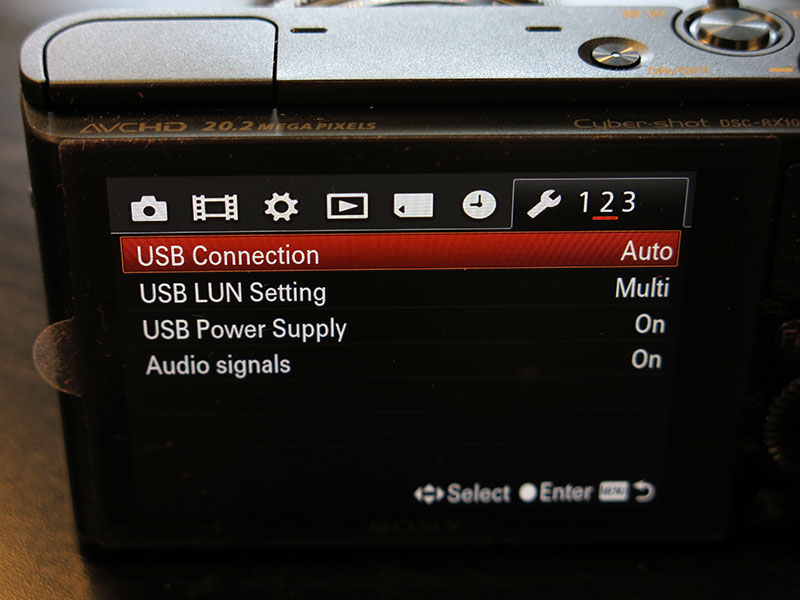
For Wrench Menu #2 and #3, assign settings as desired. These have to with how the camera functions and how it interacts with outside devices. These settings will have no effect on how you shoot pictures.
Questions about the RX100?
Head on over to our forums and post a question for our Compact Camera Experts
About the Authors
 Scott Gietler is the creator of the Underwater Photography Guide and owner of Bluewater Photo Store. An avid marine naturalist, Scott is the author of the Field Guide to Southern California Marine Life. He was the LAUPS photographer of the year for 2009, and his photos have appeared in magazines, coffee table & marine life books, museums, galleries, and aquariums throughout California.
 Travis Ball is a travel blogger and underwater photographer who recently finished 30 straight months of travel. He believes everyone should enrich their lives with travel and all the experiences it has to offer.


