How to Use In-Camera Image Overlays
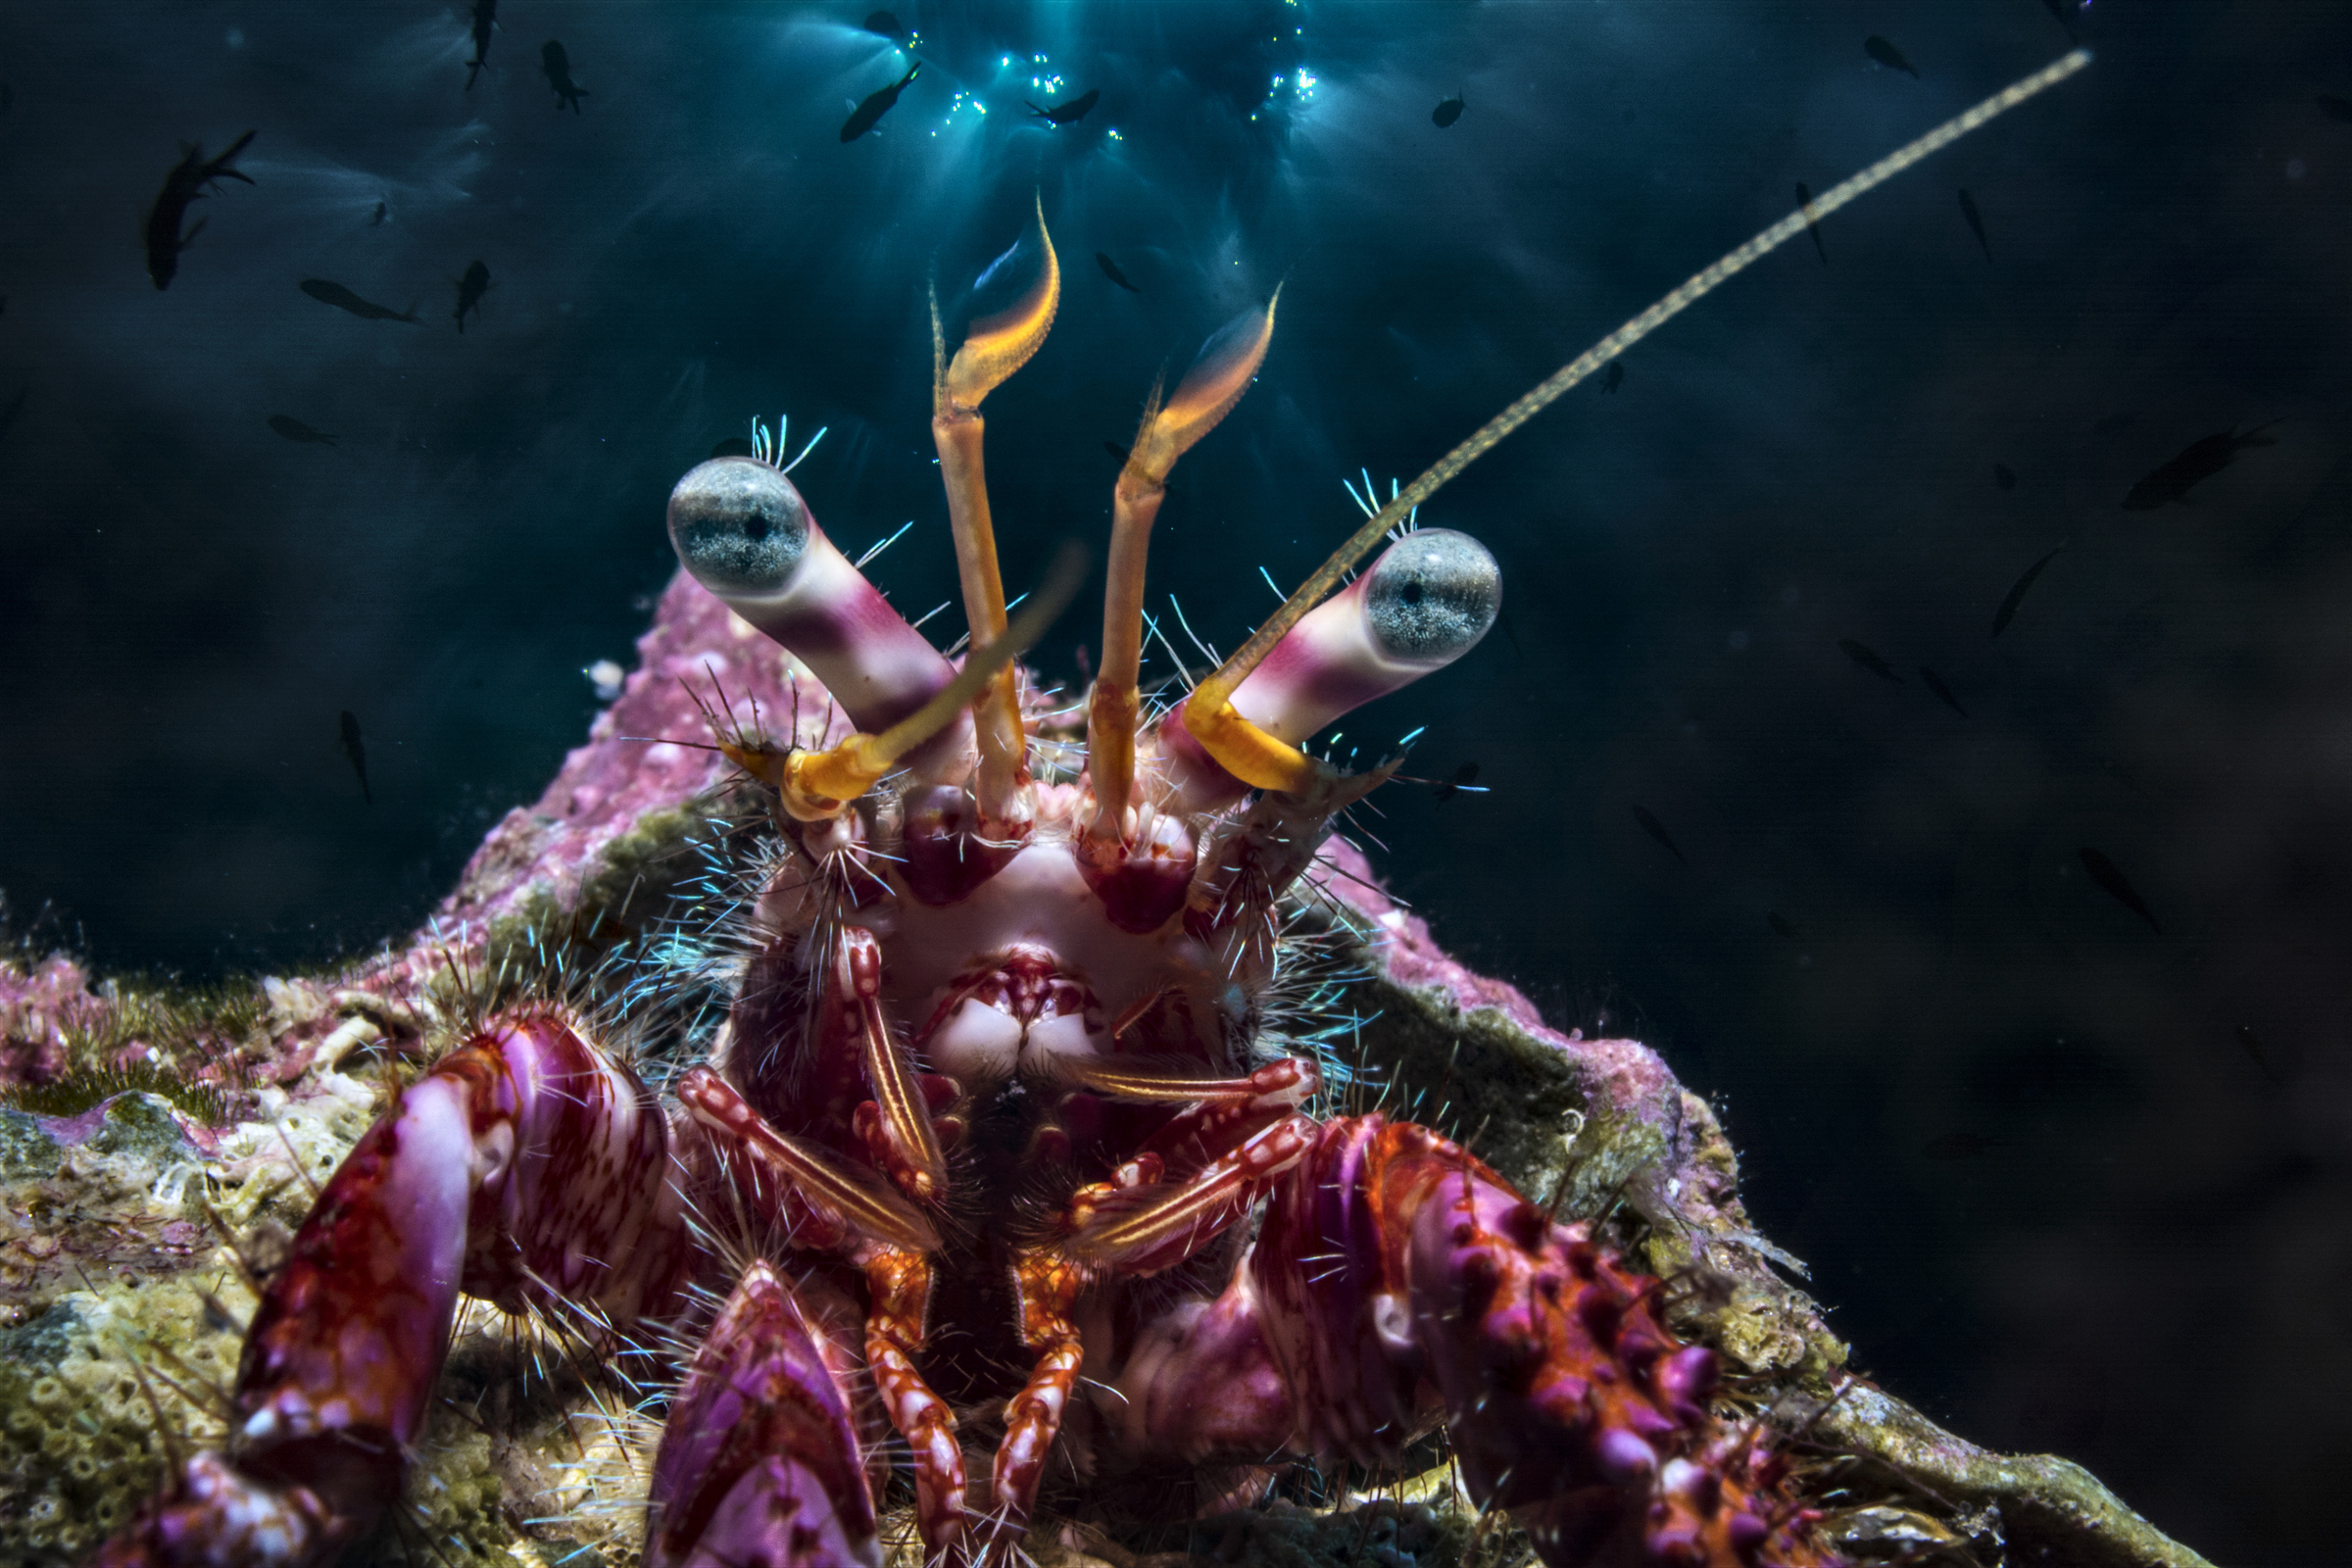
Image overlays, possible with many modern digital cameras, allows us to work on our photos directly in-camera – a creative direction that doesn’t rely on the use of computers for post-production.
The image overlay technique, in some respects similar to multiple exposure HDR, allows us to combine two different frames into a single image, provided that they are taken in RAW format with the same camera and still stored on your memory card. The final fused image is also a RAW file, numbered sequentially, which allows for adjustments during post-processing.
In underwater photography, this technique is most often seen as a combination of a macro subject with a light blue sunball in the background. These photos are quite popular in underwater photo competitions because they have so much visual impact.
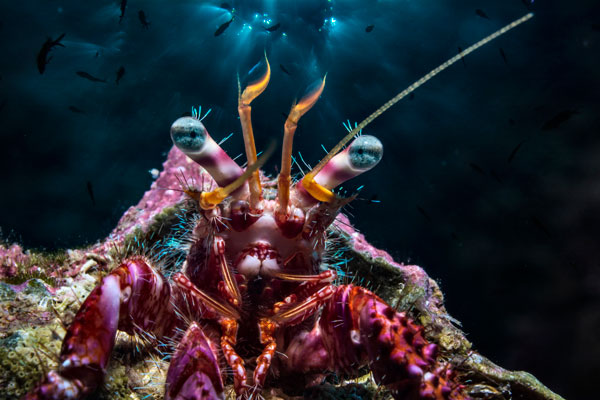
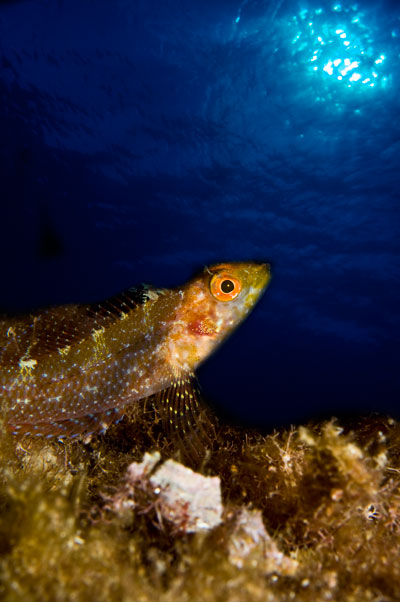
Two photos were combined to create this stunning overlay.
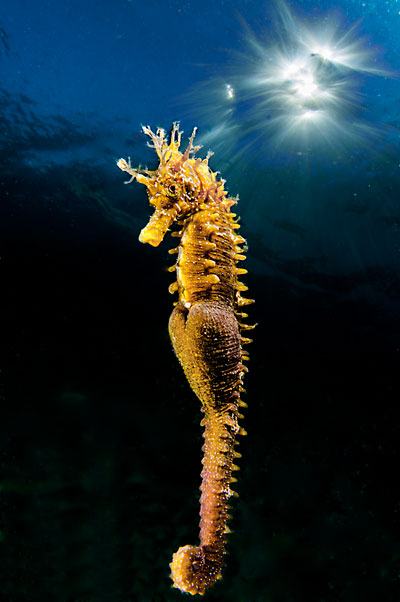
Seahorse and sunball.
Image 1: Nikon D300s, Tokina 10-17mm @11. ISO 100, 1/30, f22
Image 2: Nikon D300s, Tokina 10-17mm @17. ISO 100, 1/2000, f22
How to Create Image Overlays
Step 1: Composing and Shooting the Images
When shooting image overlays, we must always remember to compose the image and frame the subject with the image overlay in mind. This will make the job of combining images much easier, since the subject and the sunball above it each have their space in the combined frame.
Our camera does not allow us to rotate photos used in an image overlay, so if we are using horizontal framing, then both shots must be horizontal. The same rule applies for vertical pictures.
Best Lenses for Capturing the Water Surface
When shooting the sunball at the water surface, it is best to shoot a series of shots, placing the glow at various points in the frame: high, middle, right corner, left corner, etc.
If the photo of the water surface is made using a wide-angle lens like the Tokina 10-17mm, we will see a very nice effect that makes the final image appear to be a close-focus wide-angle shot.
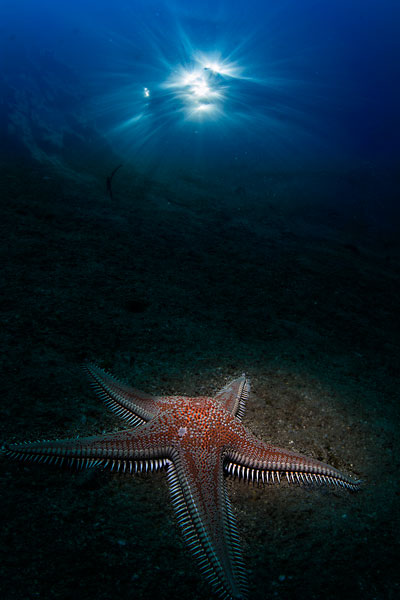
I also use a macro lens (like the Nikkor 40mm micro) to capture the water surface, since good results are also obtained, as you can see in the photos. Since this lens is not as wide as a wide-angle lens, it allows us to keep a nice deep black color in the frame around the sunball, making the image appear much more natural and less like two images fused together. That said, each photo can be shot with a different lens – it depends completely on your preferences.
Left Image 1: Nikon D7100, Tokina 10-17mm @17. ISO 100, 1/25, f18
Left Image 2: Nikon D7100, Tokina 10-17mm @11. ISO 100, 1/640, f20
Right Image 1: Nikon D90, Nikkor 60mm Micro. ISO 100, 1/200, f22
Right Image 2: Nikon D90, Nikkor 40mm Micro. ISO 100, 1/800, f18
Step 2: Fusing the Images In-Camera
(Instructions for Nikon DSLRs)
After we have our two images to overlay, we access the RETOUCH MENU and select the item IMAGE OVERLAY. At this point we find ourselves in front of the screen as shown in the images below.

Entering the retouch menu.
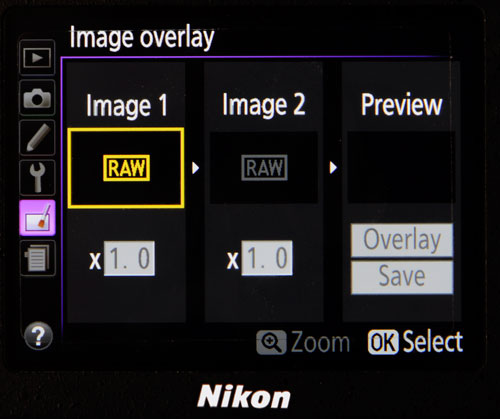
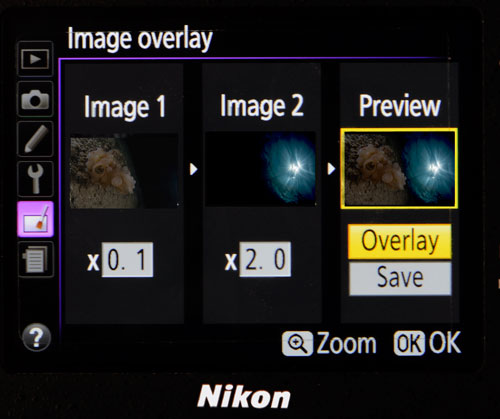
The Image overlay menu.
In the first panel we will position our first shot. It doesn’t matter which of the images you select first, but note that the EXIF data of the first image is what will be used in the final image. So if you shot the sunball with a wide-angle lens and want to create a wide-angle image, select this image first.
Immediately below this image is an opacity indicator set at the default value of 1.0. This indicator allows us to increase or decrease the opacity of the image that we are going to overlay.
In the second frame we will enter the second image and set a higher or lower opacity if desired. Our final image will appear in the third box. Once we like the result, we can save the image.
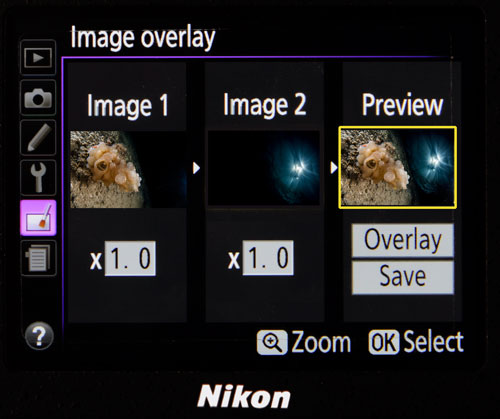
Images with opacity control underneath.
In the examples A and B (below), you can see what happens to the opacity of our pictures if you make changes by increasing or decreasing the values relative to each other. These adjustments will allow us to obtain very realistic image fusions.
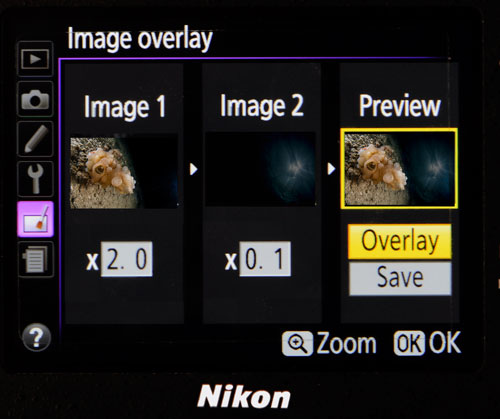
A. Opacity on image 1 bumped up to 2.0.
B. Opacity on image 2 bumped up to 2.0.
In Conclusion
The image overlay technique can be used whenever you’d like and with any popular lens for underwater photography. We can overlay images made with a wide-angle lens or mix a macro photo with a wide-angle photo. The only limit is our knowledge and mastery of the technique, plus our imagination.
Further Reading
About the Author
Francesco Pacienza is a professional photographer who graduated from the European Institute of Design, is a professor of photography at IED and author of technical books on photography. Francesco started as an advertising photographer and photographs still-life to communicate through his art. Photography combined with his great passion for the sea creates a perfect alchemy… Francesco uses the light and the sea as a painter’s canvas and colors … inspiring the observer. Since 2006, Francesco has been the Technical Coworkwer and testimonial producer for Easydive, an Italian company and leader in making universal underwater housings: the Leo series.
More info and news available on Francesco’s website: www.francescopacienza.it


