Best Underwater Settings for the Olympus OM-D E-M1 Camera
Navigation:
The Olympus OM-D E-M1 is one of the most popular mirrorless cameras used in underwater photography. In this article we discuss our recommended settings for getting the most out of these excellent cameras.
The OM-D line has surpassed my expectations with upgrades from my old PEN E-PL1 camera. The image quality, small size, super fast focusing and ease of use had made it one of the most popular cameras for underwater shooting. The advanced made from the E-M5 to the E-M1 are great with improved auto focus, more customization and a more robust body that feels more professional.
Below I’ve compiled several good starting camera settings for different shooting situations. Next is a list of the most important, or required, settings that are crucial to change in your OM-D E-M1system when shooting underwater. In addition I take an in depth look at all the menus on the camera so you can fine tune your camera for the best underwater shooting experience.
Olympus OM-D E-M1 Underwater Settings
Actual settings will vary based on your diving location and conditions. Take a look at the following suggestions below as a great starting point for shooting with your E-M1 camera.
Settings for Macro with the 45mm or 60mm Macro Lens:
-
Manual mode, F22, 1/320th, ISO 200
-
Auto white balance, camera flash on “fill in flash”, Strobe on TTL
-
Or set the strobe to manual power and adjust power as needed
-
For manual power set the camera flash to manual also to save battery life (see below for instructions)
-
-
TIP: Shoot at lower F stops like F5.6 or F2.8 to try to get some better bokeh and a blurred background
-
TIP: You’ll need to open up your aperture to around F8 when shooting fish; at F22, your strobes won’t “reach” very far and the photo will look black
-
** These settings are also useful with the 12-50mm lens in Macro Mode **
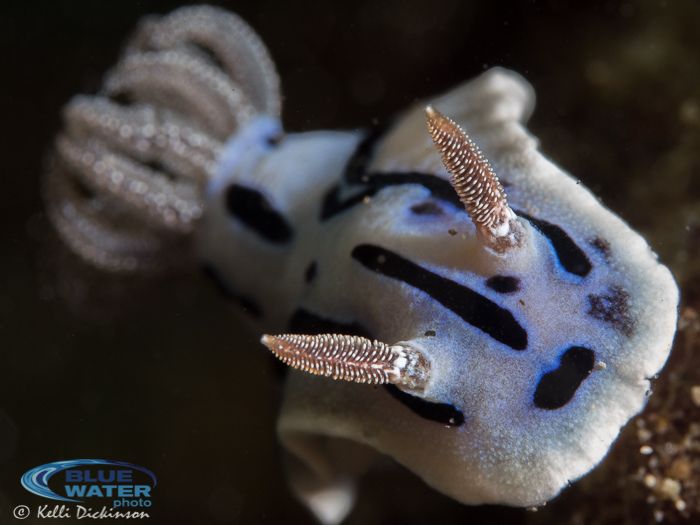
Shallower Focus achieved with an open F-Stop – OM-D E-M1 w/ 60mm, ISO 200, F10, 1/320
Settings for Macro using a standard zoom lens (14-42mm / 12-50mm) with a wet diopter:
-
Manual mode, F22, 1/320th, ISO 200
-
Auto White Balance, camera flash on “fill in flash”, Strobe on TTL
-
Or set the strobe to manual power and adjust power as needed
-
For manual power set the camera flash to manual also to save battery life (see below for instructions)
-
-
Zoom all the way in
-
Shoot at lower F stops like F8-F11 to try to get some better bokeh and a blurred background, you can open up to F2.8, but will have a very small depth of field
-
Remember working distance is limited when using a wet diopter, move carefully to avoid spooking your subject and get close.
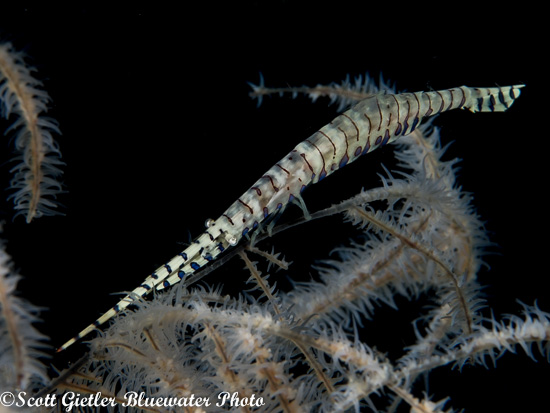
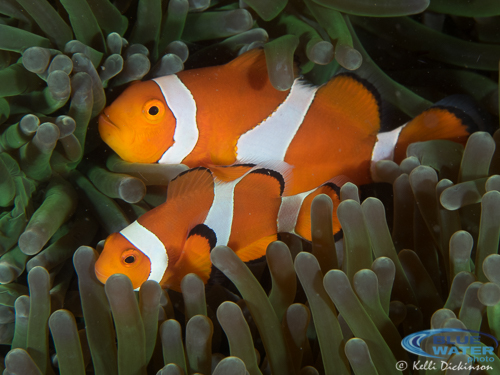
Shrimp in Anilao – 60mm Macro
Settings for Wide Angle with 8mm Fisheye or 9-18mm lens:
-
Manual mode, F8, 1/125th, ISO 200
-
Auto White Balance, camera flash on “fill in flash”, Strobe on TTL
-
Or set the strobe to manual power and adjust power as needed
-
For manual power set the camera flash to manual also to save battery life (see below for instructions)
-
-
Important: use the shutter speed to control your ambient light (background exposure). A slower shutter speed (e.g. – 1/60th will let in light when shooting in darker waters, a faster shutter speed will allow less light in when shooting in bright conditions).
-
TIP – when the sun is in the photo, set the shutter as fast as possible (1/320th), and you’ll need to stop down your aperture to F16 or F22 to avoid blowing out the highlights
-
TIP – for ambient light photography, you may need to open your aperture to F5.6 or F4 and increase the ISO to ISO 400, 800 or 1600 to let in more light.
Note: These settings also are great for starting points for shooting with the kit lens on, and for fish portraits with the 60mm macro lens.

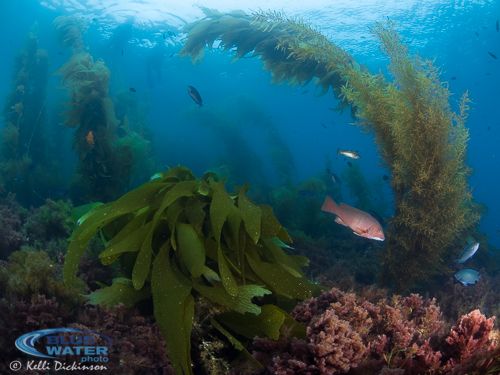
Garibaldi in Catalina, Olympus OMD E-M1, 9-18mm @ 9mm ISO 200, F8, 1/125
Olympus Camera Set up for Underwater Use
The OM-D E-M1 camera works well straight out of the box, however there are some important menu and setting changes that you will want to make sure to set for the best underwater shooting experience.
Most Important Settings for Underwater Use:
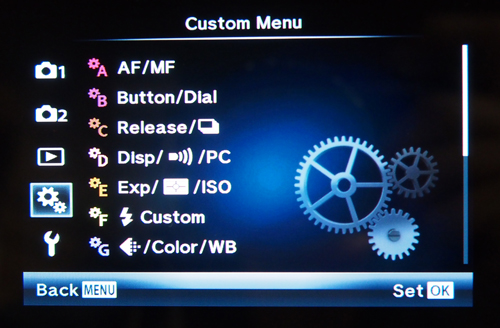
1) Custom Menu Options – The Custom menu should be turned on by default on the E-M1, if not, follow these instructions to activate it.
Menu -> Set Up Menu (Wrench icon) -> Menu Display and click OK. The Custom Menu is the small cogs icon, hit the right button, and then the down button followed by ok to activate this menu.
2) Live View Boost – this is very important so that you can see your LCD underwater. This mode disables the live view of exposure settings, since underwater shooting with a strobe, usually results in dark settings in the camera. This function will brighten your LCD so it is always at a good viewing brightness. Note: the LCD does not accurately reflect the exposure settings for the camera.
Custom Menu -> D: Disp/PC -> Live View Boost -> On
3) EVF Auto Switch – The E-M1 has an electronic viewfinder. In order to use the LCD screen underwater you need to turn off the Auto Switch.
Custom Menu -> J: Built-In EVF -> EVF Auto Switch -> OFF.
Note: You lose the ability to display the Super Control Panel in the LCD when using the viewfinder when the “Auto Switch” is turned off. The default is Live Control, which is the same quick menu as previous PEN models. If you prefer the look of the Super Control Panel you can gain access to it by turning off the Live Control and turning on the SCP through the Custom Menu.
Custom Menu -> D: Disp/PC -> Control Settings -> P/A/S/M -> Live Control OFF -> Live SCP ON
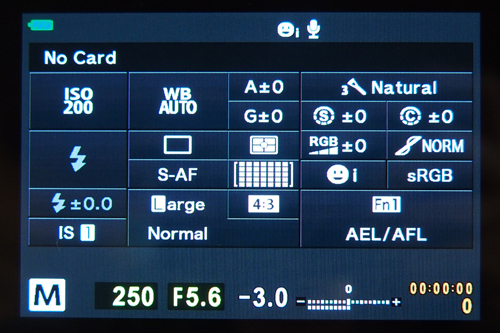
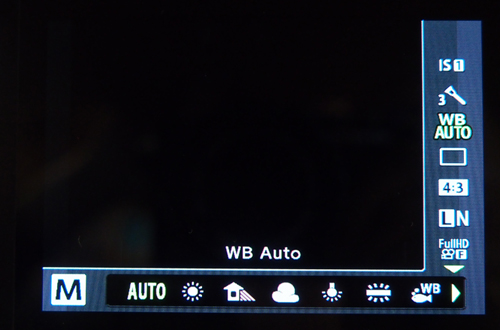
The Super Control Panel on the left, and the Live Control View on the right.
4) Flash modes – if you are using a strobe with TTL you will use the single lightning bolt “Fill in Flash” mode on the camera however, if you are planning to use the strobe in manual mode you can save battery life change the flash mode to “Manual Value” through the quick menu. This is also beneficial because using the internal camera flash at a lower power means less recycle time and helps eliminate any delay on being able to take a picture.
OK -> scroll to flash icon -> scroll over to select “Manual Value Flash” -> Press Info to change flash power -> scroll to 1/64th power -> OK to confirm
5) Rear Control Buttons – the default setting on the E-M1 rear arrow key buttons controls only the focus point, limiting the funcationity of those buttons. You can customize two of the buttons instead to gain quick, one-touch access to important features.
Custom Menu -> B: Button/ Dial -> Button Function -> Key Function (option with the four arrow key icon) -> Direct Function -> OK
Now you have access to change the right and down arrow key controls on the back of the camera. (Up gives control of Aperture / Shutter Speed without the dials and Left gives control over the focus point, these are NOT customizable). You have the same options for both customizable buttons, I suggest reviewing each and picking the ones that best suit your needs. For example, I set my camera to have direct access to the flash mode via the right arrow key and direct access to the sequential shot/ timer mode for the down key. (The sequential shot is not something used much underwater but I find i use it alot topside, so it was important to have direct access for me.)
6) Rec View – this sets the length of time an image review is displayed after taking the picture. Default is 0.5 seconds. For underwater use, 2 seconds is usually recommended so you have a chance to quickly gauge that exposure and focus look good before taking another picture. If 2 seconds is too long, set it to what you desire, or simply press the shutter halfway down to cancel the review.
Set Up Menu -> Rec View
7) Picture Mode – he default is natural, but jpeg shooters may prefer Vivid
NOTE: this does not affect RAW files
Accessible through the SCP / Quick Menu or Shooting Menu 1
E-M1 with 8mm FE, Catalina Reef F8, 1/125th, ISO 200
OM-D E-M1 Button & Auto Focus Set Up:
The auto focus set up for the E-M1 is very similar to that of the E-M5, however you get a few more bells & whistles with the E-M1 allowing you to set things in just about any way you want. Setting up a good auto focus system depends on how you assign things based on the housing you are using.
Set Up for Nauticam & Aquatica Housings:
Nauticam and Aquatica’s housing are designed more like a dSLR with great lever controls for shutter release and AEL. Assigning focus to the AEL button (new to the E-M1) allows you to make use of the lever on the Nauticam or Aquatica housing which feels very natural for focusing. To set this up:
Button Functions ( Custom Menu -> B: Button/Dial -> Button Function)
You no longer need assign specific functions to the Fn or Record buttons like you did with the E-M5 as the E-M1 has a dedicated AEL/AFL button. Take the time to look through the custom options available and assign the Fn functions that best work for you and the functions that you need. When I used the camera here is what I selected.
Fn1 – One Touch White Balance (this is useful for video and ambient light shooting and the Fn1 is well placed for easy access).
Fn2 – MF – this allows you to switch quickly between MF and your default focus mode (S-AF is recommended). This is great for using the AEL/AFL feature.
Rec – Leave as record, there are so many other buttons to customize.
1/2 Lever Switch – (Custom Menu -> B: Lever Function) Turn this to Mode 1 (default it is off), this will allow you to quickly switch the lever to be able to adjust White Balance Mode and ISO through the twin control dials
AEL/AFL Settings (Custom Menu -> A: AF/MF -> AEL/AFL)
- S-AF – Mode 1 – this will basically keep the camera as standard, half shutter focuses, full shutter takes the picture
- C-AF – Mode 3 – this will separate the shutter release from the auto focus, so you can re-focus the camera from the AELbutton and not risk taking a picture
- MF – Mode 3 – this separates the shutter release from the auto focus, so you can lock focus and then take as many images as you like without affecting your focus. When you pair focus to the AEL/AFL button this gives you an autofocus option while in manual focus mode, so if you have a focus gear on the lens you can use both manual focus or auto focus quickly and easily without changing any modes.
Now once you have set all of these, you can shoot a picture as standard (half shutter to focus) when in S-AF mode. Simply press the Fn2 button to switch to Manual Mode and now the AEL button controls auto focus and the shutter release takes the picture. This makes it very easy to have both topside settings and underwater settings created without having to change things in the menus every time you use the camera. This simplifies the process so you do not forget to reset anything for the next dive.
NOTE: I use all of these settings with the camera in Manual Mode, so I have full control over my exposure settings.
With just these few settings (in addition to the required ones above) you can quickly jump in the water and get some great shots with ease of use of the housing and functions. For more detail, see the menu options listed out below.
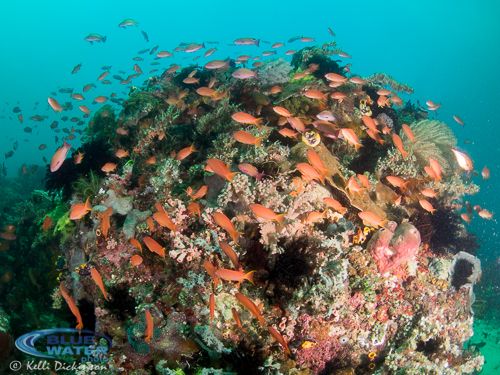 Anilao w/ Aquatica housing, ISO 200, F7.1, 1/80th – Panasonic 8mm FE
OM-D E-M1 Set Up For an Olympus Housing:
The Olympus housing a great well designed option if you are on a budget and don’t want to spend the money on one of the more expensive aluminum housings. There are a few limitations, but for the most part set up is the same. The biggest difference between the Olympus and Nauticam, is that they do not reposition the AEL/AFL button which means it is not as easy to reach, and therefore not a good option for splitting out focus lock.
Important Olympus Housing Information:
Before taking your rig underwater these things MUST be completed to ensure proper functionality and minimize the risk of a housing flood.
1) Remove the rubber grommet from around the Electronic Viewfinder.
To do this make sure the accessory flash is off the camera, and then simply slide the piece up and off the camera. Remember to replace the flash before putting the camera in the housing.
2) Change the Flash Mode so that the flash will fire even when flipped down.
The PT-EP11 housing was designed to house the camera and flash with the flash flipped down in order to be slightly smaller in size. In order to use the flash you have to activate the “Underwater Mode” on the camera. This mode acts as an “Auto” mode designed for “good” settings underwater. It also allows the camera flash to fire when “closed”.
Custom Menu -> B: Button/ Dial -> Button Function -> either Fn1 or Fn2 can be assigned this function. I recommend Fn2. -> Underwater Mode (fish icons).
Note: The Underwater Mode automatically changes the camera settings including, Mode (P), ISO to 200, Focus to S-AF, White Balance to UW Mode, and on newer lenses like the 12-50mm it will zoom all the way out (3 fish) or all the way in (1 fish). If you keep it in the UW Mode while shooting, you are limited in control of the camera. To exit out of the UW Mode simply hold down the Fn button for a couple seconds and it will restore your original Mode, and settings. As long as the UW Mode is assigned to an Fn button the flash will fire when closed, even if the mode is not “activated” so you can go back to Manual Mode and the flash will still fire in the housing.
The are no changes needed to be made to install the OM-D E-M1 into the Olympus Housing. Simply slide the camera into place with the flash attached and you are good to go.
To set up the EM-1 with the Olympus housing I recommend following the steps above but instead of using the AEL/AFL button for focus, use the Fn1 button. Here are the steps:
Button Functions ( Custom Menu -> B: Button/Dial -> Button Function)
Fn1 – AEL/AFL – the Fn1 button is well placed by the thumb to use as a focus lock on the Olympus housing.
Fn2 – MF – this allows you to switch quickly between MF and your default focus mode (S-AF is recommended). This is great for using the AEL/AFL feature.
Rec – Leave as record, there are so many other buttons to customize.
1/2 Lever Switch – (Custom Menu -> B: Lever Function) Turn this to Mode 1 (default it is off), this will allow you to quickly adjust White Balance Mode and ISO through the twin control dials
AEL/AFL – Since we used Fn1 for AEL/AFL, I would then assign the One Touch White Balance to the AEL/AFL button that way you still have easy access to customizing your white balance.
AEL/AFL Settings (Custom Menu -> A: AF/MF -> AEL/AFL)
S-AF – Mode 1 – this will basically keep the camera as standard, half shutter focuses, full shutter takes the picture
C-AF – Mode 3 – this will separate the shutter release from the auto focus, so you can re-focus the camera from the AELbutton and not risk taking a picture
MF – Mode 3 – this separates the shutter release from the auto focus, so you can lock focus and then take as many images as you like without affecting your focus. In addition this , so if you have a focus gear on the lens you can use both that focus and auto focus quickly and easily without changing any modes.
Now once you have set all of these, you can shoot a picture as standard (half shutter to focus) when in S-AF mode. Simply press the Record button to switch to Manual Mode and now the Fn1 button controls auto focus and the shutter release takes the picture. This makes it very easy to have both topside settings and underwater settings created without having to change things in the menus every time you use the camera. Simplifiying the process so you do not forget to reset anything for the next trip.
NOTE: I use all of these settings with the camera in Manual Mode, so I have full control over my exposure settings.
Set Up for a Recsea Housing:
This housing is the same to the Olympus housing, only you do not need to assign the UW Mode to an Fn button, the flash can pop up in the Recsea Housing.
OM-D E-M1 Specific Menu Settings
This info is helpful for fine tuning your camera for the best underwater settings. If a menu item is not listed that is because it does either does not affect shooting pictures or does not affect a setting that would be used underwater. Please note not all options are available with difference cameras, I try to note this as much as possible.
Shooting Menus
These set your cameras defaults, general settings that it will revert to after shutoff.
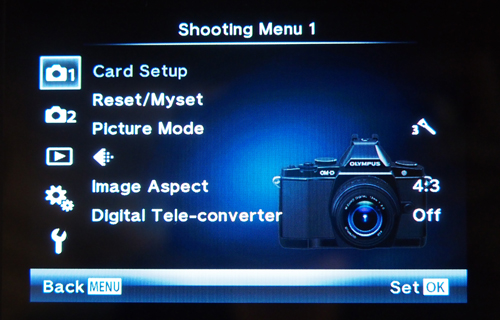
Shooting Menu #1
Picture Mode – This menu sets the look of your pictures, it is completely a personal choice to change, I prefer Vivid, because it enhances reds & oranges. NOTE: this only affects photos shot as .JPG, RAW images will not be affected.
Picture Quality (pixel icon) – Sets the default quality mode for the camera. Set this to RAW for still images, default for video is FullHD Fine, leave it there unless you know you want a lower quality.
*Note: if you do not have software on your computer that can read and edit RAW files then leave it set to .jpg (LF). I highly recommend shooting RAW for the most flexibility with in computer editing.
Image Aspect – Leave at the default standard image aspect ratio of 4:3 unless otherwise desired.
Digital Teleconverter Leave at default of OFF.
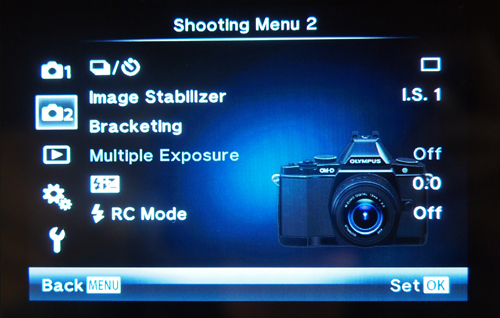
Shooting Menu #2
Burst/ Time Mode – Leave at default of Single Shot Mode, you can change this from the quick menu later for specific shooting instances.
Image stabilizer – Leave at default, or switch to IS1 – this engages full stabilization in all directions (Default is Auto on E-M1)
Flash RC Mode – Leave at default of OFF
** NOTE – If you are using the Olympus UFL-2 strobes, you can increase your shutter sync speed with the PEN and OMD cameras to 1/500 using the RC feature of the camera and strobes. Check out the strobe manual for this, but it can be very useful for getting great sunbursts in wide angle shots
Custom Menu Options
The custom menu offers more detailed camera adjustments, however, these can get overwhelming. When in doubt leave it at the default, unless otherwise noted in the Important Settings section above.
Menu A: AF/MF
AF Mode – I recommend setting this to S-AF (single AF). This is default for still images but not for video. C-AF, continuous auto focus, I find is too slow to accurately catch moving subjects and often hunts more frequently in the low light underwater conditions. You can halfway press the shutter during video to refocus when needed. Note: continuous auto focus has been significantly updated on the E-M1, so it can be a more useful tool with that camera.
Full-time AF – OFF
AEL/AFL – This is a very handy feature, especially for underwater as it allows you to set focus lock separately from the shutter button, so that you can lock focus and then take several images without refocusing. The set up will vary depending on which housing you use, so please see the Housing Settings section above for specific details.
Reset Lens – OFF – leaving this ON resets the lens focus of the lens to infinity after the camera is powered off. For most shooting situations this is not a big deal, though when using specific lenses, like the 60mm macro, it can cause initial focus hunting in the beginning. Turning it off will save the last focus distance used in the camera.
MF Assist – ON – very useful with macro – magnifies center of image 10x to aid in focusing
For E-M1 there are two options, Magnify & Peaking. If you plan to use Manual Focus, turning both on will be extremely useful. The Peaking Option outlines the area of focus to better help you see the focus plane.
AF Set Home – SINGLE- this sets the “home” position for the AF target for each AF mode. It will return to the position selected after power down. Default is full matrix, change this to Single Auto Focus Point for more control.
AF Illuminator – OFF – this is the small red AF assist light on the camera. It won’t shine through the black housing so turn it off to save battery life. If you use the camera both topside and underwater and don’t want to hassle with constantly changing it then leave it on, it will not affect picture taking.
Face Priority – OFF – this automatically focuses the camera when it detects a “face” however underwater it can mis-detect and cause issues, will not detect faces in masks so it is not needed.
C-AF Lock – OFF – unless you are using the C-AF, this won’t be necessary. If you are using that Auto Focus mode, this feature adjusts how sensitive the target activity level of the AF sensor is during continuous AF. Set it to the level you desire if using C-AF.
Menu B: Button / Dial
Button Function – There are 2 Fn buttons on the OMD and each has a variety of functions you can set. You can also customize the Rec button and assign its own function. Other settings in the Button Function menu allow you to modify the action of that key listed. To gain customization of the up and down arrows you need to change the setting of the four arrows option just below them. I recommend:
Arrow Keys – Direct Function
Right Arrow – Flash Mode
Down Arrow – ISO
For customization of other buttons, check out the Important Settings and Focus Settings Sections above for more detailed information on why I’ve set these options and how to use them.
Dial Function – This menu allows you to set the functions of the control dials for the camera. Functions are set per shooting mode indivually.
OMD E-M1 – this is the two control wheels on the top of the camera. For the E-M1 in manual mode you can select which button controls Aperature and which controls Shutter Speed, set to your preference for ease of use.
Dial Direction – can be set to change which way you turn the dial to increase shutter or F stop. Set to personal preference or leave at default
Lever Function – MODE 1 – this gives quick access to ISO and White Balance which are two useful settings for underwater
Lever 2 + – I left this off, as I did not need that additional level of customization, but feel free to explore, or customize for topside use.
Menu C: Release
Rls Priority S / C – this option allows you to set whether the shutter can be released even when the camera is not in focus. I recommend leaving it at the default of OFF for S-AF to help limit out of focus pictures. (can be set individually for S-AF and C-AF modes)
Burst FPS H / L – leave a default – this sets the frame rate for each burst mode option
Burst + IS Off – OFF – allows for image stabilization during sequential shooting when turned OFF
Halfway Rls with IS – ON – this allows for Image Stabilization to begin when the shutter is pressed halfway.
Menu D: Disp / Beep / PC
This menu customizes display and sound options. Set these to your preference, they don’t affect picture taking, except for a select few.
Camera Control Settings – this gives you options for the display of the quick menus. When the EVF Auto switch is turned off you can only access one of these. Default is the Live Control, Olympus’ standard type menu. The other option is the Super Control Panel, the new style for the OM-D that mimics many dSLR cameras. To activate the SCP, turn off the LC and turn on the Live SCP.
Info Settings – Under this menu is LV-Info. These options allow you to streamline your LCD view information. By turning each on or off you choose which viewing modes you would like to be able to see when you press the INFO button on the camera.
Live View Boost – This must be turned on to aid in viewing the LCD underwater in dark shooting conditions.
Info Off – The camera automatically hides the basic info from the LCD/ Viewfinder after 10 seconds (half press of the shutter or any button bring it back). This can be changed to be left on all the time by selecting HOLD.
I would also set the SLEEP mode and Auto Power Off modes as desired to save battery life.
Menu E: Exp / Metering / ISO
EV Step – leave at Default 1/3EV – this gives access to all “in between” stops, for more fine tuning your picture settings. It controls the size of the increments for shutter speed, aperture, etc.
NOISE / NOISE FILTER / ISO – leave at defaults
Metering – Default (Digital ESP Metering) – this evaluates the entire image for the best overall exposure. For more specific metering you can choose center weighted or spot.
AEL Metering – Default (AUTO) – if you use the AEL function leave this at the default and it will automatically choose the same metering you are currently using.
ISO / ISO Step / ISO Auto-Set / ISO-Auto leave these options at the default
Bulb / Time Timer, Live Bulb, Live Time – default (this won’t be used underwater)
Anti-Shock – Default OFF – this creates a delay between when the shutter is pressed and actually released to aid in limiting camera vibrations. Not needed underwater.
Noise Reduction* – only applies to long exposures, leave a default, won’t affect your UW photography
Noise Filter* – Default – this affects the noise reduction when shooting high ISO
F: Flash Custom
X-Sync – Default (1/320 for E-M1, 1/250 for E-M5 and EPL5, 1/160 for earlier PEN models) this sets the fastest default Shutter Speed at which the flash can fire.
Slow Limit – Default (1/60) – You can adjust this lower as desired.
NOTE: These flash settings do not matter for Manual Mode, the flash fires based on the shutter speed selected when in Manual Mode. However 1/250 is the highest option available for the OM-D and EPL5, 1/160 for earlier PEN’s.
Flash Exposure + Exposure – Default (OFF)
G: Pixels / Color / WB
WB – Auto (default) – this sets the default WB mode, you can adjust for certain instances through the quick menu
All WB Evaluation – default – this changes the overall WB compensation for all modes except custom WB
WB-Auto Keep Warm Color – default – keeps colors warm for Auto WB mode.
Flash + WB – default (auto)
Color Space – default sRGB (unless you specifically know you want a different color space)
H: Record / Erase
Set these to your preference, they do not affect picture taking
I: Movie
Movie Mode – Default – P – this sets the default mode for movie capture (unless you are doing more video and want a specific mode, such as Manual, Aperture or Shutter to be the default)
Movie Mic – Default – ON – turns mic on or off. Turn off if you do not want to record any sound.
Movie Effect – Default – OFF – disables movie effects
Wind Noise Reduction – Default – OFF – reduces wind noise
Recording Volume – Default – Standard
J: Built in EVF
These do not affect picture setting, adjust as you prefer. The only important setting in this menu is:
EVF Auto Switch – OFF – this disables the automatic switch between the LCD and EVF. This is important for underwater use because the housing will always block the sensor and it will be stuck on the EVF only.
K: Camera Utility
Set as desired, these do not affect picture settings
Setup Menu
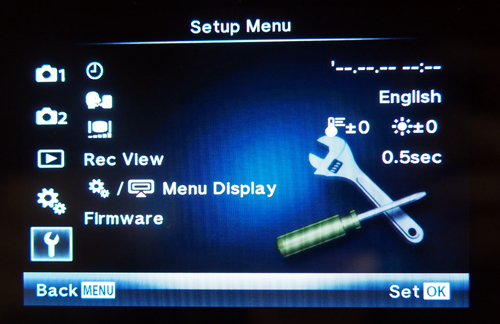
Set Date / Time, LCD brightness, upgrade your firmware, etc. The most important item on this menu is:
Rec View – this sets the amount of time an image is displayed for review after taking it. Default is .5 seconds, which is very fast. 2 seconds is a good average to set this to so that you can check exposure and focus on the LCD before taking another picture. If you need to take the next shot quickly this review disappears with a 1/2 shutter press.
If you have any further questions on setting up your Olympus camera or any issues with camera functionality, please post a question in our forums.


