Fluoro Diving

Jump to a Section
Part I | Physics | Biology | Applications
Part II | Lights & Filters | Excitation Filter | Barrier Filters | Blue Vs UV
Part III | Photo Techniques | Strobes vs Torches | Night vs Day | Safety
Part I – Introducing Fluoro Diving
What is Fluorescence Diving?
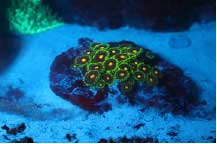
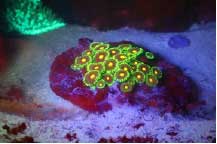
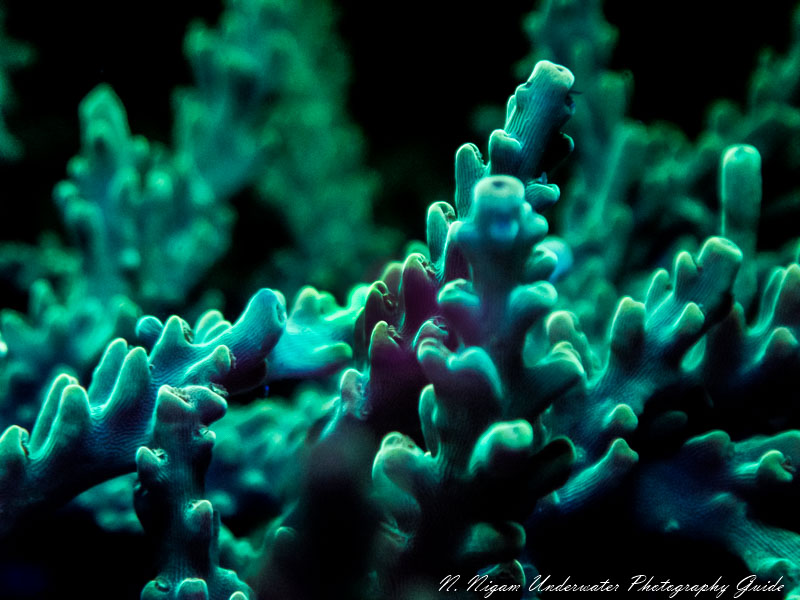
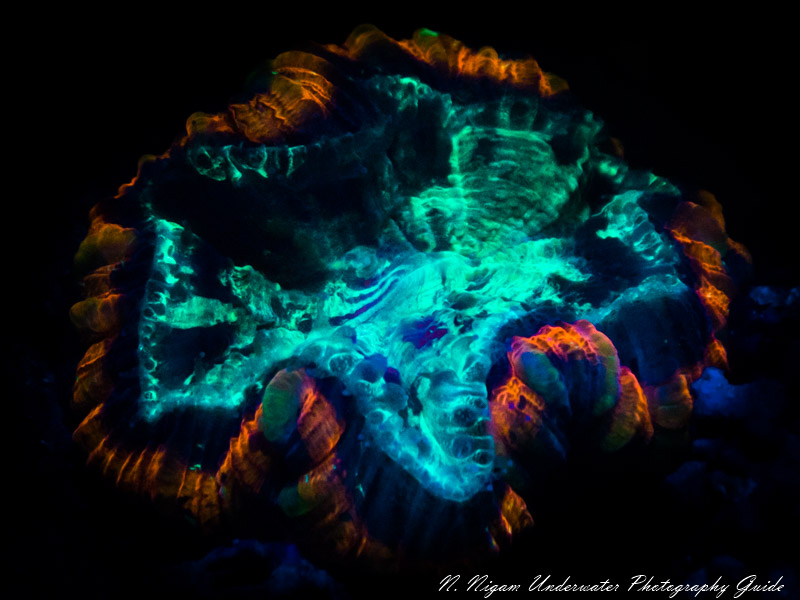
Fluoro diving is diving with a blue light torch and mask barrier filter for viewing bio-fluorescence. This is the property of some marine life to “emit” light with a longer wavelength (of visible light) when illuminated with shorter wavelength blue light. This is NOT reflected light such as when you take your white light torch on a dive. That “white light” is reflected off the reef and bounces back to your eyes/camera. Emission light, is light the organism is creating and “emitting” back to you. Not all marine creatures exhibit this effect but in those that do, it can be very dramatic. Some example species that fluoresce are: many species of shelled animals, soft and hard coral structures, coral polyps, some fishes, and anemones. Fluoro diving is no longer just for night diving. This series will discuss how it can be done with dramatic results in the daytime under certain conditions.
What is the physics that are at play?
The visible spectrum of light is the thin slice of the electromagnetic spectrum visible to the eye. It lies between the low energy, low frequency, extremely long wavelength radio waves and the high energy, high frequency, extremely short wavelength X-Rays. The “bandwidth” of light wavelengths the average person can see covers from approximately 400 nanometers (nm) which is deep purple to about 750 nm dark red.
When a high energy, short wavelength photon of light (blue in our case) strikes a protein (referred to generically as a Green Fluorescent Protein – GFP), it absorbs that light energy. This causes the electrons of its constituent atoms to make a quantum jump from one electron shell to a higher shell. Then this change in energy state “decays” (effectively instantly) back to its resting state or shell. When this decay occurs, the electron gives up “emits” a photon of light but at a lower energy and longer wavelength. See figure 1. It also emits a minuscule amount of heat, hence the lower energy state of the photon. It’s called conservation of energy – it must all balance out. This change in wavelength is referred to as the Stokes Shift named after the Geo. Stokes, the Irish Physicist who discovered it in the 1830’s. We are actually talking about quantum mechanics here. Each step, represents a quantum leap from one shell to the next. There are no intermediate steps or jumps. The further the jump, the greater energy required to make that jump and the greater the difference in wavelength when the electron decays. These differences in energy show up as different colors.
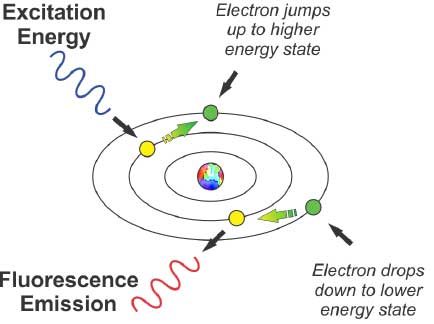
Figure 1
The wavelength of light used in most fluoro torches is a narrow band in the blue, somewhere in the range from 440-480nm. It has been shown that blue light is much more efficient in stimulating fluorescence of Green Fluorescent Protein (GFP) and its mutations than ultraviolet light. This is because (as we all know from our Beginner Open Water Course), the only light available at depths beyond about 10 meters / 30 feet is blue. This is the light organisms such as coral have evolved in over the eons and is what’s available to them for photosynthesis. Special pigments and proteins have the ability to absorb short wavelength radiation and convert it into longer wavelengths.
It is not well understood why some corals and other sea creatures evolved to fluoresce. What is known is that some marine organisms do produce GFP and mutations of GFP (other colors than green) which react to blue light causing this effect.
New results from scientific research show that many fishes, even deep-sea fishes, can actually see red light. One wonders why, since there is no red light at these depths. It has been found recently that underwater organisms actually use fluorescence to transform the only light available to them, namely blue light, into visible light of longer wavelengths, such as red (of all colors!), among others, for a number of purposes:
• Besides from apparently protecting themselves from the harmful effects of shallow water UV radiation, as a kind of sunscreen, corals seem to do this in order to feed their symbiotic algae, which live inside their tissues. In effect, the algae receive light from the sun on one side and light from the other side as the coral fluoresces. This allows the corals to dwell at greater depths, where corals without this capability are unable to thrive.
• More recent discoveries seem to suggest that perhaps fishes also use fluorescence in order not to be easily discernible from the background of fluorescing corals, which otherwise would make them easy prey, and in order to communicate between each other (within the same species), at least over short distances.
Theories as to why marine fluorescence evolved is a very active area of scientific research. Perhaps the most obvious answer to this question is that they simply do because they are made up of elements that display the fluorescence effect. This may seem confusing but consider this: human teeth fluoresce as do the teeth of nearly all animals. What possible evolutionary pressure could be at work here? The answer? Perhaps none! Teeth are made up of elements that fluoresce. It may be just that simple. Figure 2 is a perfect example. This is Kara, my Labrador poochy.
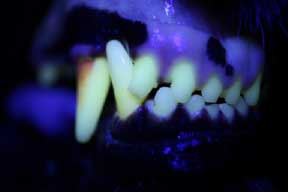
Figure 2
What is the biology that makes it all work?
GFP was first described in 1955 and identified as a protein and extracted from 10,000 jellyfish in 1962. In 2008 Osamu Shimomura, Martin Chalfie and Roger Tsien, who had worked on the subject independently, jointly won the Nobel Prize for chemistry “for the discovery and development of the green fluorescent protein, GFP”.
GFP is shown schematically below in figure 3. The part of the protein molecule responsible for color is called the chromophore. The chromophore is an area in the molecule where the energy difference between two different molecular electron shells falls within the range of the visible spectrum as described above. GFP and its relative proteins have many applications in molecular biology, genetics and medicine. This technique of using GFP as “genetic markers” is used extensively in medical research and is credited with saving 100’s of thousands of lives.
The term GFP generally refers to the first protein isolated. Yellow, Cyan and Red fluorescent protein are simply mutations of Green GFPs.
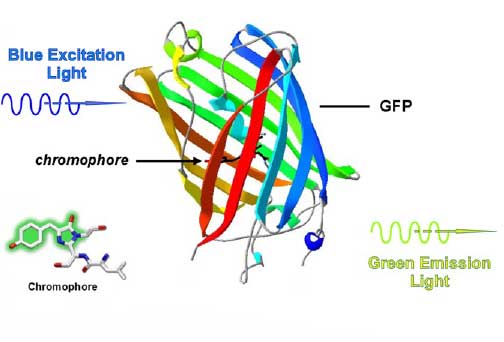
Figure 3
What are applications to fluo diving other than pretty pictures?
Research at marine institutes and universities all over the world is currently underway not only to try to understand why some marine creatures display fluorescence (if in fact there is a reason) but also in the area of climate change as well as ocean temperature and acidification studies.
When water temperatures rise, coral bleaching occurs. Corals have a symbiosis with single cell algae called zooxanthellae. These algae use photosynthesis to provide food and energy to the coral. Temperature rises cause these zooxanthellae to be ejected giving the coral a colorless, bleached appearance taking away the vital nutrients the coral needs to survive. Thus, making it vulnerable to additional stresses that can ultimately destroy the entire reef.
Ocean acidification reacts with the coral’s calcium carbonate skeleton causing it to break down and dissolve. This of course can be seen under white light conditions but it is even more dramatic using fluorescent technologies thereby enhancing this field of marine research.
This technology can be used for coral propagation census (polyp bail-out) analysis. If you come upon a polyp or coral “recruit” release with white light, you will see little or nothing. With the proper fluo diving gear, the individual, nearly-microscopic organisms will shine in the sand like sparkles in the snow on a moonlit night. It is amazing to witness. In fact, there have even been discoveries of prior unknown species because they were too small to see with white light but shine like a beacon in the dark when illuminated with blue light.
Coral reefs are considered the rain forests of the ocean and can be thought of as “the canary in a coal mine”.
Part II – Necessary Fluoro Gear
![]()
Support our content and purchase your Fluoro Gear at Bluewater Photo!
Email sales@bluewaterphotostore.com to for help finding the recommended gear needed for your video light, strobe, and/or camera.
Fluoro Diving Kit for the Sea & Sea YS-D3 Strobe
Fluoro Diving Kit for the Ikelite DS160/161 Strobe
Fluoro Diving Kit for the Inon Z330
Fluoro Diving Kit for the Sea & Sea YS-01, YS-03 Strobe
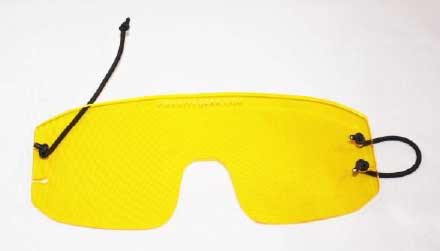
Yellow Flippable Mask Barrier Filter
Blue Light Torches:
Big Blue 11,000 + Blue Fluoro Combo
Lights and Filters
A blue light torch is required equipment for fluo diving with a bulb or LED that emits light in the 450-470nm wavelength range. This is usually referred to as Royal Blue or Actinic light.
Additionally, some fluo torches include a dichroic filter to further enhance the imaging experience. Both images below are taken with the same torch, same camera configuration, same settings. The image on the left had no filter, the one on the right had a dichroic filter installed on the torch. The addition of the dichroic filter has a dramatic effect on color saturation. These torches are available at Bluewater Photo (see above).
 |
 |
| Figure 1 | Figure 2 |

Figure 3
|
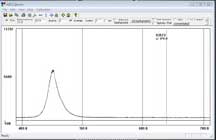
Figure 4 illustrates the spectral output of a blue LED torch. |
Excitation Filters
Excitation filters are required for strobes and white light sources to make the required blue light. It’s usually a bad idea to try to use an excitation filter on a white light torch because you lose about 80% of the output power. The reason why that is becomes a bit complicated for a short series like this but for the technically minded go to:
and
http://firedivegear.com/wp-content/uploads/2016/03/White-Paper-Why-We-Use-A-Dichroic-Filter.pdf
This is less of a problem with a strobe because they produce so much output light. They still lose about 80% but there’s still plenty of light to get the job done in most cases (especially macro work).
When using blue light, you need a barrier filter to go over your face mask. This is an essential piece of equipment. It serves two purposes:
1. It blocks the blue light that causes the fluorescence effects in the marine creature from entering into your eyes. This blue light can cause your eyes to burn and become irritated after a long period of time making the dive very unpleasant.
2. The blue light is also much brighter than the emitted fluorescence given off by the organism so the colors you are looking to observe are overwhelmed and washed out by the blue light.
The barrier filter solves both of these problems by “cutting off” the wavelengths (colors) of light just above the blue portion of the visible spectrum.
 |
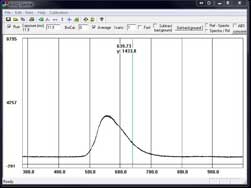
| Figure 5 |
 |
| Figure 6 |
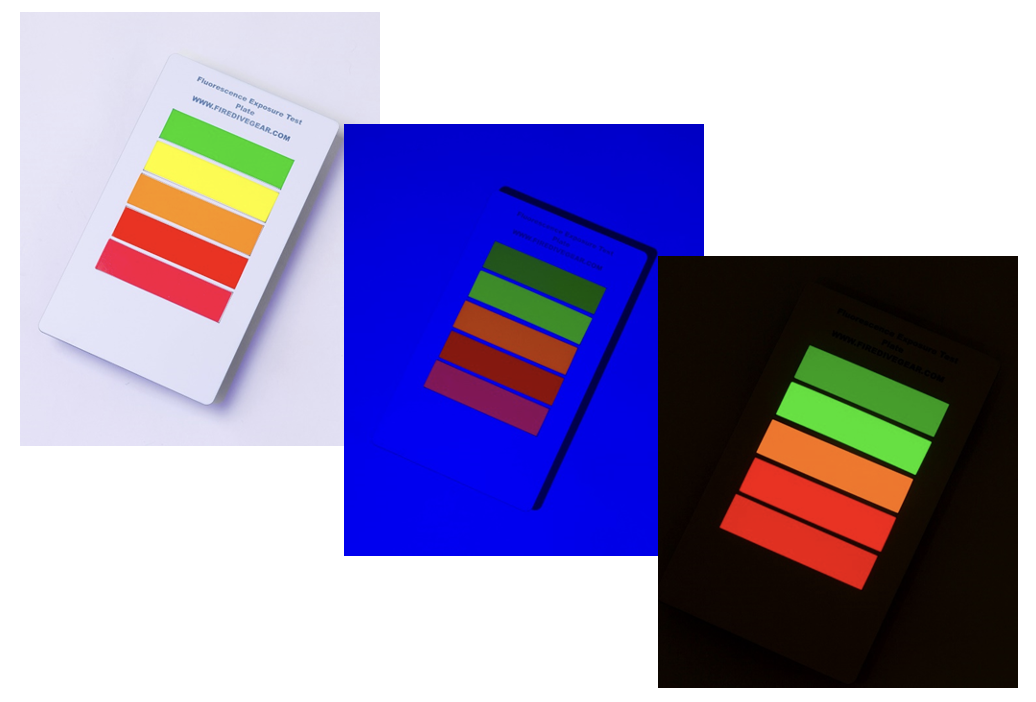
If you were to overlay figure 4 and figure 6 you would see that the resultant spectrum is just the wavelengths above about 480nm. This type of filter will leave a tiny bit of blue that most photographers find aesthetically pleasing.
The images below illustrate the effect of the barrier filter. The first image is of a fluorescent “slate” that was photographed under white light. The second image is the same slate under blue excitation light and the final image was taken under blue excitation light with a yellow barrier filter placed over the camera lens. It can readily be seen how much visual acuity is reduced because a barrier filter over your mask will have the exact same effect as that over the camera’s lens. The barrier filter is required however because as noted earlier, the blue light completely overwhelms the fluorescence emission of marine organisms which don’t “light up” like this slate does.
Blue Light vs. UV Light
Generally, there are two ways of experiencing underwater fluorescence, either with invisible (ultraviolet) or with visible (usually blue) excitation light.
In the case of ultraviolet excitation light (with wavelengths <400 nm), no filters are needed for your mask and camera. However, it is not as efficient as using a torch which has the desired range of wavelengths in the first place. An extremely detailed discussion of why that is can be found here:
Even though using invisible (UV) excitation light has the advantage that usually no filters are needed, it has been discovered that visible light (most prominently blue light, with wavelengths around 450-470 nm) is MUCH more effective in stimulating fluorescence of Green Fluorescent Protein (GFP) than ultraviolet light (by about a factor of four, with light of the same energy). An extremely detailed discussion of why that is can be found here:
http://firedivegear.com/blue-light-vs-uv-light/
If you decide to use UV, be aware however that shining powerful UV radiation into your eyes (or your buddy’s) may cause severe harm to you or your buddy’s eyesight, especially because this radiation is invisible and therefore the corneal reflex (blink reflex) and the pupillary reflex do not work. Powerful ultraviolet lights are not something you want to give to inexperienced divers to handle.
Strong blue light (as any strong light) can also cause eye discomfort, but since you will immediately feel that discomfort this is somewhat less likely to occur.
There are actually corals which do not fluoresce under UV light at all, while they do under blue light. This is presumably due to the fact that through evolution, underwater organisms have adapted to the properties of water, which is more transparent to blue light than it is to UV (or to any other color than blue, for that matter). 95% of the UV from the sun bounces off the surface of the water. The 5% that penetrates the surfaces only goes 1-2 meters deep before it’s complexly absorbed.
This, by the way is the very reason why you get a bad sunburn when you’re on the surface waiting for the boat to pick you up. You’re getting a direct dose of sunlight on your face and at the same time getting another near full dose reflected off the water.
Compare the two images below: The one on the left is a target exposed to a UV torch. The image on the right is the exact same torch only configured with blue LEDs rather than UV LEDs (no dichroic filter).
Lumens can’t be used to rate torch output brightness
Most white light torches are rated in lumens. A blue light torch can’t be rated in lumens and a lumen meter will give erroneous results when trying to measure a blue light torch. Here again, we have an extremely technical topic that can’t be adequately discussed in a short series like this.
Go to: http://firedivegear.com/wp-content/uploads/2015/12/White-Paper-Lumens.pdf
Part III – Tips for Fluoro Photography
Now that we have covered the science of bio-fluorescence and the required equipment to view it, we will now delve into photographic considerations. Of course, as everyone knows, if you ask 10 photographers about their opinion of what works best, you’ll get 11 very different answers. There is no “right way” to do this. It often requires extensive experimentation. Every camera, lens, torch, filter, strobe…. combination is different. What I outline here are general settings and conditions to start with and then fine tune your personal set up from there. Lastly, we discuss some of the safety considerations related to fluo diving, opportunities to get a certification in fluo diving and provide a wrap-up summary.
Photographic Techniques
Wide-angle (Painting with Light)
This is a technique where by you setup your camera on a tri-pod (if allowed), open the shutter and swim around with your torch(es) and “paint” the reef with your light(s). Obviously, you need to stay out of the field of view of the lens. This is a technique that Stuart Westmorland and I used in Palau to get some interesting results.
Macro
Marco is by far the easiest way to shoot fluo photography and what I find to be the most rewarding. A target organism that appears to be various shades of beige or brown under white light can explode with all the colors of the rainbow under blue light making the subject look like something out of a science fiction movie. The color of some things may even shock you. Everyone knows what a Scorpion fish looks like under white light, they’re almost invisible. Shine a blue torch on them and they light up red like a stop sign.
Video
Video can be very challenging mostly because it requires a great deal of light. This is easily solvable by using high power lighting equipment but it often creates an additional problem. If there is a lot of plankton or organic matter in the water, it will fluoresce green. This makes the water light up as well as your target which makes for a less than impressive video. Macro video is no problem and wide-angle video is no problem either as long as you have crystal clear visibility but that is rarely the case. Of course, post processing a video is an option but that transcends the point of this article.
Strobes vs. Torches
Some divers prefer one or the other and there are advantages and disadvantages of both.
Strobes are usually easier to use. You will however need a focus light that must have a blue output. A white focus light will not show which target fluoresce so a small hand held or rack mounted blue light torch is required to find the targets and then allow the camera to focus either auto or manual. Any focus light built into the strobe will not be sufficient to the task because the excitation filter will cut the output by 80% as discussed previously. The biggest advantage of a strobe is the output power available. This allows you to stop the aperture down to enhance the depth of field. The focus light can also be used to eliminate shadows from the strobe because it’s on during the entire process.
Using blue output video lights can also work very effectively for stills. A common technique is to have a small blue focus light mounted to your rack and use a hand held, high power blue video light. Holding the video light in your left hand may seem cumbersome but it allows you to move the light around, in or out as needed to get the shadows, angle, color or exposure you’re looking for. I personally find it easier to use video lights rather than strobes.

Camera Configurations / Settings
This is where things get tough. No two cameras, lens, filter, light, strobe combination is the same so this takes a bit of experimentation to lock in on a setup that will give great results. I have used both DSLR and Point & Shoot (P&S) cameras to great effect. It comes down more to lighting than anything else. Obviously, a DSLR has dramatically greater flexibility in terms of lenses but one can get some amazing images with a P&S.
At a minimum you need:
1. A small torch to find the fluorescing targets – also works as a focus light.
2. A mask barrier filter – without it, the entire reef looks blue.
3. A camera barrier filter – either internal or external.
4. A blue light source, either a video light or a strobe with an excitation filter. In some situations, you can even get away with two small focus lights for macro shots.
From there you can add extra lights and or strobes as the subject and your budget will allow.
As to settings, experimentation is the key. The emitted fluorescence is very diminutive so that means slow shutter speeds and wide apertures. Of course, you can crank up the ISO but that injects other problems like digital noise. My preference in shooting stills is to use a video light and shoot aperture preferred to capture as much depth of field as possible but one has to use caution not to stop down too far or shake becomes a problem with very slow shutter speeds. Using a strobe takes care of the shake problem and can allow a higher F-stop, but a single strobe can create shadows and the cost and complexity of a strobe setup may be a limiting factor.
Auto vs. manual focus is another consideration. With a low F-stop, depth of field becomes a problem with manual focus unless you are absolutely stationary (not so easy at times). Auto focus can be great with fast focusing lenses. A slow focus motor will give you fits. Because of the slow shutter speeds and near wide open aperture, the slightest current or surge will cause trouble also.
Dual mode operation – being able to shoot white light or blue light as desired. Obviously, if your camera barrier filter is mounted directly on the lens inside the housing, you’re only going to do fluo photography on that dive. External to the housing filters are available as are “hinged” excitation filters for strobes that allow you to swing the filter in and out of the front of the strobe.
Night Operations vs. Daylight Operations
Fluo diving originally started out as a night time only activity. Obviously operating at night can be spectacular but there are safety concerns. You are using a monochromatic light to light up the reef and you are using a mask filter that blocks that light. You’re left with very little to actually see with. This is no longer the case. Clearly you still can’t capture fluorescence in 5 meters of clear water on top of the reef at noon on a sunny day no matter how much power you are carrying with you. The targets will indeed fluoresce but the ambient light simply overwhelms the fluorescence. However, on the back side of a wall with depressions and the sun in front of you and perhaps with a bit of a cloudy sky, and a bit of depth you can find some stunning examples of fluorescing targets and still have good visual acuity. Also under ledges, or around a large outcropping are good places to find subjects. The key for daylight fluo ops: Operate in the shadows. I’ve even found targets in the open and grabbed my buddies BCD strap to drag him over the target to create a shadow.
General Safety Considerations
As noted above, It is very important to understand that when using a blue torch and barrier filter combination at night that your ability to “see in the dark” will be greatly diminished. This is due to the loss of the full spectrum of light to see with. A barrier filter over your mask will block 98% of the blue light and if nothing is fluorescing you only have 2% of your normal visual acuity. Go back and look at figure 7 of Part 2 in this series to get the point. It is critically important that good buoyancy practices are used and situational awareness is observed at all times. As an example, consider Lionfish, they don’t fluoresce. The blue lights will draw out tiny fish, worms and other small creatures that the Lions will come after. You can swim right into a Lion if you’re not paying attention to where you are and what’s around you. Day time dives make this a non-issue and may even give you a chance to ID something you want to come back to in the dark.
As always when night diving you must also have a white light source (and backup) to guide your way to, around, and from the dive site at night. These white light sources are then turned off when observing fluorescence.
Certification
PADI has a Distinctive Specialty that I wrote on the topics of Fluorescent Diving and Fluorescent Photography if you want to get much deeper into the science of fluo diving. There are about 100 instructors around the world certified to teach this course.
Summary
This series has taken you through the physics and biology of fluo diving, equipment and settings considerations and safety issues associated with fluo diving. This is a fascinating type of diving that only a small number of people have ever tried. For some, it has been a life changing experience. I started an entirely new career based on it. Give it a try, it can make for some extraordinary images.
![]()
Support our content and purchase your Fluoro Gear at Bluewater Photo!
Email sales@bluewaterphotostore.com to for help finding the recommended gear needed for your video light, strobe, and/or camera.
Fluoro Diving Kit for the Sea & Sea YS-D3 Strobe
Fluoro Diving Kit for the Ikelite DS160/161 Strobe
Fluoro Diving Kit for the Inon Z330
Fluoro Diving Kit for the Sea & Sea YS-01, YS-03 Strobe
Yellow Flippable Mask Barrier Filter
Blue Light Torches:
Big Blue 11,000 + Blue Fluoro Combo


