Mastering the Art of Split Level Photography
Since the early 1990s I had been part of a handful of film shooters specializing in fly fishing photography and was fortunate to have carved a successful niche in the industry giving me assignments around the world to shoot and write stories for a number of different publications.
My world changed with the advent of digital imaging. No longer was I exclusive in capturing publication quality images. With the instant gratification of digital capture, anyone could skip the learning curve and jump immediately to quality images that editors were happy to publish. Suddenly, competition was everywhere.
So I ditched all of my film camera bodies, including my trusty Nikonos V systems, and dived headfirst into digital media. This, of course, required me to purchase housings for my new digital bodies with requisite lenses and associated ports. Ironically, the acquisition of an ultra-wide fisheye lens, sporting an amazing 180 degree field of regard, and an ultra-wide eight inch diameter domed port, gave me an idea on how I might separate myself from the growing fly fishing shooter competition.
Thus, I began hauling my ultra-wide kit with me on assignments for a different kind of image capture, something new to the industry which could only be achieved by using the fisheye dome port combination: split level images.
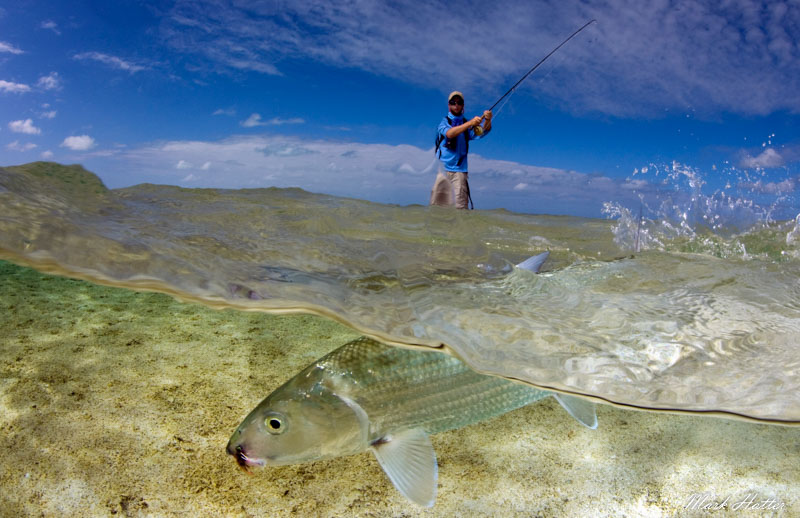
My first system was a Nikon D200 body in a Sea & Sea housing with a Nikon 10.5mm fisheye lens behind an 8-inch Sea & Sea acrylic dome port. Even though there was much trial and error, because of the instant image review on the camera’s LCD, capturing publishable images proved not too difficult. As an educated film shooter, both above and underwater, I was aware of the air/water interface physics impacting image capture, which allowed me an advanced starting point from where I could shoot, review, learn, readjust and improve.
Mastering the Physics of Split Shooting
With regard to physics, there are three considerations which should be understood and addressed in order to capture quality split level images.
First, the air/water interface results in different lens focal points for your subject. As you may recall from basic scuba, water has a magnifying effect at the air/water interface of your face mask. Objects appear closer and larger than they are due to the lensing effect of that air/water interface. The same holds true for your camera system, your UW subject will have a closer “virtual” focal point, which will be different from the farther “actual” focal point above the water.
Fortunately, the fisheye lens, with a very short focal length, provides an inherently broad depth of focus when shot at very small aperture settings, providing the shooter an opportunity to overcome the focal point differences. But while the smallest aperture settings enable the broadest latitude for obtaining sharp focus across the scene, secondarily, they reduce the amount of light to the subject necessary for proper scene exposure.
However, another advantage of very short focal length lenses is their ability to freeze motion at very slow shutter speed settings. For example, a 16mm fisheye lens can be shot as slow as 1/16 of a second and, with proper technique, image blur from motion can be avoided. Recall that the rule of thumb for minimal shutter speed to obtain a sharp image is 1 over the focal length, e.g. a 50mm lens would require 1/50 of a second. This means that we can use the smallest apertures to obtain the broadest depth of focus and not worry too much about the slower shutter speeds required to provide correct scene exposure, especially since we are generally shooting using natural daylight at the surface of the water.
Still, there is another potential scene luminosity concern; the water medium on the lower half of the scene may have a different luminosity need than that of the surface subject. This will occur if the UW subject background is dark and reflected light is minimal. This can make the total scene illumination balance a potential challenge. However, this too can be solved by employing flash fill.
When I first began to experiment with my D200, I shot ISO 200 (for lowest noise), f16 (to achieve maximum subject sharpness above and below the water while not requiring a shutter speed slower than 1/30 second) and Aperture Priority (where shutter speed “floats” to accommodate correct exposure with fixed ISO and aperture). I also set the camera to Matrix Metering, which evaluates the entire scene for proper exposure and, Point Autofocus specifically for the UW subject.
This combination of settings gave me sufficient shutter speeds to enable sharp images but sometimes resulted in an inability to obtain proper exposure across the entire scene. In addition, I often had subject softness above the water because I could not shoot a smaller aperture without getting too slow on shutter speed. And, a higher ISO in my early camera body produced unacceptable noise.
Still, because I could literally shoot until the card was full or the battery drained, I’d return with a handful of images for which the editors would clamor.
To solve the luminosity balance issue I began shooting splits with a single strobe mounted directly to the housing for flash fill on either the surface or UW subject. With the camera set to Rear Sync (which allowed for ambient light fill to the background) and a change to Spot Metering for the UW subject, I was able to achieve much better total scene exposure balance.
To fix my occasional image softness issue on one half of the scene, I switched from Autofocus to fixing the focus manually at a distance just beyond where autofocus would have locked on my UW subject (taking a page from the Nikonos handbook using the field of focus markings on the lens barrel). This shifted the field of focus enough to now enable sharp focus on both the UW and surface subject.
The third physics concern with split shooting is relatively simple to solve. Fisheye lenses provide a unique, often unnatural image perspective at normal shooting distances. They bend lines with a barreling effect on subjects becoming most pronounced the further the subject is from the center line of focus. And, they create a magnified, false perspective of subject distance the farther the subject is from the lens.
But we know from our UW shooting that by getting super close to our subjects we can actually use these effects to our advantage. The same holds true for split shooting but with an important corollary; the above wa-ter part of the subject will appear farther away than the UW part of the subject which will appear closer due to the air/water and air/air interface of the dome port.
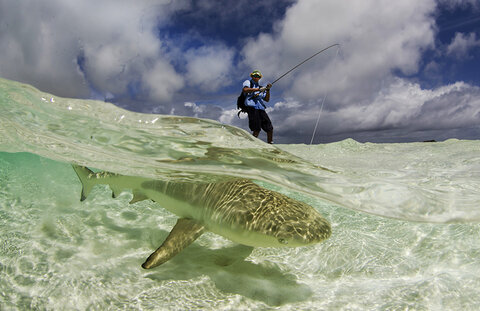
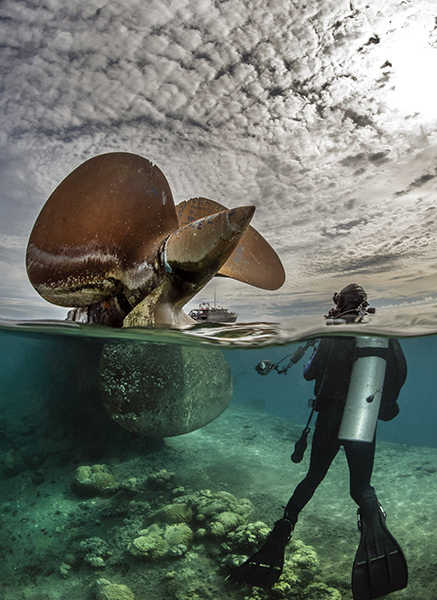
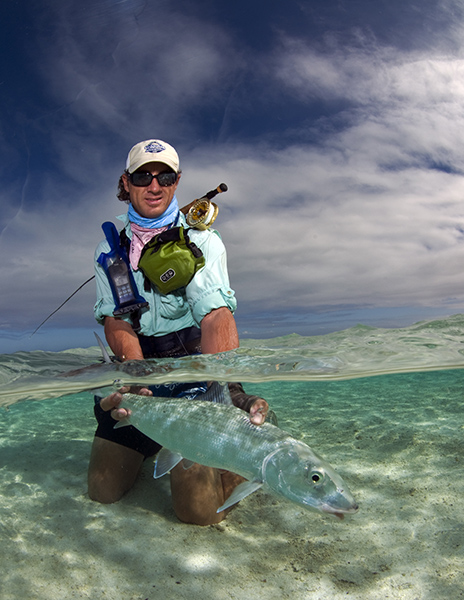
This is something to think about when choosing subjects to shoot with split shots. For example, shooting a reef scene and a palm tree on an island above the water will likely result in the tree being too small to add significance in the image. Conversely shooting an unnaturally large surface object (like the ship propeller and the diver) can make for an interesting split image.
Mastering the Techniques of Split Shooting
Today’s camera sensors are vastly improved with regard to sensor sensitivity under low light situations. This means we can employ higher ISOs allowing the smallest apertures for a given scene. I now routinely shoot splits at ISO 800 and f22 with my Nikon D850 in a Subal housing behind a Zen 230mm (9-inch) super dome port. As a bonus, image sensors on todays camera bodies have considerably more dynamic range allowing the shooter to often forgo using flash fill. Matrix metering with the high dynamic range allows more even exposure both above and below the surface.
As a starting point, I recommend the following camera settings for natural light: ISO 400 (800 if you can without imparting noise), f18 (f22 if you can), spot or small area focus specifically for the UW subject, matrix metering (take advantage of the dynamic range of he camera if you can), aperture priority and manual focus set for 12-16 inches from the dome port. These setting should result in a good starting point to shoot splits without flash fill.
While any dome port with a fisheye lens could be used for split images, the largest dome ports provide the very best image quality. I recommend nothing less than a 200mm (8-inch) dome for the 35mm standard camera system. And if you can go 230mm, do it.
When you initially begin shooting splits you’ll find that, depending on the material of the dome (acrylic or glass), water will adhere to the port surface in varying degrees forming rivulets and beads on the dome surface. In addition to being annoying, it will also have a negative impact on the surface subject.
A rivulet or drop will, on its own, act as a mini lens on the surface of the port and cause image distortion. I find that glass tends to have less surface tension than does acrylic, meaning that water will “sheet” more cleanly off the glass surface better leaving fewer rivulets and droplets than acrylic.
Through trail and error, I have found an effective technique to minimize the offensive water issues on the dome. The technique employs dunking the entire dome underwater and shooting the camera on Continuous Trigger Release Priority while slowing lifting the housing from the water. As you do this, a thin layer of water remains on the entire surface of the dome for a brief instant due to surface tension before sheeting off under gravity. Because this water layer is uniform, it does not impart image distortion on the above surface portion of the image.
By shooting continuous release mode as you slowly lift the housing from the water, you will likely capture at least an image or two in the burst that will have both the UW and surface subject within the scene.
While splits can be done in deep water, the inherent weight of the housing/dome port system lends it to be best used in water shallow enough to stand.
After shooting a burst of shots, check your work. I typically shoot a series of shots at a given group of settings and camera angles, then check the LCD for both image quality and histogram clipping. Generally, histogram clipping is rarely an issue. However, camera housing angle is often something I need to correct. As I am generally above the camera, my view of the camera angle may not be perpendicular to the subject, resulting in either too much UW or surface subject. So I use the image set in the LCD and adjust accordingly.
Finally, when I think I have a set of images that appear to be winners, I will select them individually in the LCD and blow them up to check for sharpness of both the UW and surface subjects. I’ve learned the hard way that failing to check image sharpness across the scene is a guarantee I’ll end up with more losers than winners when enlarged on the computer.