Nikon D600 / Sea & Sea Housing Review – Macro

Nikon D600 and Sea & Sea Housing Review
Detailed Reviews of the Nikon D600 and Sea & Sea MDX-D600 Housing
Part II: Macro
Text and Photos By Victor Tang
The Nikon D600 has proved to to be an amazing tool for capturing wide-angle stills. In some ways this is not surprising, for the benefits of having a full frame (FX) sensor have been extolled since the Nikon D3 was first launched. The D600 undoubtedly proved its mettle behind a dome port, but what about a macro one?
Preparing The D600 For Macro
The Sea & Sea MDX housing requires two port components in order to have full lens functionality (including focus gears).
- A Port Base. The Base attaches to your housing and accommodates up to half the length of your macro lens.
- The actual Macro Port. This is the business end that the front element of your lens peers through.
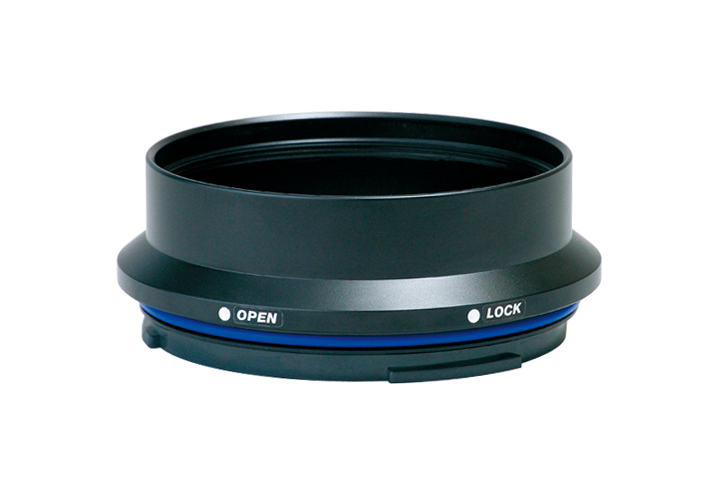
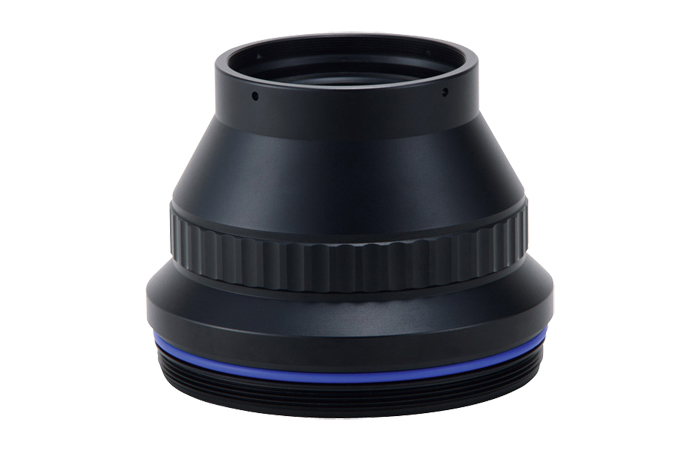
The Macro Port is screwed onto the Port Base via screw threads on the base of the Macro Port. This arrangement means that there is another potential flood point, and it proved so when I did a leak test for the first time and discovered water seeping though right where Port Base meets Macro Port. Thus the first lesson shooting macro with Sea and Sea housings has been learnt: do not over-tighten the Macro Port to the Port Base, as the O-ring will get distorted and water will enter. The build quality of the Base and Port is superb, however. Their aluminum alloy construction gives the system a solid feel – an assurance that the lenses are well-protected.
On my DX macro setup I employed two lenses: The Nikon 105mmVR and the Tamron 60mm macro. The Tamron is designed for DX cameras, so I chose to house the 105. The 105 also provides a similar field of view as the 60mm would give on my DX setup, which is a good starting point.
Shooting Macro
After commencing the first dive the immediate task was to familiarize myself with the focus point selector buttons, as I shift focus points frequently when shooting macro. I was not able to access the selector buttons when my right hand was on the housing handles, but by moving my hand into the space between the housing and handle the buttons were easy to reach. I really love the feel of the buttons on the Sea & Sea Housing, as they provide very tactile, reliable feedback. Every button also has a unique shape so it is easy to choose by feel.
After firing a few test shots and reviewing them it became clear that compared to shooting with a DX crop sensor I would have to adjust my default settings slightly. Foremost is the difference in depth of field (DOF) between FX and DX. Shooting on an FX sensor with the same aperture setting as the DX counterpart will result in images with a depth of field (DOF) shallower than with a DX sensor. The result is that you have to shoot with a smaller aperture if you want the same DOF as in DX cameras when shooting with an FX sensor. Why is that? The math is complicated and of no practical use when actually shooting underwater so here is my “for dummies” explanation:
- A FX sensor is one-third larger than a DX sensor, which means that to frame the same subject identically as in a DX camera, a FX shooter will have to move closer to the subject, making the DOF shallower. When moving closer, we need a smaller aperture to get a deeper DOF.
As I delved further into shooting more macro subjects one of the D600's flaws kept glaring at me through the viewfinder: the puny autofocus (AF) coverage. The AF points have been transplanted from the DX sensor D7000, and with the larger sensor of the D600 the spread of focus points is all clumped towards the center of the frame. Having been very used to having a far wider AF point spread, this presents an inconvenience since I often have to use the nearest point to focus and then recompose the shot. The AF-C 3D Tracking focusing mode is often helpful in this situation.
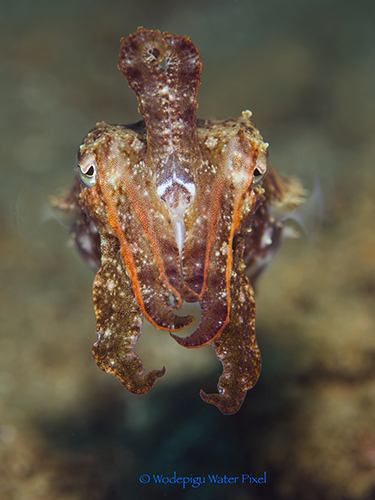
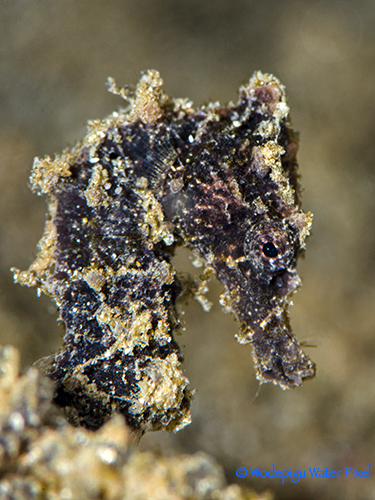
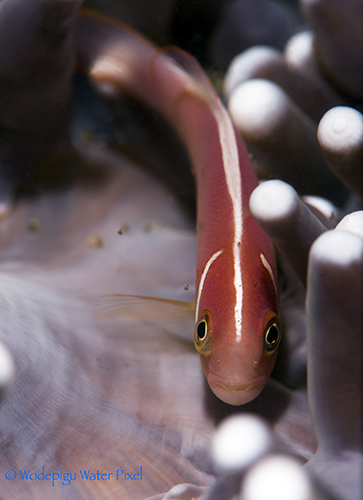
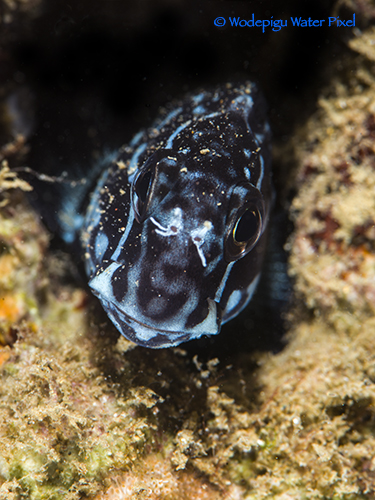
Even with these two nuances between the sensor sizes, the photo results are absolutely glorious! Colors are vibrant, there is better contrast, and the amount of detail that is recorded will satisfy any pixel peepers. In fact such fine details allow the versatility of cropping your photos more dramatically than without a noticeable degradation in image quality.
Using the DX Mode Option
The D600 allows the user to specify how much of the sensor will be used to record images, which in this case means FX or DX mode, where a box will appear on your viewfinder telling you the boundaries of the image. Switching to DX mode allows you to recreate the same field of view as you would on a DX camera, allowing the photographer to achieve a tighter framing that may not have been possible if using the whole sensor. The downside is that instead of 24 megapixel resolution, DX mode drops it down to 10.5 megapixels and the maximum printable size of the photo will be smaller. Many may scoff at this and prefer to stick to FX mode, but in my view there are certain reasons why DX mode is still a viable option in some macro scenarios for the underwater photographer:
- Although DX mode gives you only 10.5 megapixels, those pixels can still deliver outstanding quality. Bear in mind that the minimum needed to print in A4 is about 6 megapixels, and that your masterpieces taken in DX mode can still be featured in dive magazines or any internet screen. The smaller file sizes are also more manageable than large RAW files.
- For photographers with ambitions to win competitions, cropping is usually frowned upon and will cost you points. Shooting in DX mode may give you the framing that you need without further cropping for that winning shot, and with the RAW file looking the same as the JPEG, there will be no penalty in the eyes of the judges.
Shooting in DX mode I have seen no discernible difference in image quality, in fact I would be hard pressed to tell them apart viewing them on LCD screens. Using DX mode on a FX camera is definitely an option to consider when all others have been exhausted, but if the situation calls for it you will not be upset. Examples below:
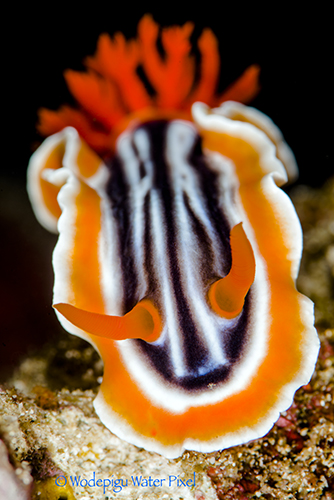
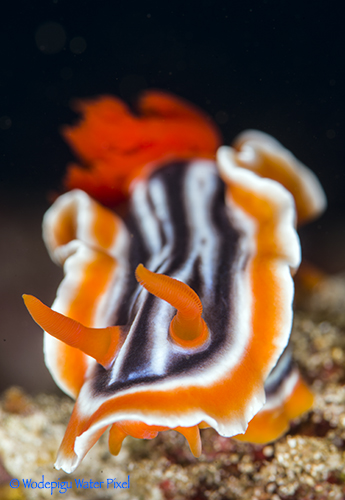
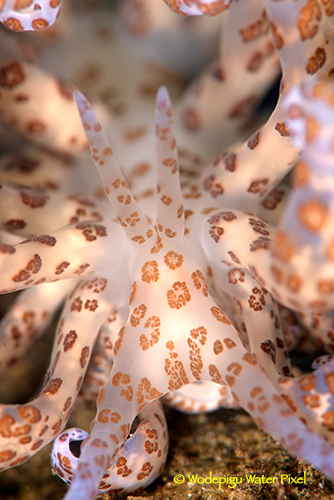
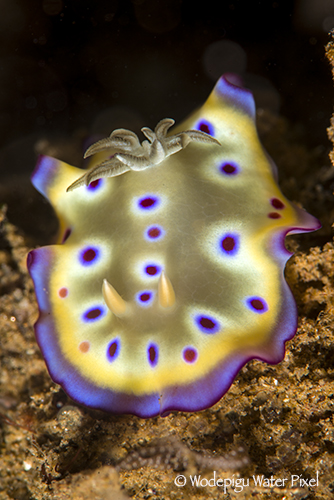
Chromodoris Magnifica in DX Mode. Do you see any difference? Nikon 105VR. 2 Sea & Sea YS-D1 strobes. ISO100, F22, 1/250s.
Teleconverters
Another way to have a tighter field of view on FX cameras is to use teleconverters. Using a 1.4x teleconverter on any macro lens almost fully recreates the field of view that you would have on a DX camera. In order to accommodate a teleconverter in your macro setup you would need to get an extension ring to elongate the macro port. For 1.4x teleconverters like Kenko and Tamron, a Sea & Sea SX Extension Ring would suffice.
Shooting with a teleconverters does have its downsides, namely that your maximum (widest) aperture becomes smaller and the view through the viewfinder will be dimmer. However out in the field I have found this to be barely noticeable, and certainly not a hindrance. Autofocus is still quick and accurate and you would be hard pressed to see any degradation in image quality.
Final Thoughts
Capturing macro subjects with the D600 has inspired me to further hone my shooting technique and to consider more factors before taking the shot. The shallower DOF inherent in a FX sensor makes getting subjects in focus slightly more challenging, but it brings with it new possibilities. When the patience pays off, however, the image quality, detail and color reproduction of the D600 will simply take your breath away.
Go to:
Part I: D600 & MDX D600 for Wide-Angle
About the Author
 Victor Tang is the founder of Wodepigu Water Pixel, an adventure dive company and photography consultancy with a nose for off the beaten track dive destinations. When not stranded on shore with other pursuits as a musician and TV producer, Victor is on the prowl around Southeast Asia searching for new pristine waters to explore. His sister will always tease him for taking an oath never to take a camera underwater again after his first try in Malapascua, but lately he carries a camera anywhere he goes.
Further Reading
Where to Buy
Please support the Underwater Photography Guide by purchasing your underwater photography gear through our sister site, Bluewater Photo & Video. Click, or call them at (310) 633-5052 for expert advice!
![]()