Macro Wide Open
Is underwater macro photography trendy? Of course it is. The key to great shots is to try not to get caught up in the regular macro styles, but to try something different. When you do, all kinds of good things are bound to happen.
‘Macro wide open’ uses the bottom end of your lens’ f-stop range to help create extreme bokeh in your images. In fact, these images are mainly comprised of the bokeh with just the slightest anchor points of sharpness for the viewer’s eye to hold on to. Leaning towards reverse ring macro, this wide open technique is a sure fire way to expand your portfolio right away without spending more money on expensive or confusing gear.

It’s All About the Bokeh….
First, lets address the creamy, buttery portions of the image referred to as bokeh. Simply put, bokeh is the natural depth in an image and occurs naturally in photography/cinematography. This natural depth is created in an image by framing the sharp focal point that then fades away out of focus through the frame. The focal range creates a plane of focus and shallow depth of field that many shooters attempt to forever enlarge by increasing their f/stop settings (to create more depth of field and less bokeh).
The amount of bokeh is dictated primarily by the f-stop setting of the lens and can expand or collapse depending on the shooter’s desired aperture selection. Nearness to the subject and background, light and other elements including lens build also play heavily into creating interesting bokeh.
So what would happen if we concentrated on dramatically expanding the soft area before and after the focal point, creating an image with the narrowest depth of field possible? What would happen if we were to isolate an anchor point and to exaggerate the bokeh to the maximum? What would happen if the image were all about the buttery and creamy portions of the image; more importantly, how do we get there?
Mike’s Gear Box:

Purchase the gear Mike uses at Bluewater Photo.
Camera: Nikon D7100
Lenses: Nikkor 60mm, Nikkor 105mm
Housing: Sea & Sea MDX D7100 Housing
Strobe(s): 1 or 2 Sea & Sea YS-D1 strobes
Arms/Clamps: Ultralight / Beneath the Surface
Accessories: 1 high-powered diopter (like the SubSee +10)
(Aquako or Subsee are both used in this write up to decrease DOF)
Accessories: 1 FIX modeling light
What is “Wide Open”?
Shooting Wide Open means just that: shooting at the bottom end or lowest aperture number (smallest number) of your lens. In fact, for this wide open project the lower the better. By simply dialing back your f-stop to its widest setting, like f/2.8, you will notice a few things occurring immediately and be met with the following challenges:
1 – A rush of incoming light and overexposed images
2 – Blurry, soft images
3 – Lack of color or a color shift in your images
4 – Extreme narrowness in the depth of field
Take on each of the above challenges one at a time to conquer them. This can be done quite easily and you will soon be on your way to gaining a better understanding of your lens, lighting, composing with more bokeh and how they all combine in creating your image.
Breaking away from some of the rules of composition (like shooting up) to shoot at a downward angle will help to increase the bokeh while working with very tight compositions or when the background is very close to your subject.
Load your images onto your computer and check them for the best results, as the LCD on your camera isn’t a very good way to appreciate or grasp what is happening in the image. Look hard into the bokeh and see how the light ripples, buckles, kneads up or swirls. The newer lenses work hard to avoid this effect but older lenses can be easily obtained to create more interesting natural bokeh.
Tutorial in Photos

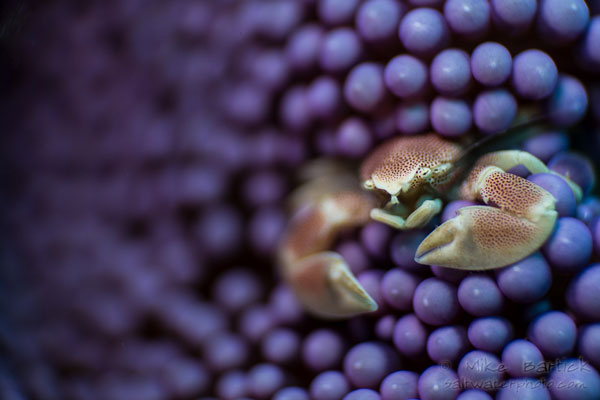
Peppermint Patty
Gear: 60mm lens, + 15 diopter to decrease depth of field, f/3.2 @ 1/320
Technique: Medium power constant lighting and lowest power on the strobes for color in the foreground.
Caption: Candy Crabs are interesting and common subjects that mimic the soft corals on which they are found. Their lightly colored carapace are easily over exposed and will make a great test subject. Review your images and adjust your strobes and modeling light.

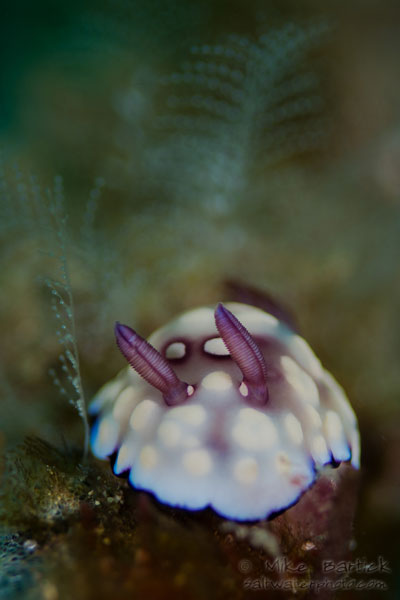
Purple Polka Dots
Gear: 105mm lens, +15 diopter to decrease depth of field, f/3 @ 1/250
Technique: Foreground lighting with FIX modeling light on lowest power and low power on the strobes.
Caption: Having both eyes reasonably sharp for this image was important, and getting them both evenly distanced from the lens was hard work but is necessary on all these kinds of images.
Notice how the light distorts and begins to buckle. Some of this is created while locking the focus and then pulling back, as most diopters are the sharpest in the center. This technique will help to decrease the DOF even further than the aperture setting.
Donuts
Gear: 60mm lens, +15 diopter to decrease DOF, f/4.5 @ 1/100
Technique: Front lit with FIX light. Background is lit with low strobe power.
Caption: Knowing that the light in the background would create pastel colors and distort the bokeh, the strobe lighting really came into play while making the image. Notice the hydroid and how the bokeh begins to bead up into soft round orbs; this is regarded as good bokeh.
The now-hated mirror lenses of the 70’s and the 80’s created a certain donut shape in the bokeh that many photographers ripped apart and regarded as poor bokeh. I happen to like it, especially since creating that with a quality (new) lens is nearly impossible.
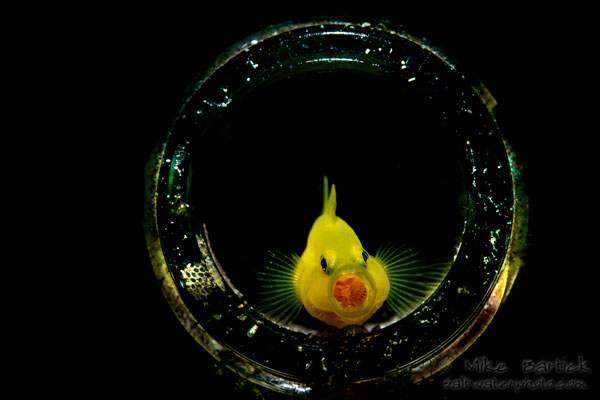
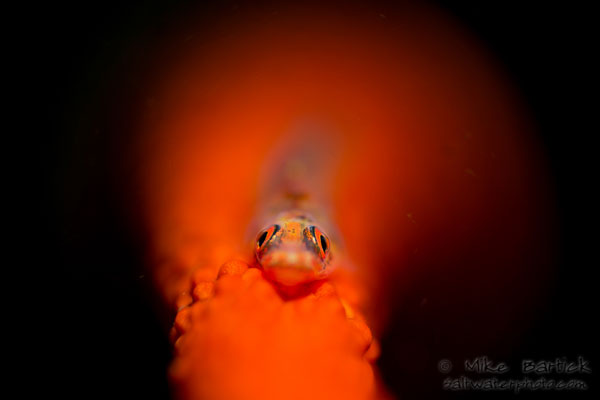
Lemon Drop
Gear: 60mm lens, using Retra Snoot, f/16 @ 1/200
Caption: These small Lemon Gobies are very popular to photograph when they take up residence in bottles, and photos of them are seen frequently as they are a habitat conducive to creating cool images. This one is shot using a snoot at a higher f-stop for a greater depth of field and dark negative space that fills the frame. I’m rim lighting the subject and the bottle, but as much as I like this mage its seems a bit ordinary.

Lemon Butter
Gear: 60mm lens, f/3.2@ 1/160
Technique: FIX constant lighting in the foreground
Caption: Here is an example of the same Goby in the same bottle but shot in a different manner. At f/3.2 the narrow depth of field and nearness of my lens to the subject creates an extreme example of the buttery bokeh that I find interesting and quite different from the rest.
Dippin Dots
Gear: 60mm lens, f/3.2 @ 1/250
Technique: Two YS-D1 strobes, low power
Caption: The plane of field is also something to play with when shooting this shallow. I liked the way the light played out in this image with the lavender colors. The Anemone is quite different and filled the frame nicely for this image.
Pika Chu
Gear: 60mm lens, +15 diopter to decrease depth of field, f/3.2 @ 1/250
Technique: Front lighting with FIX constant light and backlit with YS-D1 strobe, low power
Caption: The Bokeh swirl is also another dreaded pitfall for some, and something that lens manufacturers try to avoid. Slightly apparent in this image, the swirl is caused by locking the focus and pulling back slightly to the most minimal focal plane possible without losing the sharpness on your anchor point.
Comet Trail
Gear: 60mm lens, f/3.2 @ 1/250
Technique: Two YS-D1 strobes, low power
Caption: Dropping the angle of view and capturing the whip coral in the background with such a low f-stop created a very smooth and textured swath of color behind our common subject. In my imaginative mind I see a goby riding a comet!.. No comments please..
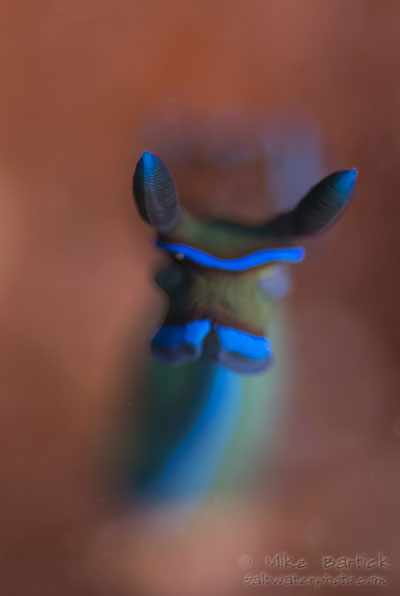
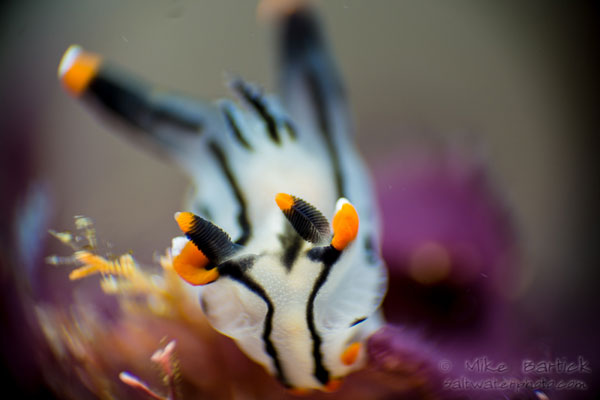
Phoenix
Gear: 105mm lens, f/4.2 @ 1/320
Technique: Front lit with FIX constant lighting, back lit with two YS-D1 strobes
Caption: This Tambja nudibranch, sitting on a hydroid perched with the back of its foot just touching the rocks behind it, begged for a creative image. The first few shots were so generic and full of muddled clutter in the background that I nearly swam off. Taking a few minutes and thinking about what was being presented quickly had me changing my strategy on how to shoot the nudi. The result was much more gratifying than the prior images and a lot more fun to make.
In Conclusion
Shooting wide open is a fun and challenging way of creating images that closely resembles “reverse ring” image making without the added costs. It’s also much more convenient. Experimenting in shooting wide open will quickly teach you how to shoot using the full range of your lens and expand your portfolio. Have fun!


