How to Remove Backscatter Quickly & Easily with Photoshop

Other than sorting and culling photos, backscatter removal is probably the most time-consuming and painful part of post-processing underwater photos. Especially if you shoot a lot of wide angle, and like getting really close to your subjects (as you should!).
Although Lightroom’s Spot Removal tool can do a decent job with small amounts of backscatter, any photo with significant amounts requires a more powerful tool. Enter Photoshop, with it’s very powerful (but also potentially destructive) dust and scratches filter. The key to using this filter properly is to use it selectively – the more selectively, the better. Although it’s very straightforward to select an area in photoshop and then apply this filter, it can result in large sections of the photo being either overly smoothed, or left with some backscatter.
By creating a dust & scratches layer mask and painting the filter onto the image, pinpoint backscatter removal can be done very quickly, allowing you to easily strike a balance between removing backscatter quickly, and maintaining the quality of the image. If all of this just sounds like gobbledegook to you, don’t worry, you are not alone. I had no idea how to use photoshop when I first learned this method; as long as you just follow the steps outlined here, and don’t try to get too fancy, then you should have no problems using this technique.
You can either use the instructional video here, or scroll down to see the same directions in text form.
Please note that these modifications are best done for images being posted to social media or used in smaller formats. For large-format printing, it is best to follow the more time-intensive content aware fil backscatter removal method as covered in this tutorial.
1. Select “Edit in Photoshop” from Lightroom Catalogue
I always manage all of my editing through my Lightroom catalogues. I often find that doing most of my edits in Lightroom first can bring out more backscatter, so it can be beneficial to edit in Lightroom first, and then to do backscatter removal in Photoshop.
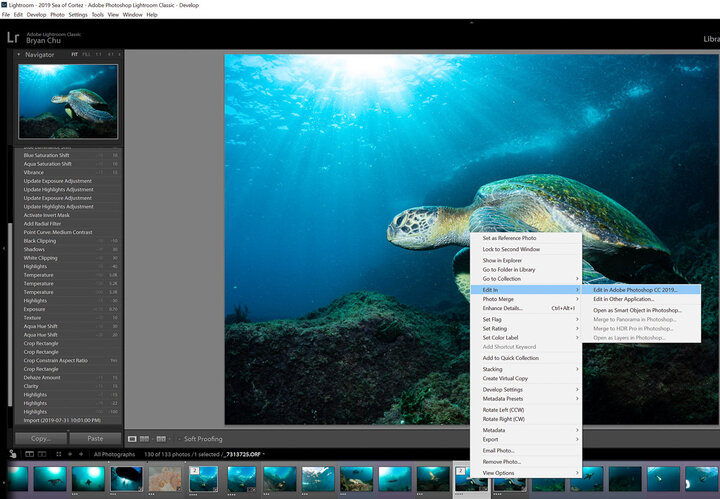
The downside to this is that if you want to go back and make changes to your Lightroom edits, you will have to redo the Photoshop editing. This is because when you edit an image from Lightroom into Photoshop, Photoshop takes the latest version of the Lightroom edits and uses that as its original file. After you make all of the changes in Photoshop, it saves a new image, which is automatically added to your Lightroom catalogue. This new image will be whatever version of the photo you edited from in Lightroom, plus the changes made in Photoshop.
So if you want to maintain the highest level of flexibility with your editing in Lightroom, the best workflow is to edit your RAW image directly from Lightroom into Photoshop to remove backscatter, and then do all the other edits on the de-backscattered photo from Lightroom. This is the workflow I would recommend for people who are new to editing (workflow #2 below).
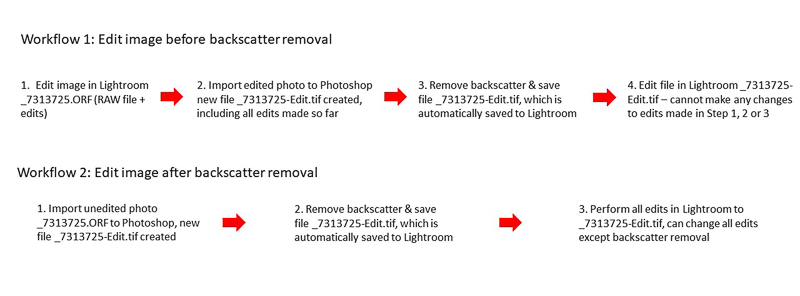
Note: whichever workflow you end up going with, editing in Photoshop creates a new .tif file, which can range in size from about 50 to 250 MB or more. So, although this method should save you a ton of time, it also does lead to larger hard drive usage (but that will be the case no matter what method you use, if you use Photoshop).
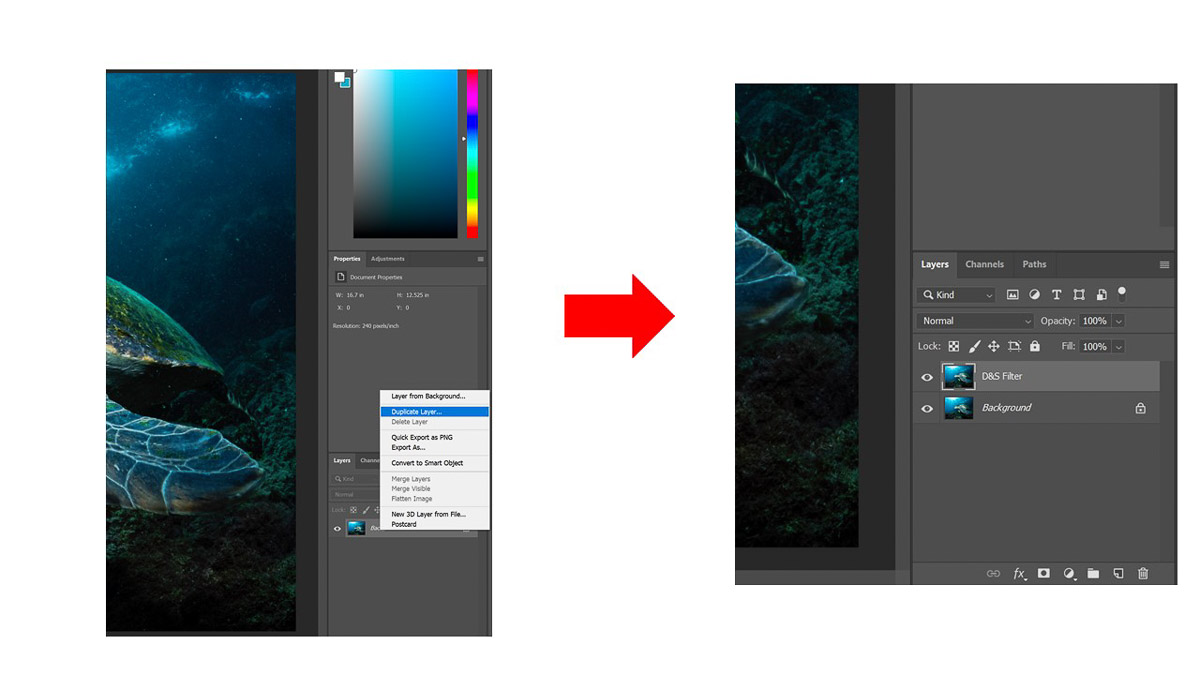
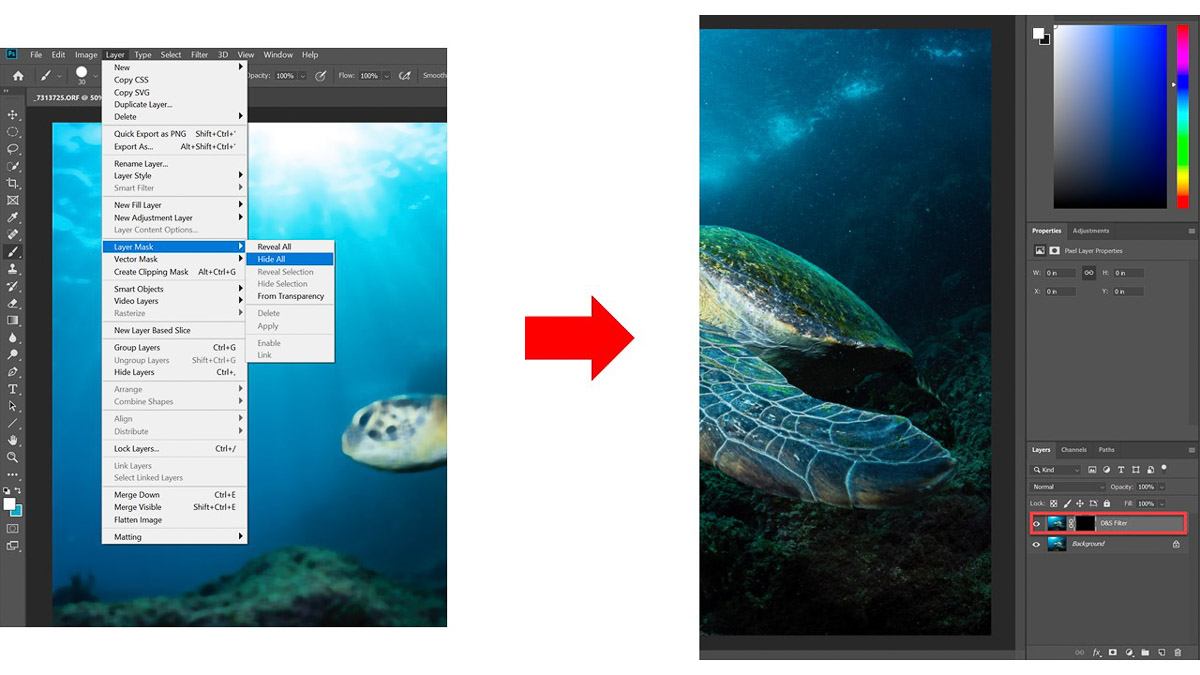
2. Duplicate Background Layer
Now that you have your image open for editing in Photoshop, you need to duplicate the background layer. This just means that Photoshop adds a second layer to the image which is an exact copy of the original photo. To do that, go to the Layers panel, right click on Background, and select Duplicate Layer. Name it whatever you like – I always use “D&S Filter”.
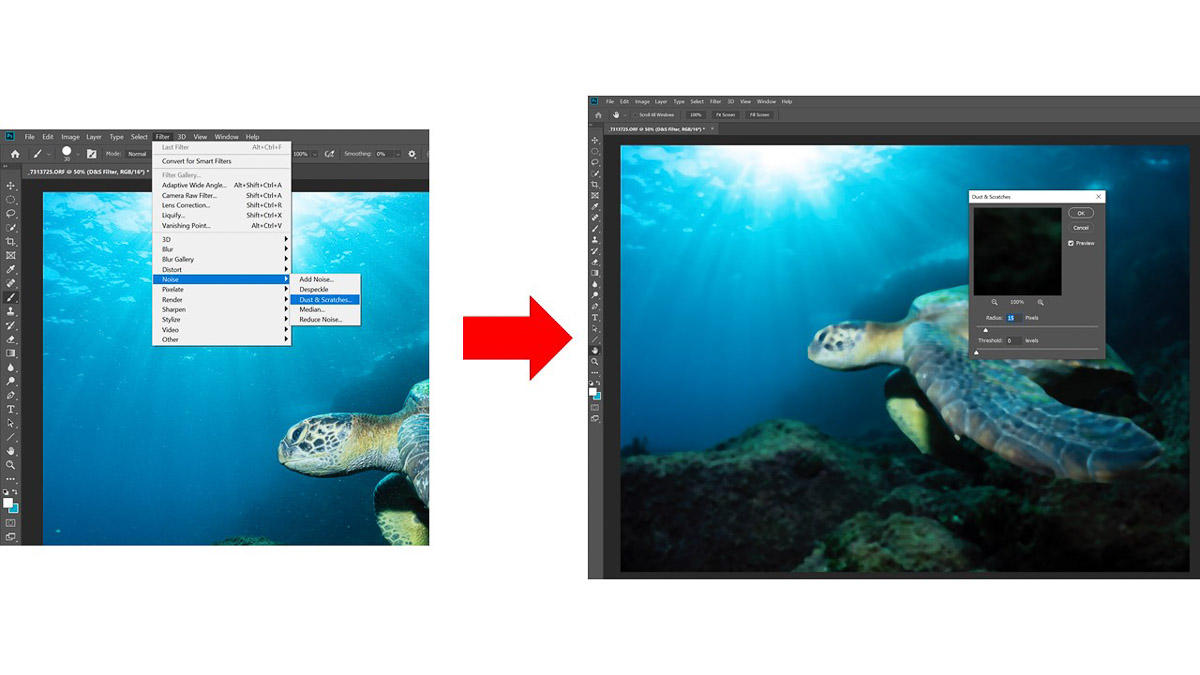
3. Apply Dust & Scratches Filter to New Layer
To remove backscatter from this duplicate layer, make sure you have it selected in the Layers panel, then go to the Filter Menu -> Noise -> Dust & Scratches. This will open a dialogue box which asks for a Radius and a Threshold. Keep the threshold at 0, then select a radius so that every piece of backscatter in your image disappears. Unless your backscatter is really gnarly, 15 usually does the trick. You will notice this blurs out your entire image – don’t panic, this is OK!
4. Hide Layer
Select Layer -> Layer Mask -> Hide All. This takes your new dust & scratches filter layer and hides it all behind the background image. This creates a black “mask” next to the dust & scratches filter layer showing that it is all hidden.
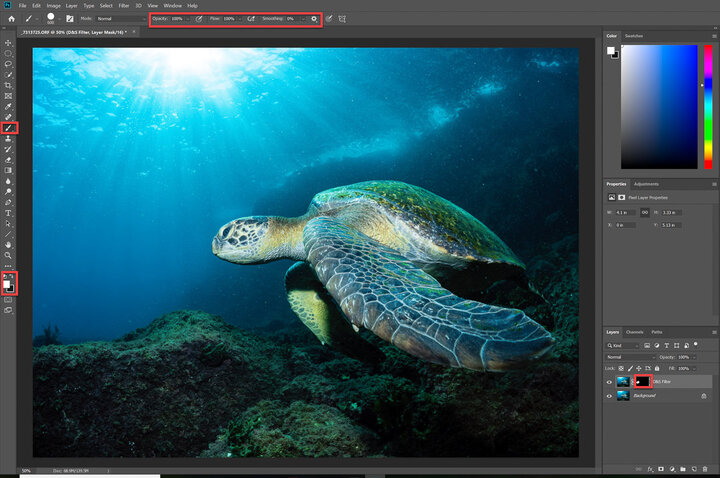
5. Paint the Dust & Scratches Layer on Using White on the Black Mask
Now is where the fun begins. Select the black mask layer, then select the paintbrush tool and make the color white. Now anywhere you paint on the black layer, it will magically remove the backscatter by bringing through the dust & scratches layer. There are a few ways to use this:
- For areas which are already blurry, like blue water or a black background, use the brush on 100% opacity, enlarge its size and cover the whole area
- For areas which are not very blurry but for which you want to remove backscatter, like your subject, or a close reef, use the brush on 100% opacity and shrink its size down to that of an individual backscatter piece. Then click each piece individually to remove. (This works much better with a mouse instead of a clickpad!)
- For areas that are kind of in-between, like rocks a middle distance away, or surface water, where you still want to keep some details, set the opacity around 40-60% and then paint over the whole area. This will not completely remove the backscatter, but will tame it down while not getting rid of all of the background details
- For sun rays in the water, I like to paint in lines parallel to the sun rays, clearing up some areas but keeping some with backscatter, so as not to remove the details of the run rays
Note: if you paint over too much, instead of having to undo, you can just paint black over any areas you want to remove the dust & scratches filter from. This is very useful if you find after doing a bunch of work that you smudged something you didn’t want to.
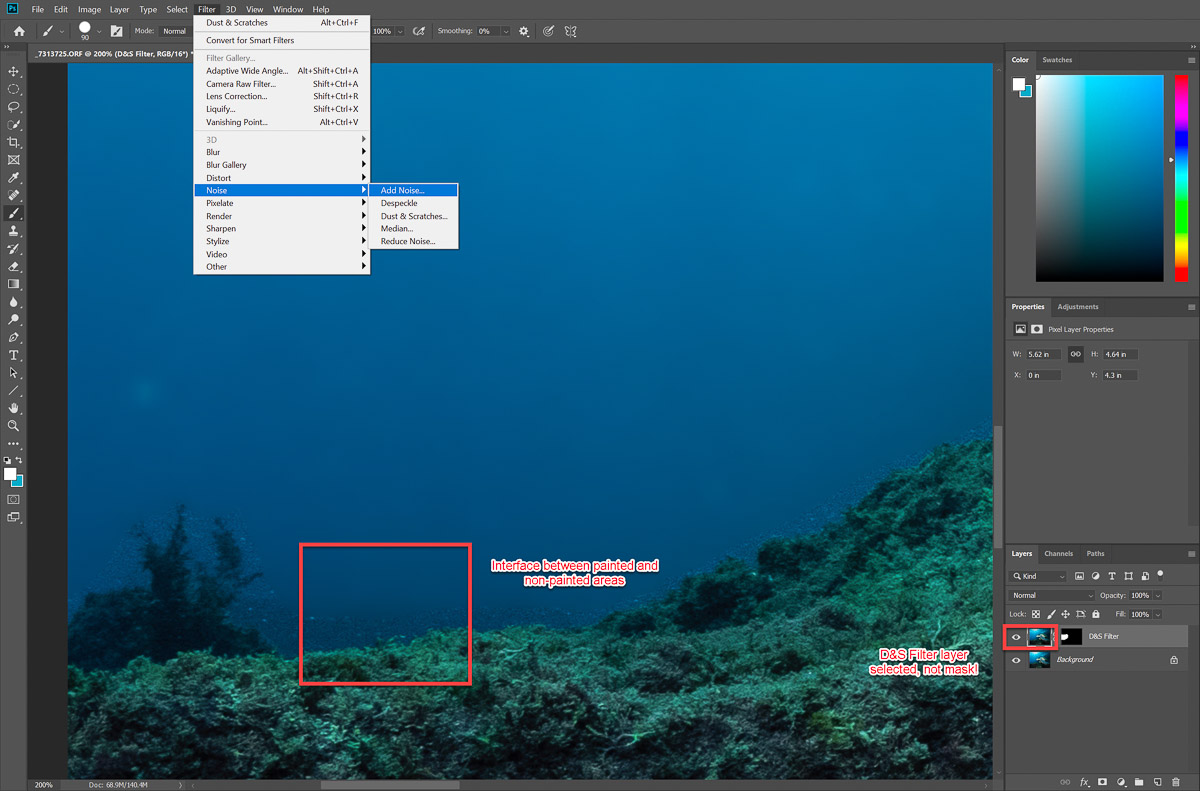
6. Add Noise to Dust & Scratches Layer
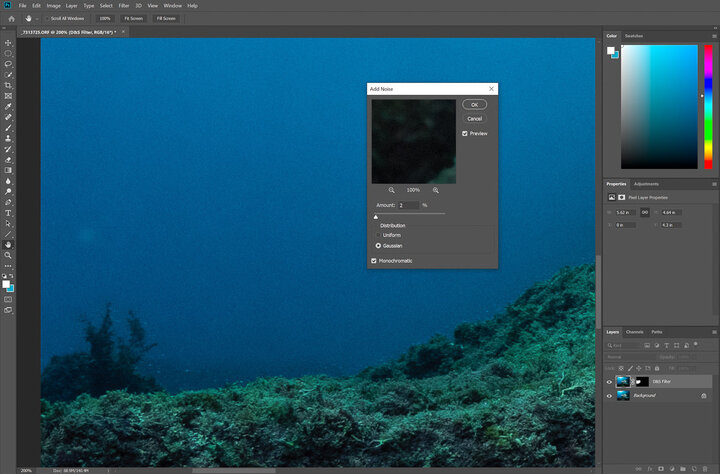
Once you have completed your painting, you will find that the image looks nice and clean, but when you zoom in, perhaps it looks too clean on the areas which you have painted. The dust & scratches filter removes all noise, making the painted areas look artificially smoothed. So now, zoom in on an area of the image where there is a very clear delineation between the smooth painted area and the noisy original background layer. Select the dust & scratches layer itself, not the black and white layer mask, then go Filter -> Noise -> Add Noise.
Set the noise level to a percentage which makes the smooth area look similar to the noisy area (the higher the number the more noise). I find typically something in the range of 2% to 4% works. It’s OK if it’s a bit noisier. Check Monochromatic, and then you can use Gaussian or Uniform, depending what looks better. For this image, 2% Gaussian looks pretty close for me, though a bit rougher. But that is OK.
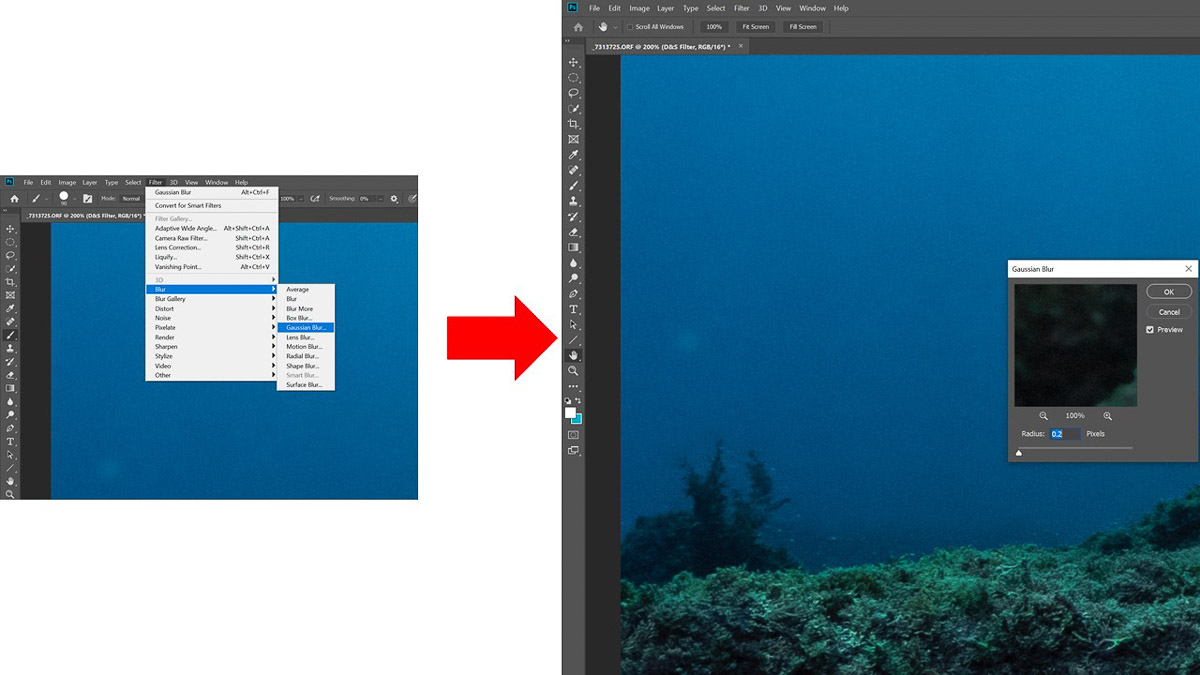
7. Blur the Noise on the Dust & Scratches Layer
This step is optional – if you find the noise is a bit too strong, then following that step, go Filter -> Blur -> Gaussian Blur and select a blur amount. I usually use around 0.1 to 0.7 – the higher the number, the stronger the blurring effect. For this image, 0.2 seems about right.
8. Save File, Return to Lightroom
Once you are finished, save your file and it will automatically be loaded into Lightroom as a new image stacked with your original image. Now you can make final edits and then export your photo. One thing that I always save to the end, whether I am editing before using Photoshop or after, is noise reduction. So I recommend going in to your new edited file and adding in some luminance noise reduction (I usually use around 15 to 20). This will help blend together the original image noise with the noise you added in Photoshop to the dust & scratches filtered area.
That’s all there is to it. I hope you find this useful, and that it saves you as much time as it saves me!


