Removing Backscatter in Photoshop
We all try our best to get clean images that are free of backscatter using strobe positioning and proper buoyancy techniques. But, let’s face it, all of us are plagued with unwanted objects in our images from time to time. Sometimes it is just a few specks of particles floating in the water column, but often it is much worse than that. Thankfully, Photoshop gives us a number of tools to solve these problems.
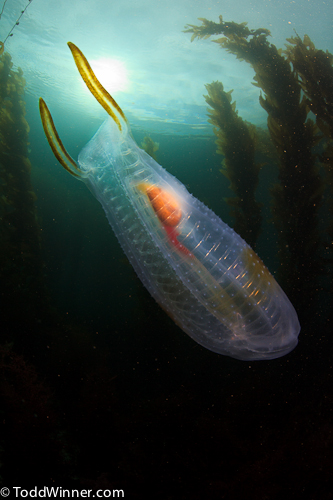
The original image was fairly clean, but had quite a bit of scatter in the top right area and on the kelp. See 100% crop for more detail.
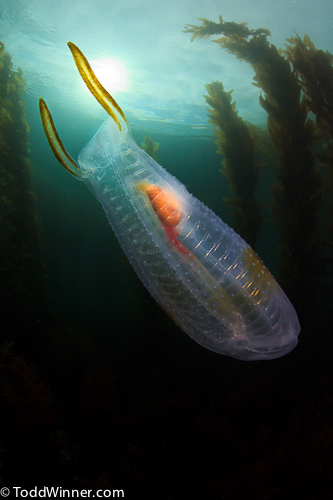
This is the final image. I used the spot healing and healing brush to remove the large blemishes. I used content-aware and the patch tool to remove the strands of kelp from the top left area of the image and applied the dust and scratches filter with a mask to remove the small particles of backscatter.
New Layer
Sart by duplicating your background layer. An easy way to achieve this is to simply drag the background layer onto the new layer icon located at the bottom of your layer panel. It is a good idea to start a new layer any time you are making big adjustments. It’s a simple way to see your before and after and it gives you many other options like blending modes, masking and opacity adjustments.
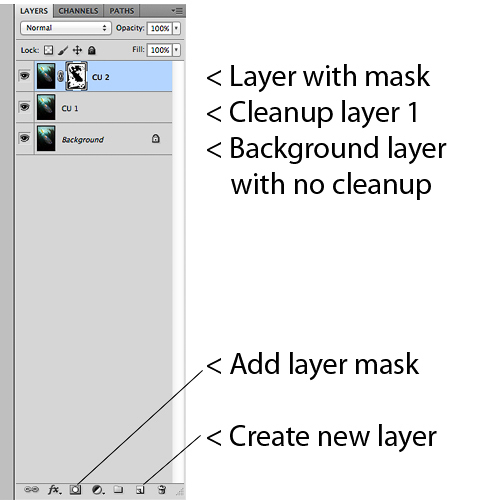
Layers panel showing layers, masks icon and new layer icon.
Clone Stamp
The clone stamp is probably the most commonly used tool for removing unwanted objects, but it’s the one I go to the least. It does exactly what the name implies; you copy, or “clone,” one small section of the image and stamp it, or “paste,” it into another portion of the image. The problem with this is that it is often very recognizable that you have cloned portions of your image. However it is still a useful tool, especially when retaining small details is important.
Spot Healing, Healing Brush and Patch Tool
These are my go-to tools for most of my backscatter removal. The spot healing brush is the fastest and most useful for removing small quantities of backscatter especially from backgrounds. You simply need to stamp or brush over the unwanted object and the tool will blend from surrounding pixels to keep the same luminance and texture. Because it blends with adjacent pixels, it is not the best tool for working around edges especially high contrast edges. For those kind of problems, the healing brush tool is a better option.
The healing brush requires you to sample a portion of the image much like the clone stamp by Option / Alt + Clicking on the sample area and then clicking on the area that you want to conceal. Unlike the clone stamp, the healing brush keeps some of the luminance values from the new concealed area.
The patch tool is not one of my personal favorites, but it can be useful for removing large blemishes. Simply draw around the unwanted section and click + drag it to another portion of the image that you want to conceal it with.
All of these tools have adjustable options on the main menu bar, but the default options work well for most images.
Content-Aware Fill (CS5 and higher)
If you have very large object that you want to remove, like your buddy’s fin, the content-aware fill is a good option. Select the lasso tool and draw around the unwanted object. Once selected, push Control + Shift + Delete and the Fill box opens with Content-Aware and click OK. Content-Aware does a good job of sampling other portions of your image and creating detail patterns, but it often picks areas that aren’t what you desire. Unfortunately, there is no way to control this. Maybe in CS-6 they will add more control. For the time being, resampling the area multiple times and combining content-aware with some of the other tools can give you excellent results.
Dust and Scratch Filter
If you have a background with a lot of backscatter, the dust and scratch filter is a powerful remedy. It does not work well on large blemishes, but it is perfect for lots of tiny particles. There are a number of ways to use this tool, but I like to apply the filter to a entire layer and paint the blemishes away. Start by making a copy of the background layer, then apply the Dust & Scratches filter located under noise in the Filter pulldown. There are two sliders in the filter. Start by moving them to their smallest positions. Increase the radius slider until the small particles are concealed. This will soften your entire image, but you can recover much of the detail by increasing the threshold. Use the smallest increments that conceal the blemishes and don’t get too concerned with the detail as we are going to paint in the effect. Next, add a mask to the layer by option + click on the add vector mask icon at the bottom of your layers panel. This will give you a mask filled with black over the entire layer. Now select your brush tool and white as your painting color and simply paint away the unwanted backscatter with an appropriate sized brush.
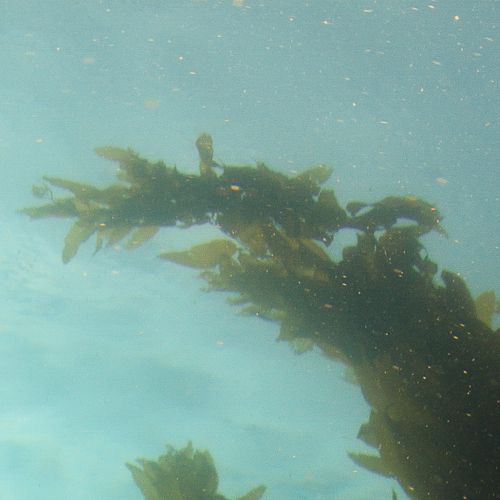
100% crop of the top right area of the original image.

100% crop of the top right area of the final image after applying the cleanup techniques.
Remember that all of these tools have lots of parameters that you can change to help you to achieve your desired effect. For more information, contact Bluewater Photo for one of our Lightroom / Photoshop classes: www.bluewaterphotostore.com or see www.toddwinner.com.


