Canon EOS R5 Underwater Settings
The Canon EOS R5 is a camera that has it all – 8K internal RAW recording, 45 megapixel still images, 4K video at 120 fps, 5 axsis in-body image-stabilization…you really couldn’t as for a better camera. As with any camera packed with tons of great features, it can be a little daunting when you first hold the R5 in your hands. Thankfully, we’ve done all the hard work for our readers during multiple dives with the R5. Here are some of our top settings, tips, and tricks for shooting photos and video with the Canon EOS R5 underwater.
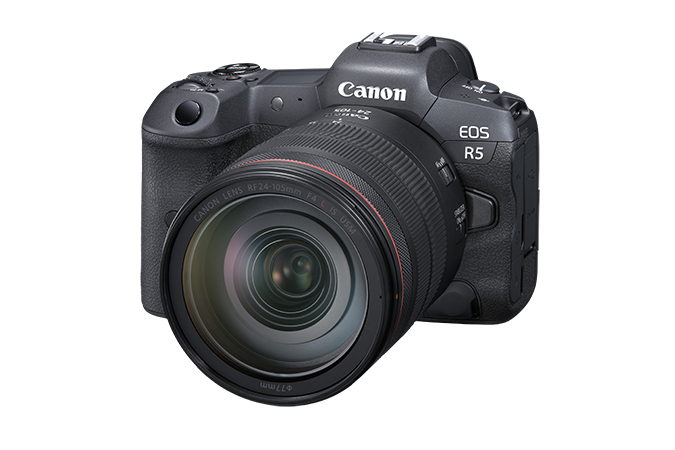
Canon EOS R5
![]()
Support our Content and Purchase a Canon EOS R5 underwater housing at Bluewater Photo:
Nauticam Canon EOS R5 Underwater Housing
Ikelite Canon EOS R5 Underwater Housing
Sea & Sea Canon EOS R5 Underwater Housing
Aquatica Canon EOS R5 Underwater Housing
Isotta Canon EOS R5 Underwater Housing
Check out our full Canon EOS R5 Underwater Housing Buyer’s Guide
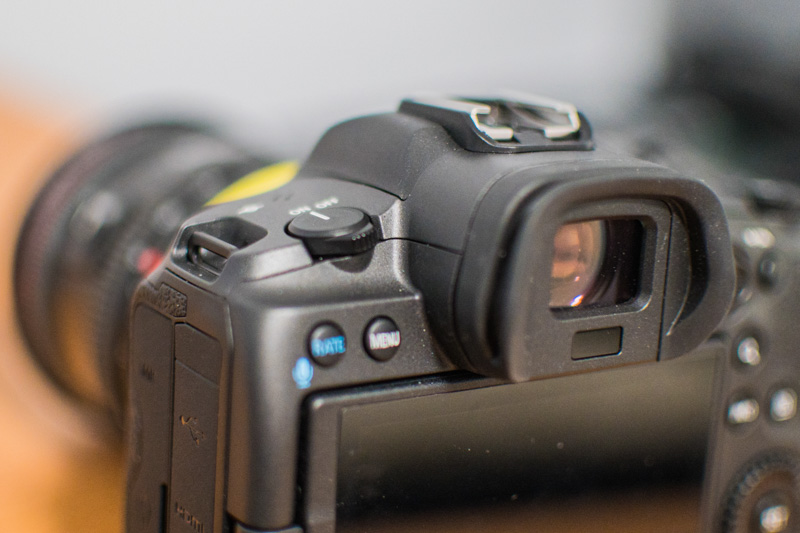
The back dial does not have a D-pad
Considerations Concerning the Canon EOS R5’s Dials and Joystick
If you shot the orginal EOS R, you’ll be relieved to hear that the annoying touch bar control on the back of the camera has been replaced by a fairly comfortable and easy to use joystick. This is a great addition for top side shooters, but underwater it makes things a bit tricky. This is because Canon decided that the joystick was enough replacement for a d-pad on the back of the camera. The joystick is intended to be used for scrolling through settings on the camera. However, if you place the camera in an underwater housing, there’s a chance the housing will not have full control over the joystick. Because most housings are not yet shipping for the EOS R, we have yet to confirm if any will give the joystick full functionality.
So whats the solution to the lack of a d-pad? Controlling your settings with the dials! The EOS R5 has three nice, big dials – two on top and one on the back. It takes some getting used to, but we found that after a few dives, scrolling through settings via the dials is actually a bit quicker than pressing a d-pad. You just have to develop some muscle memory for accuracy. When you do scroll through menus using the dials, be sure you aren’t accidentally changing your shutter speed, aperture, and ISO accidentally.
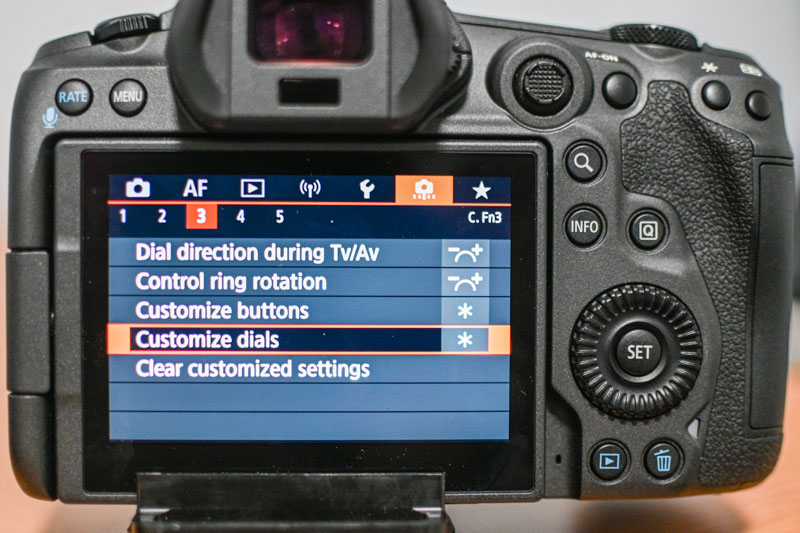
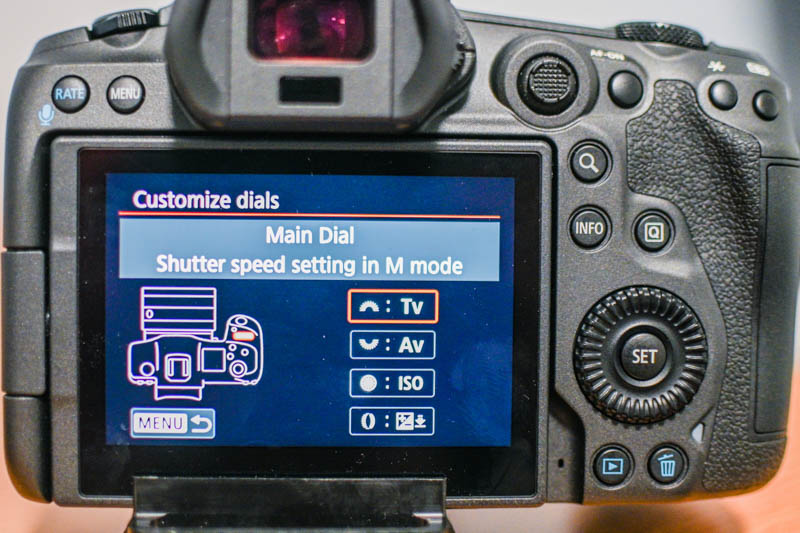
Customizing Your Dials: Shutter Speed, Aperture, and ISO
This brings us to our next point: the tiangle of exposure – shutter speed, aperture, and ISO – are really easy to adjust on the EOS R5. The three dials can be used to each control a leg of the triangle. It’s also easy to custom set which dial controls which setting. To do this, click the “menu” button, scroll to the C.Fn3 menu (panel 3 of the orange menu), and select “customize dials.”
The Canon EOS R was Canon’s first attempt at a full-frame mirrorless camera. With many good options form Sony and Nikon, it fell short. Fortunately, the Canon EOS R5 addresses many of the concerns that Canon EOS R users brought up. Though I would like to interject and say that the Canon EOS R was one of our favorite cameras that we tested underwater.
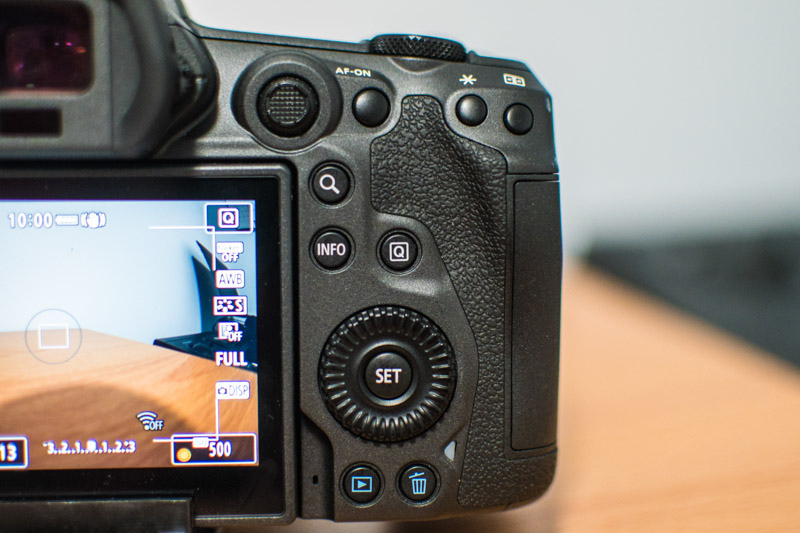
The Q Menu
The Q menu is the most important menu that an R5 user will scroll through during general use of the camera. Take a look at your Q menu and make sure to get very familiar with it – the Q menu includes settings that you are likely to switch often during a dive. These include autofocus point selection, autofocus modes, recording file type, drive modes, metering, etc. We will briefly cover what settings you might want to have in the Q menu for general underwater photography…
AF Mode – The best AF setting for you will depend on what type of photos you are taking and your style of shooting. The AF tracking on the EOS R5 is very advanced and even capable of picking up some fish eyes and faces. It’s one of our favorite modes to use. AF spot is great if you are shooting stationary subjects. Expanded area AF is a good mode if you are shooting quick animals but don’t want to rely on tracking.
AF Operation – AF operation lets you choose between shooting with continuous autofocus or single autofocus. Continuous autofocus, also called AF Servo, is where your camera will continue to adjust focus no matter what you are doing. Single autofocus, or One Shote AF, is where the autofocus will lock after you press the AF-ON button on the back of the camera or half press the shutter button. We recommend using Servo for quick subjects and one shote for stationary subjects.
Image Quality – Generally image quality should be set to RAW – especially if you intend to edit photos in Adobe Lightroom. You can also choose to shoto RAW + JPEG or just JPEG.
Drive Mode – Drive mode will allow you to select how many photos your camera take in a given period of time when you hit the shutter button. Most situations will call for single shooting which means the camera will take one photo when you hit the shutter button. If you are working with quick subjects but you have strobes, then we recommend low speed continuous. If you do not have strobes and need the fastest speeds your camera can offer, then select high speed continuous + which will give you 12 frames per second!
Metering Mode – If you are using strobes then select spot metering. If you are shooting ambient light then evaluative metering can be a good option depending on your style of shooting.
Anti-flicker shoot – off
White Balance – AWB (will note affect your photo if you are shooting RAW)
Picture style – Standard (will not affect your photos if you are shooting RAW)
Auto Lighting Optimizer – Off
Cropping/Aspect Ratio – Full
Important Customizations
Selecting Your AF Point
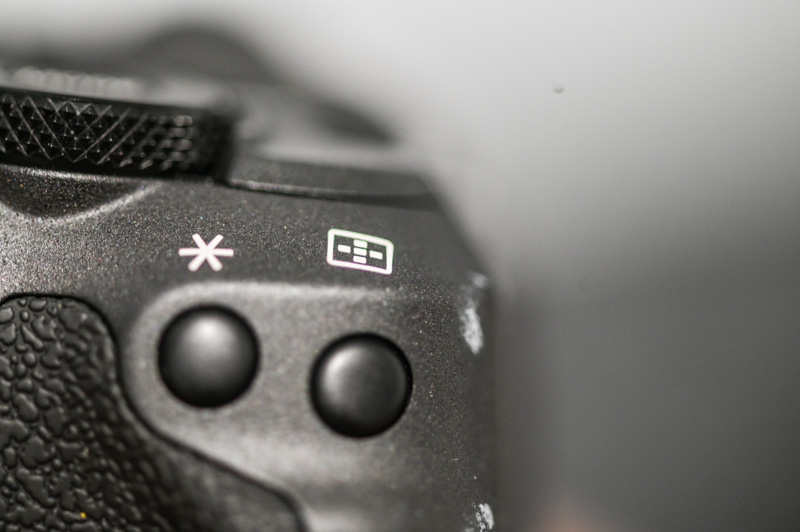
The Canon EOS R5 is a revolutionary camera because it offers autofocus points on 100% of the sensor. However, taking advantage of this can be a little clumsy underwater. Unfortunately AF point selection is a two step process on the R5. First, click the AF point selection button on the top right of the back panel of your camera. Then you can use your dials to scroll with the autofocus point to the location you would like it. We found it could often be easier to use AF tracking to lock onto the point you want to keep in focus and pan with the camera. We also customized the “*” button adjacent to the AF point selection button so that it would move the AF point back to the center with one click. To do this go to your C.Fn3 pane in the menu, select “customize buttons,” select the “*” button, and then select “Set AF Point to the Center.”
Switching Between Your EVF and LCD
Most housings will block the automatic EVF to LCD sensor, so you will need to manually switch between the two. To switch between your EVF and LCD, select the 3rd panel of the yellow set up menu (SET UP3), then select “screen/viewfinder display.” You will have the option to select viewfinder or screen. You can also customize a button on the camera to automatically switch between the two when you press it. We highly recommend doing this. To do so, select the C.Fn3 panel (orange menu), select “customize buttons”, select a button (we chose the LCD panel illumination button), select “switch between VF/screen.”
Turn Off Exposure Simulation
The Canon EOS R5 applies your exposure settings to the EVF and LCD preview by default. However, when you are diving with strobes, the screen will often appear dark when the exposure settings are applied because strobe lighting will increase the exposure. To make sure you can see what you are shooting underwater, select the menu button, select the red SHOOT7 menu panel, select “expo. simulation”, select “disable.”
Tweaks to AF and Subject Detection Settings
Autofocus settings can be complicated and variable depending on your style of shooting. However, we do have some important recommendations for general underwater photography. The AF menu can be found by selecting the “menu” button and then selecting the magenta AF menu.
Subject Detection – In the AF1 panel, change your subject detection to animals. When you are using autofocus tracking, we’ve found that the camera is able to find fish faces and eyes 20-40% of the time!
AF Assist Beam – Turn this off in the AF2 panel. It’s a waste of battery underwater.
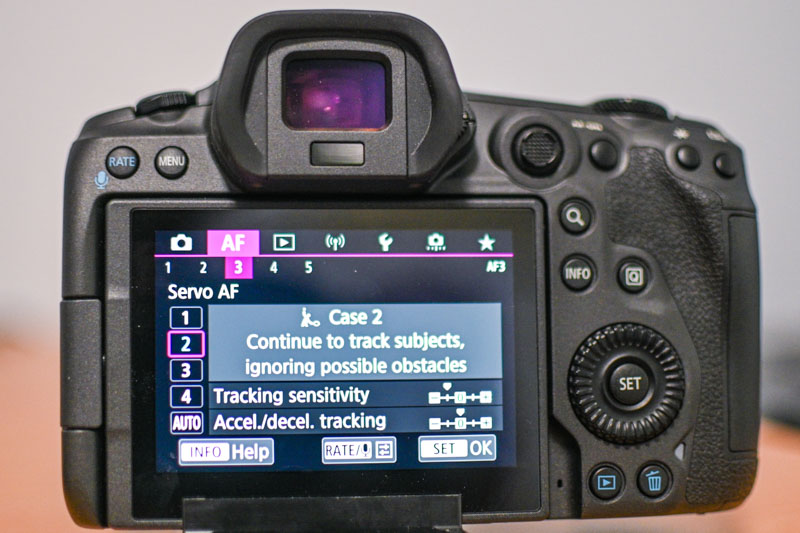
Servo AF Cases – The AF3 panel gives you a series of options for continuous autofocus and AF tracking. We recommend using Case 2 for underwater photography as it will ignore particles in the water and continue to track your subject.
Other Main Menu Changes
The main “menu” on the EOS R5 is a large, lengthy beast. It has every setting you could possibly want and can seem overwhelming at times. If you follow the steps above, you won’t need to go into the menu very frequently. That being said, there are a few more things that can be useful to know about your menu.
Some Things Are Better Left Off
Gimmicks like auto lighting optimizer, high ISO speed NR, and Long exp. noise reduction are better left off. Do all your post processing in lightroom – don’t let your camera decide how to edit your data.
External Speedlight Control
Chances are you’ll be shooting the EOS R5 with strobes. If you are, you can select your flash settings in the SHOOT2 red panel under “external speedlight control.”
Flash firing – Enable
E-TTL balance – If you are using TTL use standard
E-TTL II meter – Eval (face prtty)
Contin flash ctrl – E-TTL each shot
Slow synchro – 1/250
Your flash function settings and flash C.Fn settings will be determined by the manufacturer of your flash trigger or sync connection. Please refer to them for the correct settings.
Formatting Your Card
To format your memory card, go to the Set UP1 yellow panel and select “format card.”
Custom Settings
As we mentioned before, you can customize your dials and buttons in the orange C.Fn3 panel (the 3rd panel) of your menu.
C1-C3 Custom Shooting Modes
The C1-C3 shooting modes are useful if you want to save your settings and jump to them quickly during a dive. This can be useful if you want to switch to different frame rates for video or between wide angle and macro quickly. To save your settings to a C1-C3 mode, go to the yellow “SET UP5” panel and select “Custom shooting mode (C1-C3).” Then select “register settings” and your preferred custom shooting mode to save the settings.
Firmware
To make sure your camera is updated with the latest firmware, go to the yellow SET UP5 panel in the menu. Select “firmware” and look up the most recent firmware version on Canon’s website to compare it. At the time of this article, the most current firmware was Ver.1.1.1. We hope more firmware versions will be released soon to help further address the overheating issues with the camera.
Considerations for Underwater Video
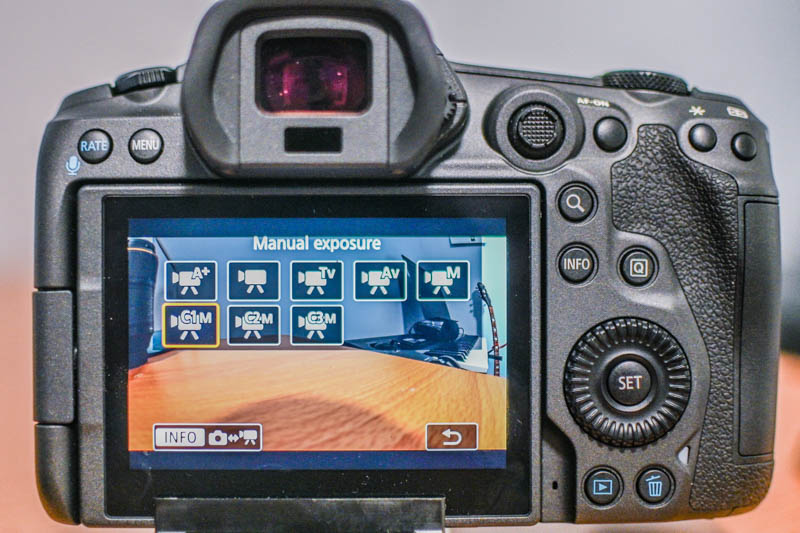
Although the Canon EOS R5 is a true hybrid camera, it’s a very exciting camera for video shooters. Switching to video modes is a relatively easy, two step process. First hit the mode button on the top of the camera. Then hit the info button on the back panel. We highly recommend utilizing the C1 to C3 modes to customize video frame rates, log profiles, etc. That way you can easily switch between settings with quick changing situations. Exposure control, the Q menu, and other controls work very similarly in video modes as they do in video modes. Here are some additional settings to consider when shooting video…
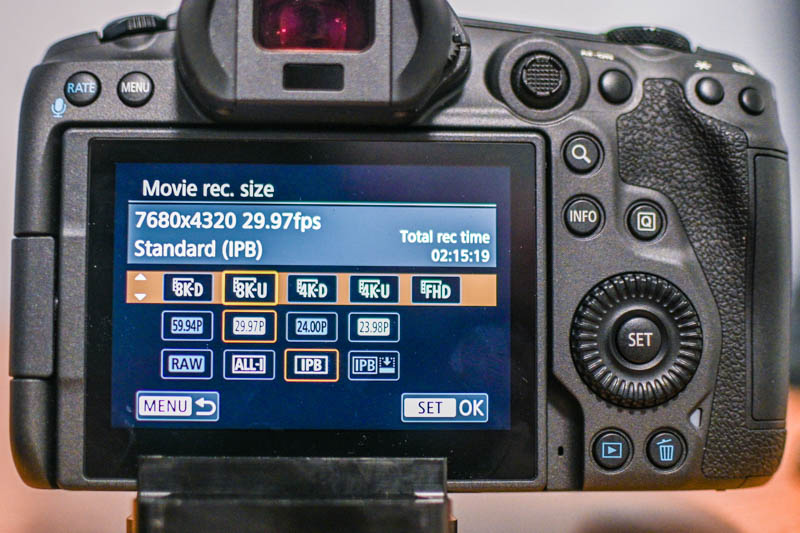
Setting Movie Recording Format and 4K @ 120 fps
The easiest way to set the movie recording format is in the Q menu. Select the “Q” button on the back panel, select “movie rec. size,” then select your recording size, frame rate, and file type. 4K video @ 120 fps, will need to be set in the main menu. Select the “menu” button, go to the red SHOOT1 menu panel, select “movie rec quality,” select “4K” or “FHD” recording, select the “menu” button to go back, “select high frame rate,” and then select “enable”.
SHOOT3 Menu: Canon Log, Picture Profile, and Custom White Balance
The red SHOOT3 menu in video mode includes important features like picture profiles, log profiles, and custom white balance options. To find this menu select the “menu” button and scroll to the 3rd red “SHOOT3” panel. To switch Canon’s Log profile on and off, select “Canon Log settings.” To select your picture profile select “picture style”. To set custom white balance, select “custom white balance.”
Fortunately for Canon EOS R5 users, the R5 has proven to be one of the most ergonomic and intuitive full frame mirrorless cameras on the market. That’s why our settings guide seems so simple and easy to use! Although it is not necessary, the camera allows for plenty of customization that makes it easier for users to plan out their controls based on their diving style, underwater housing, or end goal. The easy dial controls, intuitive Q menu, and useful main menu make for an excellent day to day experience. And if you’re still left with questions, feel free to contact us at info@uwphotographyguide.com!
![]()
Purchase a Canon EOS R5 underwater housing at Bluewater Photo:
Ikelite Canon EOS R5 Underwater Housing
Sea & Sea Canon EOS R5 Underwater Housing
Aquatica Canon EOS R5 Underwater Housing
Isotta Canon EOS R5 Underwater Housing
Nauticam Canon EOS R5 Underwater Housing