Freediving Photography with the Olympus TG-5
A Note from the Editor: The Olympus Tough TG-5 is an award-winning camera known for its versatility, ruggedness, fantastic macro capabilities and extremely high performance-to-cost ratio. After we reached out to our dedicated readers and customers, freediving instructor Pavol Ivanov shared his insights into underwater photography from his fascinating world of breath-hold diving. – Bryan Chu, Associate Editor.
Check out our full review of the TG-5 here!

Underwater Photography – Why we do it!
This sounds like very stupid question… but have you ever asked yourself “why do we really spend so much money on underwater photography equipment?” Well, there is the obvious reason, which is to share the experience with other people. But then there is the less obvious one: creativity! We have this amazing technology at our disposal which enables us to tell a story! And as they say, ‘’a picture is worth a thousand words!’’
Breath-hold Diving in the Past and Now – Accepting the challenge
For those who don’t know what freediving is (no, it is not free-of-charge scuba diving), it is the activity of diving underwater using only one breath taken at the surface. In the past, freediving was commonly used to harvest sea sponges, shellfish, fish and other sea goods, either for self-consumption or for sale on the market. Some people still practice this method of artisanal living today!
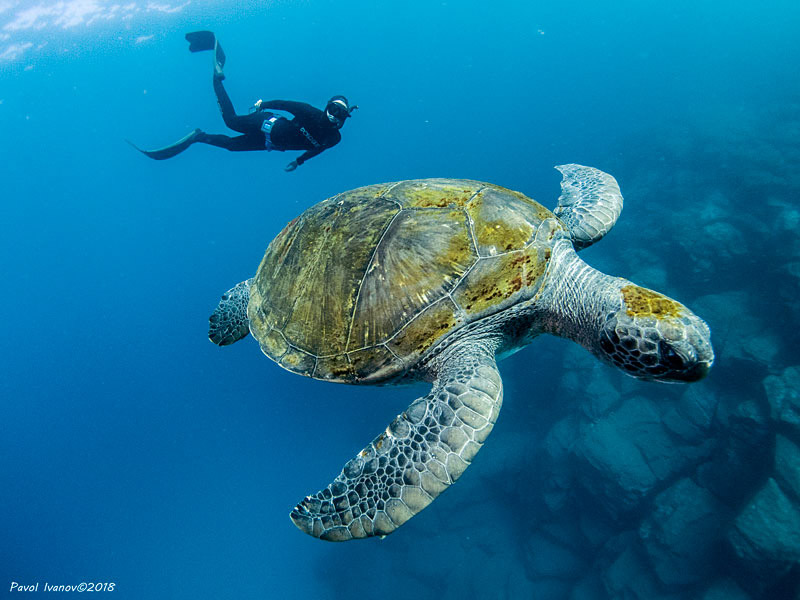
Now, recreational freediving is being taught worldwide. It is practised as a competitive sport, including freediving photography (in some countries)! For many people, the decision to learn to freedive comes from wanting to challenge themselves in a very extraordinary way. Who doesn’t want to be a Marvel hero? After only 2 or 3 days of learning and training, being able to dive to about 20m depth (66 ft) on one breath sounds pretty incredible, doesn’t it? However, taking good shots with a camera, while holding your breath and swimming underwater, takes a bit longer than just a few days. Same as with scuba, mastering diving first and then taking shots later requires more than just a few dives under one’s belt.

Photography Equipment for Freediving
Correct streamlining, buoyancy, equalisation, head positioning, movement, awareness, and relaxation are some of the many very important components of freediving. Every inefficiency costs you precious oxygen, of which you have a very limited amount. Having heavy equipment and pushing big lenses, strobes, lights and strobe arms through the water costs air. Less air means less time and distance under water. This is why most freediving photographers choose more compact designs; cameras which are easy to control, setup, and swim with.
In freediving, we have to be very aware of our buoyancy, as it is something which is changing constantly. Most of the time, we are very positively buoyant in shallow water and very negatively buoyant in deep water, which can both help and hinder us. (Editor’s note: since freedive weighting is constant, but at depth air spaces become significantly compressed, freedivers will always be less buoyant the deeper they go. Safe freediving weighting ensures that the diver has positive buoyancy in shallower water so they can make it to the surface in an emergency). In deep water we can enter into something called freefall, which can often allow us to drop right on the top of our subject, sometimes getting very close without being detected. However, the positive buoyancy in shallow water sometimes gets in the way of taking our shot; in this particular situation, exhaling all of our air can help, but of course this sacrifices our bottom time for that dive.
I have chosen as my weapon of choice the Olympus TG5, with the Olympus underwater housing and the UWL-04 wet wide angle lens. Most of the time I prefer to shoot in ambient light as I believe that this can be one of the great advantages in freediving; getting underwater scenery with a nice, natural look. If I need to highlight a particular scene or object I use a video focus light; the key with this is to get as close to the subject as possible.

My Thoughts About Shooting with the TG-5
Since this camera doesn’t have full manual mode, having 2 programmable modes (C1 and C2) straight on the dial of the Olympus TG5 is one of the key functions for usability. I choose to shoot in Aperture priority mode. It is possible to save any setting of any mode under one of the two C1 or C2 quick dial options. My most used mode is for wide angle photography, so this is my C1 option. Since we don’t have an option to set the shutter speed, we have to start with ISO setting first as this will give us more options for Aperture setting later. Depending on the light available, the shutter speed I need (automatically adjusted by the camera) and the subject, I dial ISO in with just a couple of clicks on the quick menu.
Normally, when shooting relatively shallow I keep the ISO low at 100. For deeper photos in less light I will go up to ISO 400, which will immediately give me more shutter speed, especially with Aperture at 2.0 or 2.8. It is really difficult to shoot with much smaller apertures when in deep water, even in clear waters, with this camera. Another trick to use is to change the exposure compensation, again very quickly on the quick menu on the shooting display, to change and improve the shutter speed as needed. However, most of the time we end up pushing the ISO. Correct shutter speed is very important in freediving photography, as we keep moving almost all the time and it can also be used to give a sense of speed in the water to moving objects.

I highly recommend using the RAW photo format. Normally I use single photo shoot mode, but I do also sometimes use sequential photo mode up to 20fps and Pro Capture mode, which has helped me to capture great over-under photos even on rough surface days. My C2 programmable dial is set for shooting macro, where I can just remove the wet wide angle lens and take nice macro shots, getting the subject really close to the lens of the camera. Again, to save this mode I would actually use microscope mode and dial in ISO. In Microscope mode I cannot adjust the Aperture directly, but I take advantage of the manual focus and colour focus peaking mode, which can be set up in the main menu of the camera. There are some amazing macro shots to be taken with this small setup. I also think that for a beginning photographer, seeing how aperture and ISO affects the shutter speed and behaviour of the camera is a great way to learn about manual options for the future.
For lights, I use a set of iDiving 105 video lights, which are pretty small and light and produce 1500 lumens each (at 5800K). It is not much but they help me to bring up some colours on the subjects I shoot. Most of the time I prefer to shoot with ambient light, since where I dive most we are lucky to have a lot of sunshine and clear water. I do take the video lights most of the time for shots which are a little deeper, or shots where I am shooting against the surface (though I would like a bit more lighting power in these situations). In the future, I am planning to test this setup with strobes, so perhaps my next article I will talk about that!
My original idea was to go for larger setup like the Olympus OM-D E-M5 Mark II. However, for me the most important criteria was how easy I can set up, move and take care of the camera, since I do use it a lot during my work and on trips with clients as a freediving instructor. I also quite like that the camera itself is waterproof, so I don’t have to worry too much about any potential leaks or accidents. The camera is capable of taking good photos, though of course it would be nice to have a bigger sensor and full manual shooting options, as well as better lens options. I will have to keep that in mind for my next setup.

Space for Creativity and Stepping Out of the Crowd
The biggest difference between scuba and freediving photography, in my opinion, is the ability to quickly adjust angles and the positioning of the photographer relative to the subject. This provides a lot more space for creativity, and this is one of the biggest factors which motivates me to shoot pictures while freediving. If it is a picture of a diver descending on the way down, at the bottom gliding next to the animal or object, on the way up, or even on the surface, all of this can be done in one single dive. For this reason I really value having quick saveable custom modes which I can dial in by just a turn of the button, any time during the descent or ascent as I need.
As far as macro, this is one area where scuba wins big time! It is really hard to stay down, find the perfect frame and focus while holding your breath and fighting buoyancy. Because it is very difficult (but not impossible) to do in freediving, any successes are very rewarding! So I welcome the challenge and I am a very big fan of the TG5’s incredible microscope mode, which does allow the acquisition of some great-looking macro shots!


Pros and Cons – Your Choice!
Freediving as a sport is growing; as an instructor I see more and more people of all age groups wanting to learn to freedive! Taking photos while freediving is a natural progression, and adds another element of creativity which can be very enjoyable for both photographers and the audience. The obvious disadvantage of breath hold diving is counteracted by the freedom of movement, as well as the ability to be in the water for a very long time (over the course of the day) and move in a large area without having to worry about air supply and decompression time. The ability to fly on an airplane immediately after freediving is a big benefit as well!
The big disadvantages are that you lose out on the ability to capture incredible macro shots, the ability to look deep into caves, or the ability to spend lots of time searching for very little animals. Having the privilege of air supply and being able to really take your time makes me want to learn to scuba dive as well! And in the end, I think scuba and freediving both complement each other very well. Being able to freedive instantly improves comfort and air consumption in scuba diving, and being able to scuba dive gives a lot more potential for great macro shots and more time to work with your camera underwater. It seems like the best choice is to do them both! (Editor’s note: as a dedicated Scuba diver who recently took a beginner’s freediving course, I agree 100% with this).
Wishing you happy and safe photo hunting!
Gear Links
- Olympus Tough TG-5 Camera
- Olympus PT-058 Underwater Housing
- Olympus TG-5 Camera and Housing Bundle
- Olympus TG-5 Camera, Housing and Sola 3000 Video Light Bundle
- UWL-04 wet wide angle lens


