Five DSLR Life-hacks for Great Macro Photography
If you are new to underwater photography, chances are you are starting to discover the wonderful world of tiny critters that await their turn in front of your lens. Not knowing where to start, what lens to use, what camera settings work best, and many other uncertainties can prevent a budding photographer’s success. Fortunately, you can get great results no matter how advanced your photography skills are, by using the following five tactics.
The Right Macro Lens
If you are using either a full frame or a crop sensor DSLR camera, a 50mm or 60mm lens is a good choice for macro photography. It enables you to shoot critters from the size of a basketball to the size of a golf ball. You can add a diopter or tele-converter as your skills improve for shooting tinier subjects, and the lens allows you a minimum working distance of about 7-9 inches. Another good choice for both crop sensor and full frame cameras is a 100mm or 105mm lens. This lens is my personal favorite because of its versatility. When paired with a diopter it is capable of shooting critters that are just millimeters big, but it works well as a portrait lens too. I have even used it for large subjects in a pinch.


Lighting Techniques
Artificial light is essential to good macro photography. You can achieve great results with either one or two strobes. TTL works well for macro subjects because the output of light coincides with your camera’s settings, giving the optimum amount of light for the conditions you are shooting. My preferred method, however, is to set the strobe power manually. If you choose manual settings, start with your strobes on half power, check the image in the LCD, and adjust them up or down according to what you see. Keep in mind that if you have two strobes, they don’t have to be set at the same power. You can get nice texture by setting one of your strobes on a lower output than the other.


ISO
ISO is one of the three settings every DSLR user must understand. In simple terms, ISO is how sensitive your camera is to available light. A low number such as ISO 100 is less sensitive and a high number such as 1600 is more sensitive. For macro photography, you can get great results every time with an ISO of 100.
Shutter Speed
Like ISO, shutter speed has an effect on the amount of light that hits the sensor and is measured in fractions of a second. For macro photography, the strobes are doing all the lighting work, so the goal of shutter speed is to block ambient light from hitting the sensor. Fortunately, you can set your camera to the highest shutter speed your camera’s flash will sync with. 1/250th of a second is standard, but you can use 1/320th if your camera allows (or 1/200 for many Canon shooters).
Aperture
Aperture describes the size of the opening in the lens. Called an f-stop, a high f-stop such as f/18 is a small opening, and a low f-stop such as f/5.6 is a large opening. The opening in the lens also has an effect on light, but it has another function referred to as depth of field. If you want to have a lot of depth of field to produce a tack sharp image you should use a high f-stop such as f/22 or higher. If you want a shallow depth of field, use a low f/stop such as f/5.6 or lower. Keep in mind that a higher f/stop will require more light from your strobes, and a lower f/stop will require less.

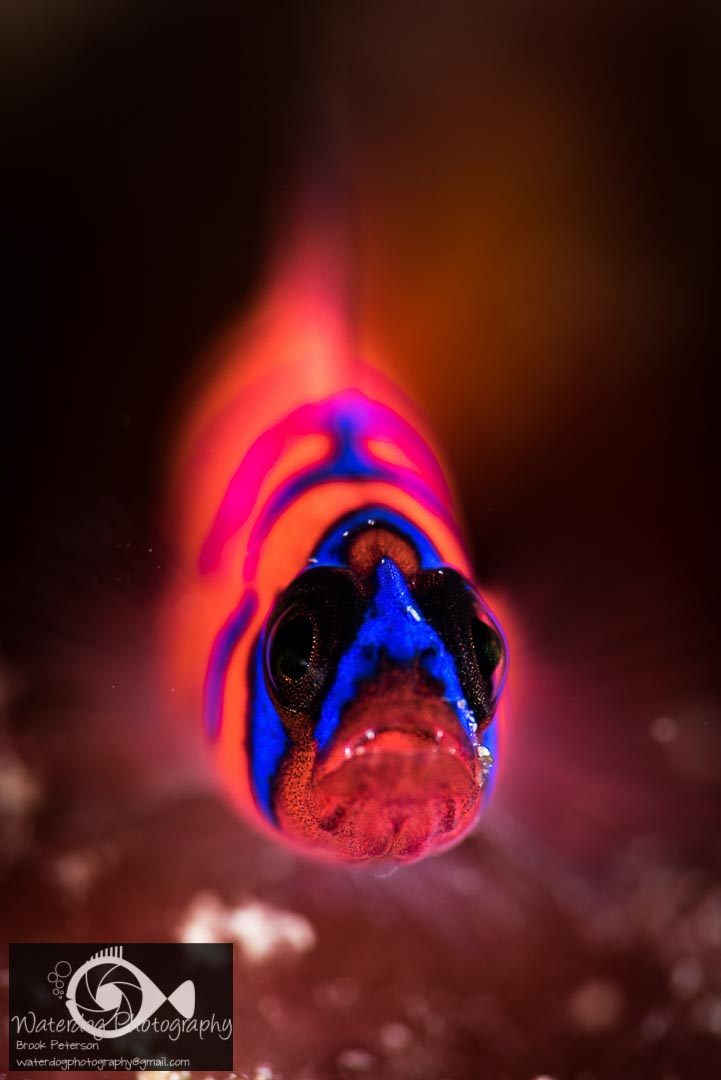

Photo left: This image was created using an open aperture of f/5.6 to blur everything except the animal’s face. Nikon D810, ISO 100, 1/320th, f/5.6
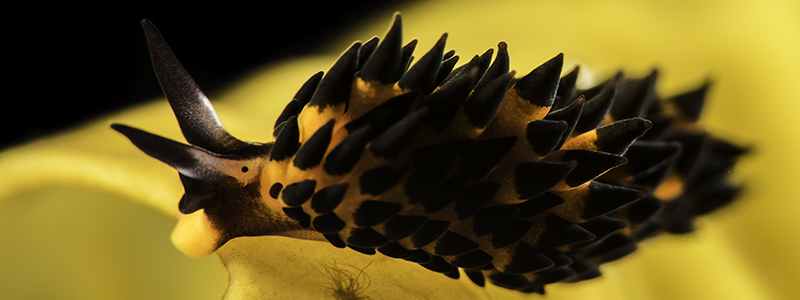
Photo right: This animal had an interesting gill plume in the back that I didn’t want to lose, so I used a greater depth of field to capture that detail. Nikon D810, 105mm lens, ISO 100, 1/250th, f/22
Mastering manual camera settings can be an overwhelming task, but one that is well worth the effort. I recommend starting with a 50mm or 60mm lens, one or two strobes on low power, an ISO of 100, Shutter Speed of 1/250s, and an aperture of your choosing. With these five settings, you are sure to get great images every time.


