Taking Macro Shots Underwater with the Canon G12
Since the introduction of the Canon Powershot G9 and it’s associated underwater housing the WP-DC21, the G series of cameras have fast become the compact of choice for many scuba enthusiasts seeking their first foray into underwater photography. With it’s affordability, excellent image quality and great ergonomics that allow an exceptional amount of manual control, many first time buyers find the G series a great learning platform before graduating to DSLRs. After shooting with the G11 and G12 for close to two years now, I have many tips and tricks that can help you capture hat perfect photo.
The latest variant of the G series, the G12, arguably encapsulates the yardstick against all the other premium compact cameras. While retaining all the desirable qualities of the G11, the G12 now has a dial at the front of the camera. This means that there is now a dedicated control surface for aperture, shutter speed, ISO and exposure, which allow true full manual controls that some DSLRs simply don’t live up to. Additionally, the G12 features video recording in HD 720p resolution, so users can try their hand at underwater videography as well. Many underwater housing manufacturers have caught on to the camera’s popularity, so there are a whole plethora of housings, lenses and accessories to suit every budget, which will help the user get the best out of this awesome camera.
The G12 is an excellent choice for taking macro subjects underwater, because beneath the apparent specifications of the camera there are a few features worthy of mention:
The Lens
The G12 is equipped with one of the sharpest lenses ever put on a compact camera. The fact that this lens has been used on the G series since the G10 and still holding it’s own against the competition is a testament to it’s optical quality.
Focusing Distance
The closest focusing distance on the G12 is 1cm. That means if you place the lens of your camera 1cm away from the subject, with the lens at it’s WIDEST setting, it will still be able to autofocus on the subject and give a sharp image. This is a very handy feature to have in your arsenal, because although you hardly ever go so close to a subject in real world shooting, such a close focus distance means you can concentrate on getting the subject in the frame and getting a good composition at realistic distances (5cm or more) without worrying about your image not being in focus. Zooming all the way in on the subject actually gives a smaller focused image than if it was left at the widest setting, because the minimum focusing distance increases to 30cm.
Getting Ready to Shoot
Once you have your G12 and your housing, it’s time to go take some pictures! Let’s start from the beginning and assume that all you have is a camera, underwater housing and a great desire to take some beautiful shots underwater. That leaves you with two choices: not using the built-in flash for ambient light photography, or using the camera flash to illuminate your subject. There are some focus settings that will apply to both ways of shooting which include:
-
AF Frame set to Flexizone
-
Digital Zoom set to OFF
-
AF-Point Zoom set to ON
-
Servo AF set to OFF
-
Continuous AF set to ON
-
AF-assist beam set to OFF
-
MF-Point Zoom set to OFF
-
Spot AE point set to AF POINT
With these settings you will be ready for almost any situation (or subject) that you may encounter.
Ambient Light Macro
-
Turn on macro mode! You would be surprised how often this seemingly-obvious step is overlooked.
-
Set the ISO to 400. Not utilizing a flash means we need to make use of the available light around us to illuminate the subject. Increasing the light sensitivity of your image sensor will greatly help your shot exposure. Turning up the ISO will induce more noise in your images but for the G12 at ISO400 the increase in noise is almost imperceptible.
-
Switch to Av Mode. This means you set the aperture manually and leave the other settings like the shutter speed up to the camera to decide the optimum exposure. This allows you to concentrate on framing the shot.
-
Set your aperture to f5.6. Although f8 gives the sharpest image, I find that the camera will almost always choose a shutter speed slow enough to see the effects of camera shake. Camera shake is more pronounced during scuba diving because the diver is floating and moving all the time. I find that f5.6 offers the best compromise between image sharpness and preventing camera shake.
Macro with Camera Flash
-
Set ISO to 80. Now that you have the help of flash to illuminate your subject you can dial down the sensitivity of the image sensor to reduce noise in your shot and get better image quality.
-
Use the diffuser provided with the underwater housing. Due to the design of underwater housings for the G12 the flash from the camera will be blocked by the front port of the housing, which gives a pronounced light falloff from the middle of the image onwards. Using the diffuser would somewhat mitigate the problem but will not fully solve it.
-
Set your flash mode to ON.
-
Stick to Av Mode. However you can now set your aperture to f8. Another advantage of using Av mode is that when depressing the shutter fully to take a shot, the camera will set off a pre-flash to determine the best flash power for perfect exposure.
-
If you wish you can try setting the shutter speed manually. I would suggest an initial setting of 1/125, reducing the shutter speed if the exposure is too dark or vice versa.
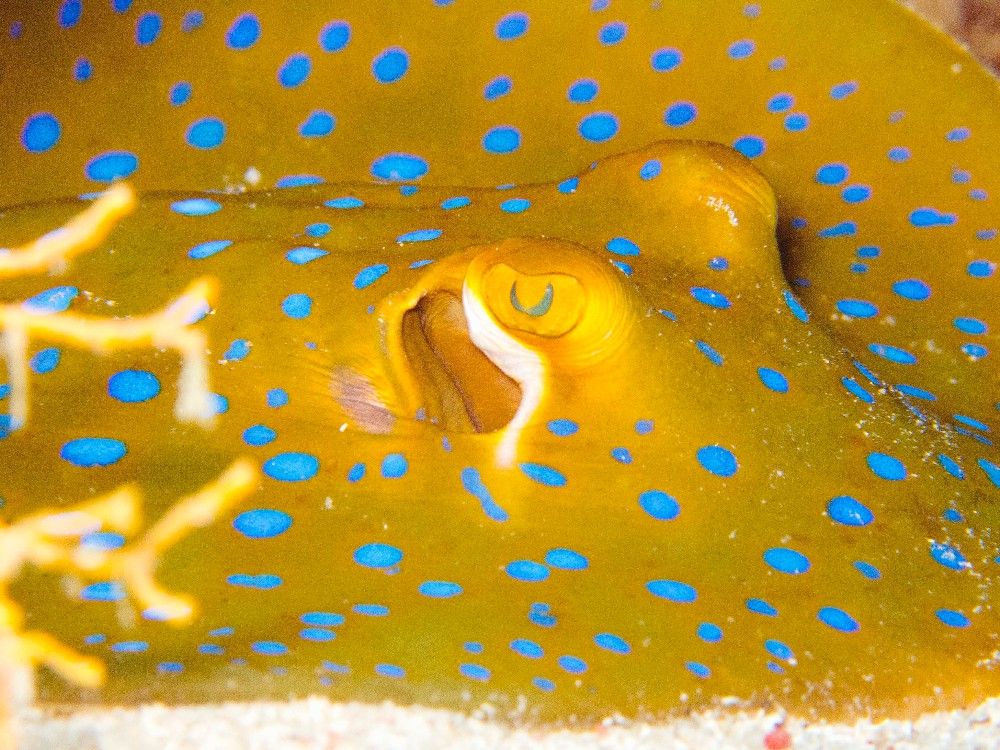
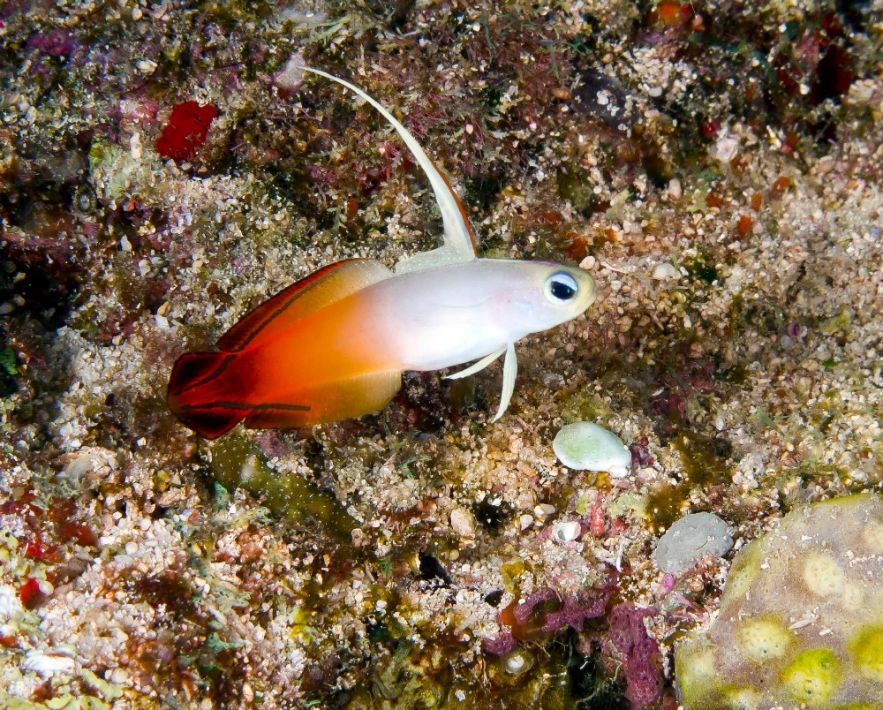
Blue spotted stingray. Shot with camera flash on. Av mode at f5.6 at ISO400. 1/60s.
Now with Strobes
One possible drawback of using camera flash to illuminate the subject is that you are more likely to get backscatter in the images. This is attributed to the particles in front of and behind the subject, which may be lit up, resulting in reflections picked up by the image sensor. This causes the “snowfall” effect on the image, which is usually undesirable.
Its not possible to change the direction of the flash built into your camera, and as far as I know there are no compacts currently in the market or in the pipeline that will come with a swivel built-in flash. So we will have to rely on external flash units known as underwater strobes. Strobes help us control the direction and intensity of the light falling on the subject. Not only can they help minimize backscatter and illuminate your subject adequately, they also allow you to control where the light is coming from, which allows the photographer to explore a myriad of creative opportunities to capture stunning images.
The issue of strobe positioning has been talked to death, and while some strobe positions have gained traction among the majority of photographers, there is almost always more than one option applicable to every photo opportunity. Instead of agonizing and arguing about what ultimate strobe position to adopt, the focus should instead be on making your camera as “macro-friendly” as possible before and during the dive.
Before the Dive
Setting your Operational Distance
As mentioned earlier, the G12 can focus up to 1cm from the subject at it’s widest setting, but the minimum focusing distance increases to 30cm all the way to 50cm when it is zoomed in. You can take effective camera shots 50cm away, but do remember that at longer focal lengths the risk of compromising the shot due to camera shake increases. With that in mind:
-
Find a nice flat surface in the shade, place your G12 rig on one end, and a small non-reflective object about 35cm away on the other.
-
Choose your preferred strobe position and adjust till the strobe lights directly face your object. If your strobe has a focus light, use it for greater accuracy.
-
Set ISO at 80, aperture to f8 and shutter speed to 1/250.
-
Set your strobe power to a quarter of it’s power. Take test shots and adjust the strobe position accordingly until the object is well illuminated.
The reason why it is suggested to setup the camera to illuminate the subject at that distance is because in real world shooting, focusing distances on the G12 range from between 5-25cm. You go closer to the subject than ‘intended,’ thus making more use of the edges of the flash emitted rather than getting the full-on blast from the strobe. Termed “edge lighting,” images illuminated this way tend to look more natural, and more importantly it reduces the chances of backscatter showing up on your shot. This is not an exact science, but I find it a good way to start off.
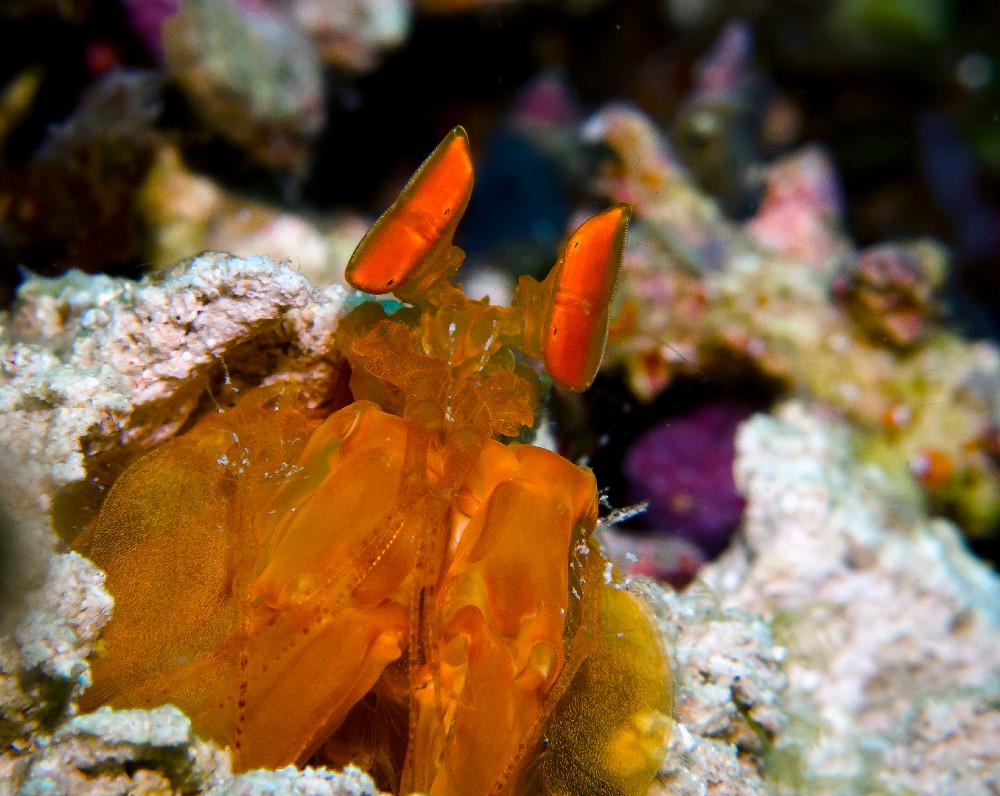
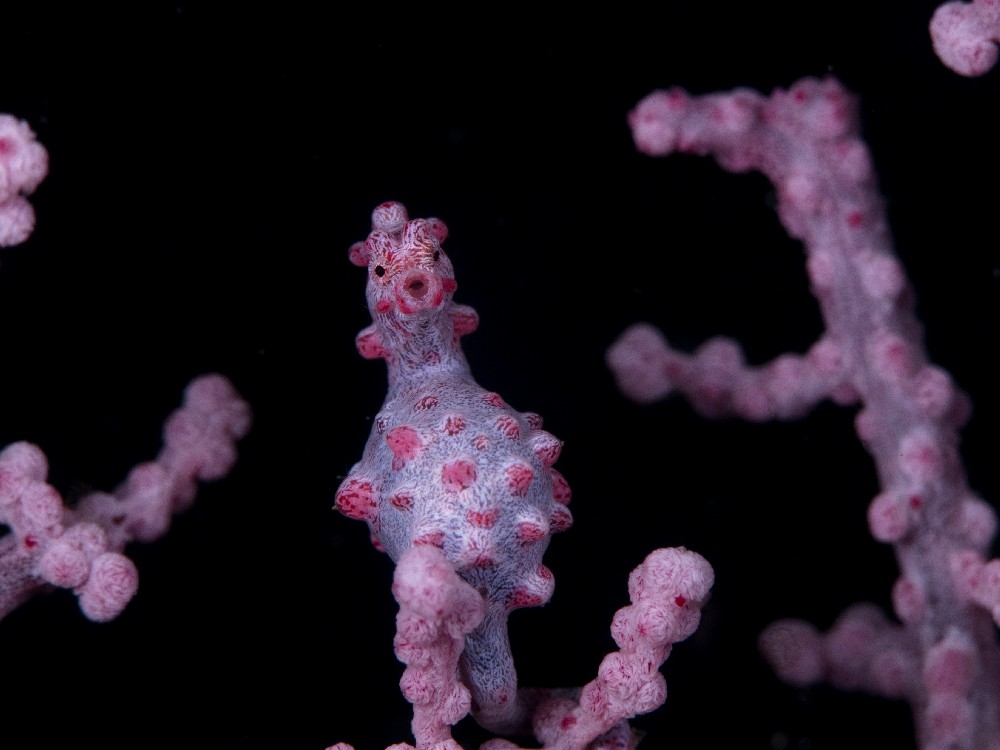
Golden mantis shrimp. Taken with single Inon D2000 at ISO80. Shot with manual mode at f8 and 1/250s.
During the Dive
Tweaking Strobe Power
Water is a great absorber of light, which is why at depths above 15 meters things tend to get dark pretty fast. Light emitted from the strobe also gets absorbed, which means strobe power settings that might be perfect for shooting at 15 meters may not work at 25 meters. Now that we have our strobe positions more or less set, let’s worry more about getting the right amount of light on your subject.
-
When you have descended to about half of your planned maximum depth, pick one spot on the reef or wall, with the camera at full zoom and strobe(s) at half power, take a test shot.
-
Adjust strobe power if necessary and repeat the process until you are happy with the exposure.
-
Take test shots again when you have reached your maximum depth and adjust strobe power until you get the right exposure.
As light conditions change, take test shots as you see fit. A little preparation goes a long way to help you save time on the technicalities.
You may have noticed that I am concentrating most of my efforts on controlling strobe power and not changing the aperture or shutter speed of the camera. In fact, I am mainly fiddling with my strobes underwater. Camera settings only matter if you can make out what the image is, so getting the lighting right is a top priority when doing underwater photography. Taking pictures underwater is essentially capturing images in a sub-optimal light environment, so we are compensating all the time. If the picture is too bright or too dark you will not be able to see that great sunburst captured with that high shutter speed or that shallow depth of field that only allows the fish’s eye to be in focus. Get the lighting right first so that you can fully showcase all your artistic and aesthetic talents.
White Balance
At this juncture it’s time to introduce another powerful weapon in the G12’s arsenal: the shortcut button. This can be set to custom white balance. Different parts of the light spectrum gets absorbed as it goes through water, especially red light, which explains the blue-ish tinge we get on some underwater shots. The auto white balance on the G12 is adequate and light from the strobes can mitigate the problem to a certain extent, but knowing how to set your own white balance can save you a lot of time on post-processing. This could influence your decision to discard that great shot because the color might be “off.”
Setting custom white balance is easy:
Go into the camera settings menu and set the shortcut button to custom white balance.
With every 5-8 meters change in your depth, point your camera at a white surface like a slate and press the shortcut button. The camera will take a shot, analyze it and adjust the white balance in the camera. You could also use a white patch of sand on the reef or the palm of your hand to achieve this.
One drawback of using custom white balance is that you will need to be mindful of changes to your depth between shots, or you may get a red or green tinged image popping up on your screen.
Using Macro Lenses
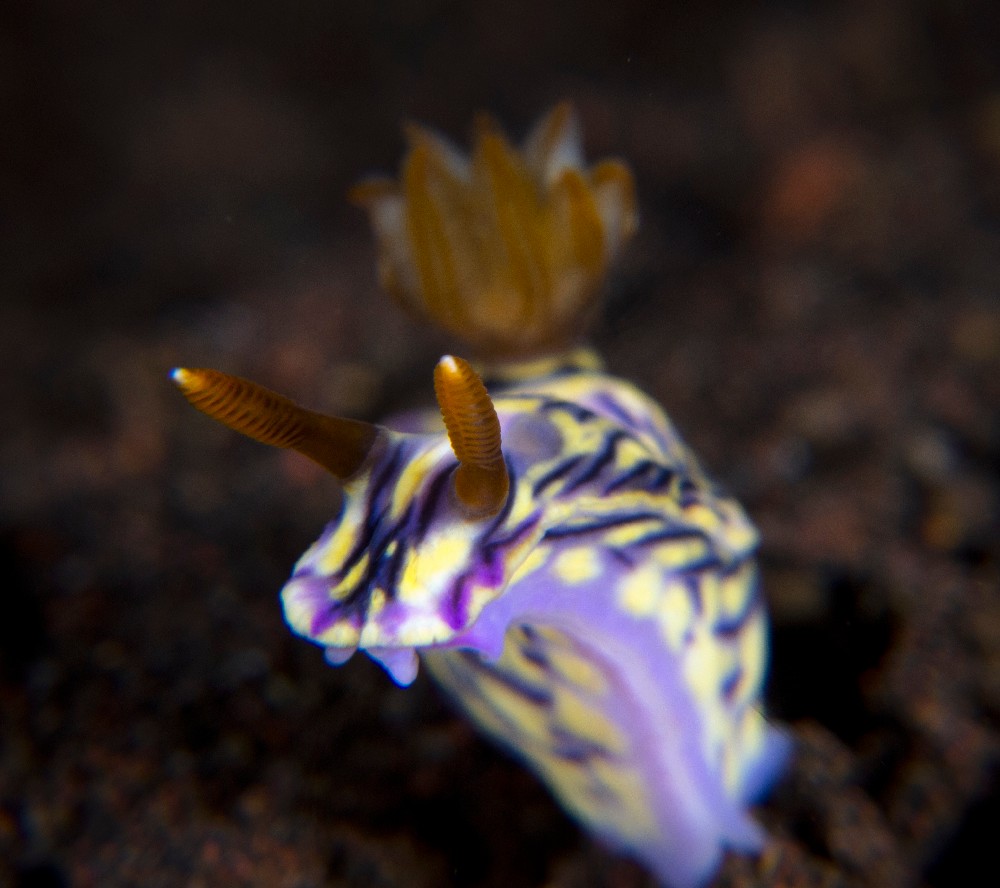
As one progresses in macro photography, smaller and smaller subjects will begin to appear on your radar. You may want to focus on the blooming gills of a nudibranch, or wish you could fill more of the pygmy seahorse in the frame, sadly realizing that even after your best efforts the pygmy seahorse can’t get any bigger in your image. The lack of magnification for macro is one of the shortfalls of compact cameras, and although the G12 is as capable as they come for macro shooting in compacts, it does need some extra help when taking small subjects. That’s when external macro lenses come to the rescue!
Macro lenses are essentially magnifying glasses that you put in front of your lens to get better magnification. They help obtain greater magnification than your camera can do alone, and add more versatility to the type of shots you can achieve. However, there are some caveats to using macro lenses:
-
You will need a lens adapter. There are many adapters that suit different housings, so obtaining one should not be a problem.
-
Autofocus is disabled. The camera lens is meant to focus within certain parameters. Adding a macro lens will throw it off, so that means you will have to manually focus with your eyes, essentially moving the camera back and forth until a clear crisp picture appears on your LCD screen.
-
The working distance becomes shorter. Using macro lenses means you will have to move closer to the subject to achieve focus. This can be a challenge for subjects that are shy or skittish.
-
Depth of field decreases, meaning the distance between the nearest and farthest objects in a scene becomes narrower. In this situation you would need to be careful of the parts of the image that you would like to be in focus.
There are many upsides to using macro lenses:
-
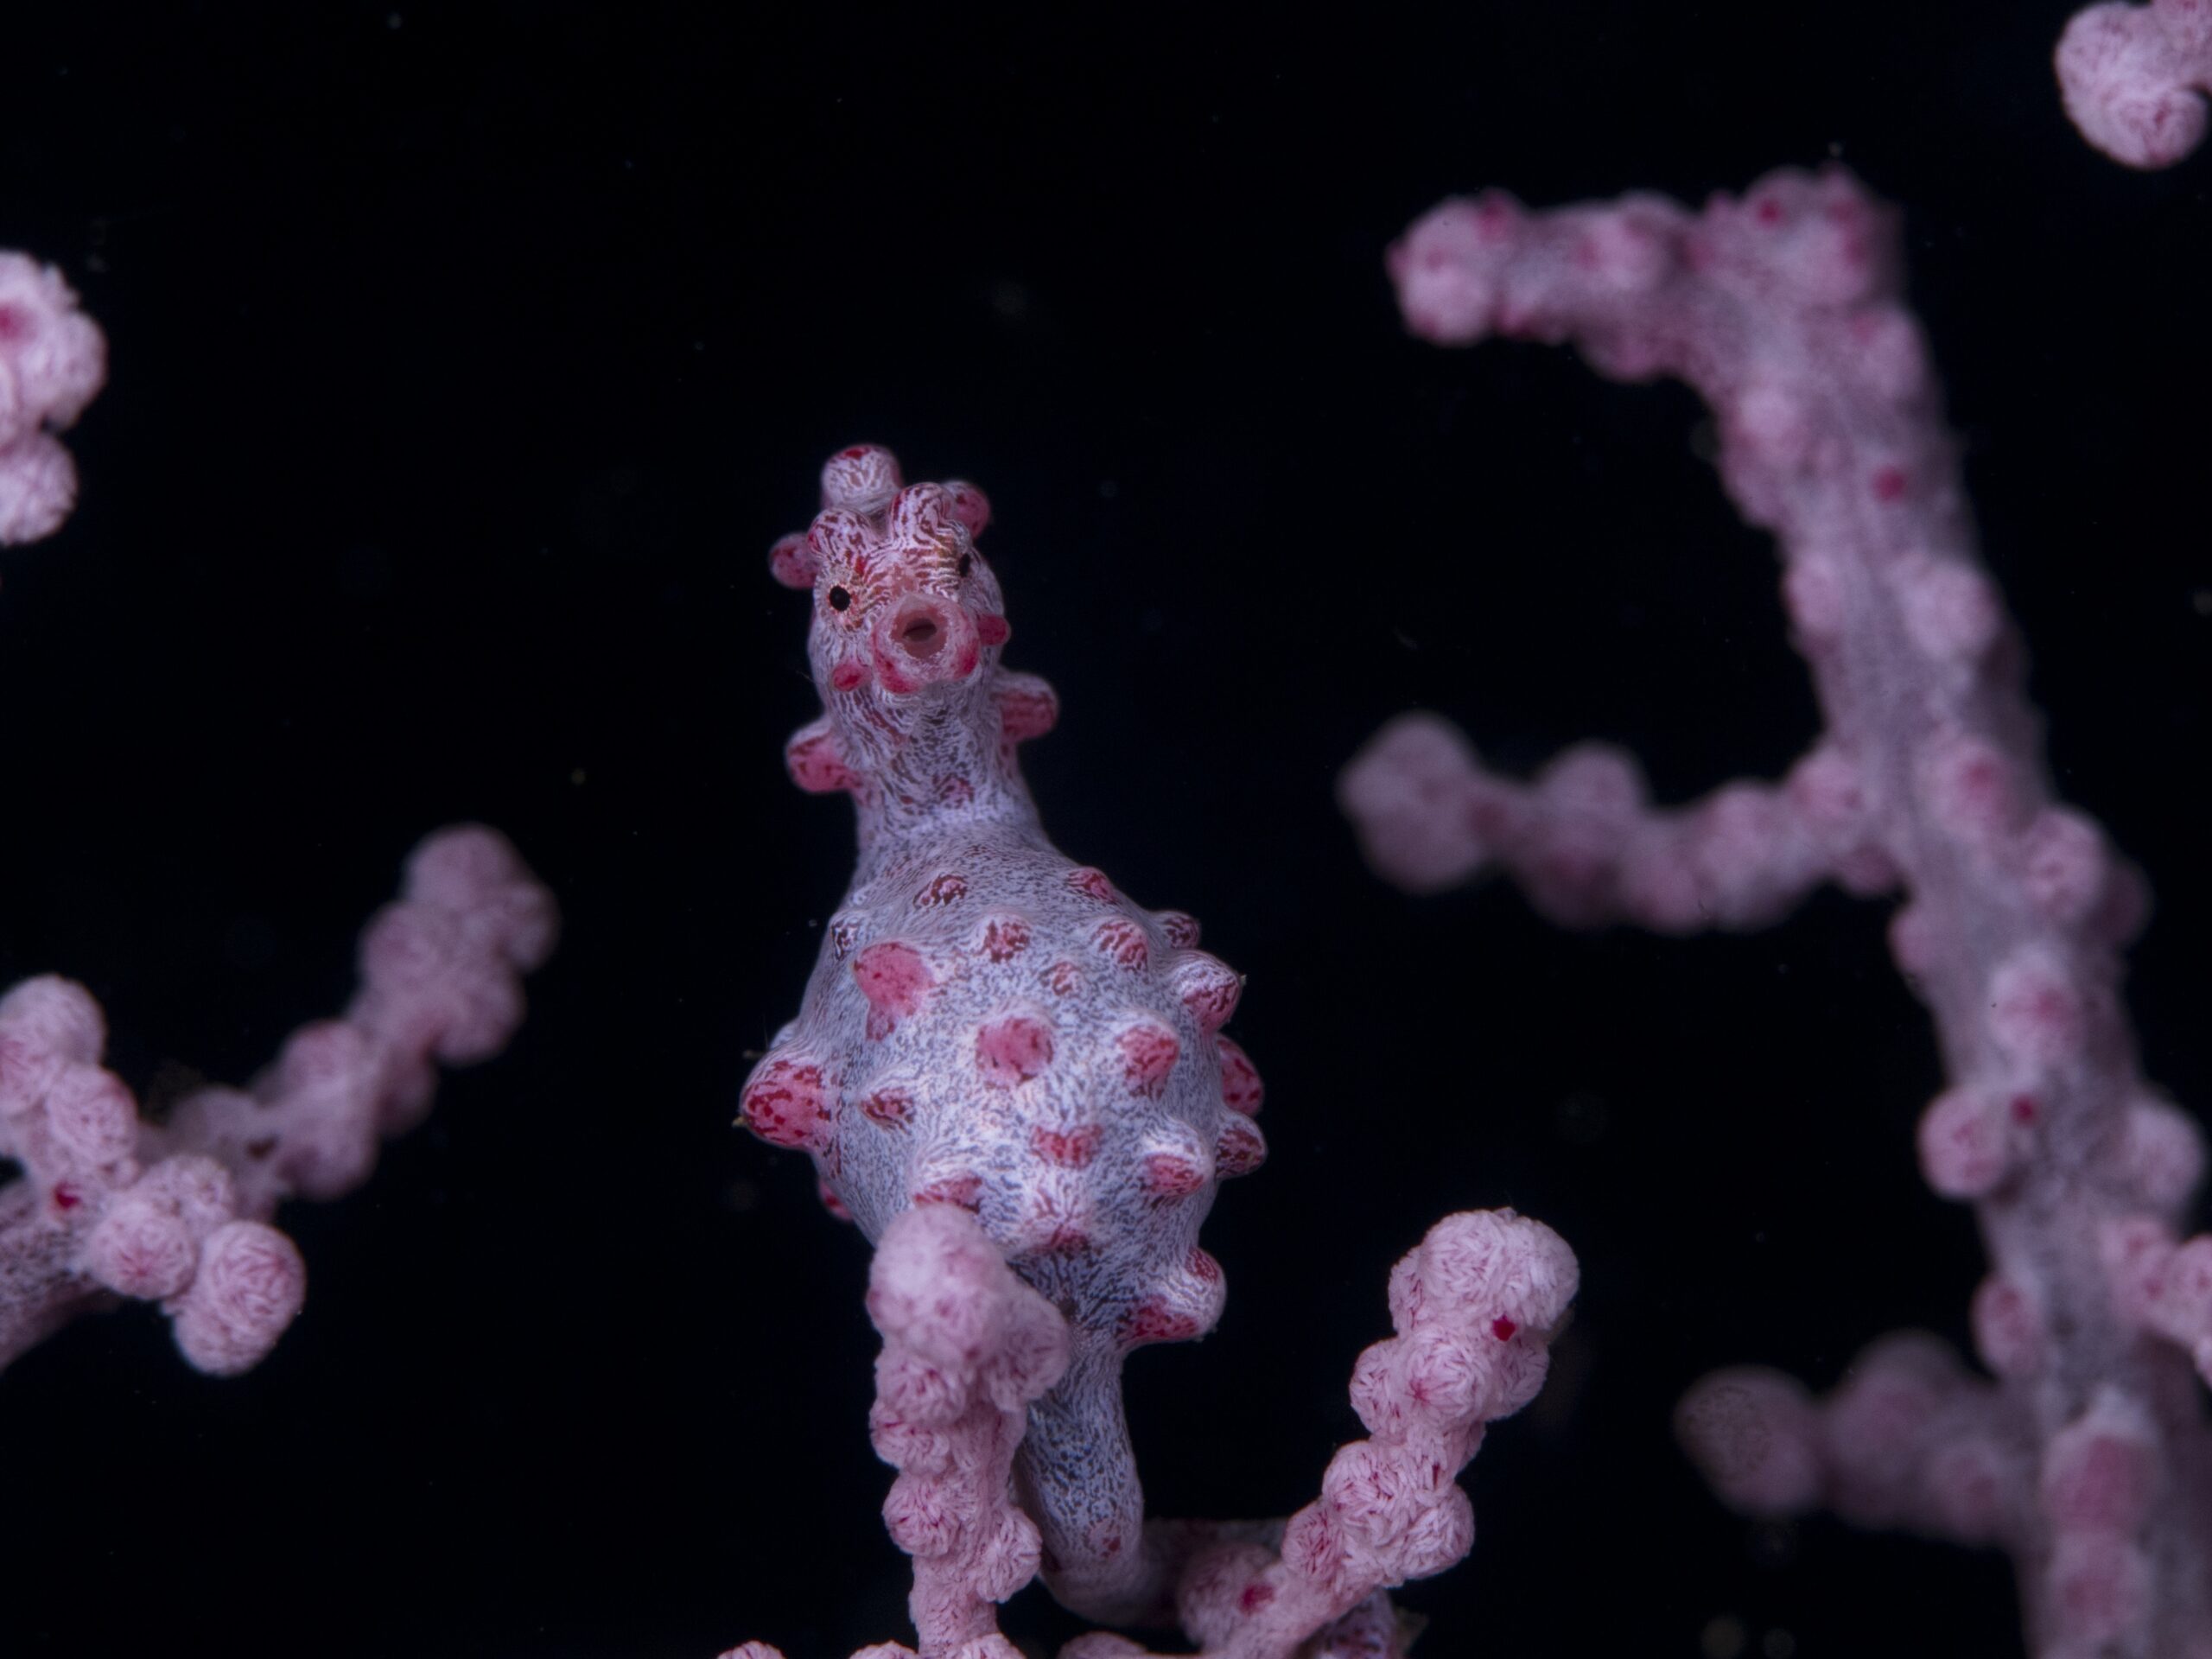
The subject can be captured in more detail. For example, now the rhinophores (horns) of a nudibranch can be captured in greater detail, or the O-shaped mouth of pygmy seahorse.
-
Portrait shots of small subjects are possible. Few people have seen such creatures up close before, making your photos more dramatic.
-
There is less ambient light to wreck havoc on your image. Consequently there is less chance of backscatter.
-
Shallow depth of field, if used creatively, can be aesthetically pleasing.
Which Macro Lens to Use?
There are many macro lenses to choose from, the biggest differentiating factor being it’s magnification power. This can range from +2, having a relatively small magnification, all the way to a +10, which can achieve magnifications that can make the subject look larger than its actually is. There are mathematical formulas for this that are meaningless underwater, so your judgment will have to come into play. What you’ll need to do is to take time to analyze the subject and it’s size, decide how you want to take a picture of it, which determines how much magnification you need or if you need to add a macro lens at all.
After some trial and error I have come up with a personal rule of thumb when using the G12, by literally using my thumb:
-
If the subject is noticeably bigger than my thumb, I would try not to use any macro lenses and rely on the close focus distance of the G12. For portraits and specific parts of the subject I may choose magnification power up to +7.
-
If the subject is around the size of my thumb, I would add a +5 lens for profile shots and a minimum power of +7 for portraits.
-
If the subject is much smaller than my thumb, I most probably would go straight for a +7 lens at least and may even use a +10. Sometimes I even stack lenses on top of each other to do supermacro.
These guidelines are not scientific, but could be good for starters. It does help me streamline my decisions underwater for my thumb is always at hand for comparisons should I need them.
The G12 can almost be considered a poor man’s dSLR, with it’s relatively compact size, superb image quality and wealth of aftermarket accessories, making it a very compelling choice from beginners to serious hobbyists alike. It’s not perfect, but when it comes to taking macro shots underwater the G12 is without a doubt the best in it’s class.
Further Reading:


