Lightroom Tutorial: Time-Saving Tips for Managing Photos
Culling and managing photos is easily one of the most painful and time-consuming parts of my post-processing workflow, and I think that goes for most underwater photographers. By the nature of what we do, a lot of our photos don’t quite turn out the way we want. It is often necessary to take many attempts at a subject to get what we want. This can leave us with 10, 20, or even more photos of the same subject to sort through, without one clear “perfect” shot standing out above the rest.
Although it’s more exciting to focus on learning new techniques and tricks for processing individual photos, if you are not a well-tuned photo culling machine, the biggest area for time-saving in your post-processing workflow is likely photo culling.
This video covers some Lightroom tips and tricks I have picked up through my experiences. None of this is rocket science, but that doesn’t make it any less important. If you do not want to watch the video (I don’t blame you, as that involves listening to me) but would rather see this information in article form, I have included that below as well.
1. Quality Over Quantity
If you are looking through someone’s photos, would you rather see an album of 30 photos, with 20 great shots and 10 decent ones, or an album of 80 photos, with 20 great shots, 20 decent ones, and 40 mediocre ones? I always prefer to see a smaller album of higher quality images, and I think most people are the same. Seeing many different takes on the same subject can be interesting, but I really want to see the best one or two takes of that subject, and then move on. Not only that, but if some great shots are buried in a bunch of mediocre ones, I might even skip over those great ones because the mediocre ones just make me skim the album!
Of course, when it comes to culling photos, this is easier said than done. What makes it so difficult to be ruthless with our photos is that we put a lot of time and effort into them, and we have a personal story and a context for each photo. This is even more true with underwater photography, as it is a lot more difficult than most land photography! So it’s important to remember that other people don’t have the story or context; they just have the photo (plus whatever caption we use).
I’m not advocating ruthlessly getting rid of all of your fun photos and ones with genuinely neat stories. Or that one not-the-best shot of a blue-ringed octopus, which happens to be the only one you have ever gotten of that subject. But, overall, less really is more. Every mediocre photo you include in your album takes a little bit away from your really great shots. As some photographers say, you are only as good as your worst shot. So trim as many of those mediocre shots as you can, and make room for the great shots to really shine!
Below I have posted screenshots of two of my albums, to demonstrate this. The first is from my very first underwater photography trip, in the Sea of Cortez. It has 131 photos, many which are repeats of the same subject. There are some good photos, but they get drowned out by all of the mediocre and similar shots I decided to keep alongside.
The second is from a recent dive trip to South Australia. I did about half as many dives there as in the Sea of Cortez, but I only kept 23 photos. Yes, there are lots of sea dragons, but that was really most of what I was shooting, and they are mostly quite different subjects, different backgrounds, and different compositions, each which I think adds something. There are a few 3-star shots, but most I rated either a 4 or a 5 out of 5 (see below for more about rating photos).
")

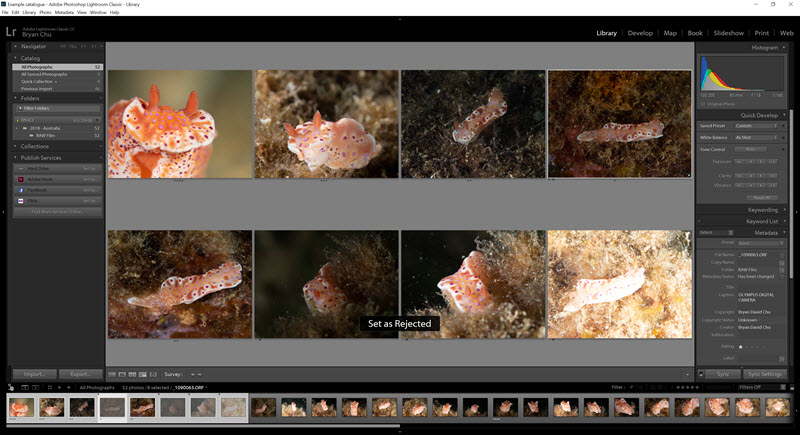
2. Rate or Reject Each Photo
The first step of my culling process is to run through each photo individually. This can be done in Library mode or in Develop mode. Any photos which are clearly blown out, blurry, out of focus, or otherwise flawed I flag them as rejected (keyboard shortcut: X), and move on.
Any photos which may be worth keeping, I rate from 1-5 stars, 1 being barely keepable, 5 being fantastic (keyboard shortcut: 1-5 keys). If a photo is keepable but I know I have a better shot of the subject, I will usually just reject it.

3. Reject (Most) 1 Star and 2 Star Images
Once the initial rating process is done, I use the filter to pull up only my 1-star and 2-star photos. Now, having gone through everything, I have a pretty good idea of what 3-5 star shots I have. Unless the 1-star or 2-star shot is of a special subject, unique behavior, dive buddy, or something else I really want to keep, I flag all my 1- and 2-star shots as rejected.
After completing this process, I go to the Photo Menu -> Delete Rejected Photos (keyboard shortcut ctrl + backspace) and then select that I want to remove them from disk. I don’t see a point in keeping them, but if you want to you can just remove them from your library. (But keep in mind that requires a lot more disk space!)
4. Use Survey View to Trim Shots by Subject
After my initial rating and culling process, I am typically down to around 30-50% of my original photos. Now I make sure I am in Library mode, and use the Survey View function (keyboard shortcut N) to compare all of my shots of a given subject. So if I have 10 shots that I kept of a certain nudibranch, I select them all (holding down ctrl and clicking on each one individually) and then hit N. Lightroom puts the photos up side-by-side so I can compare what I have. Now I go through and try to whittle down my shots to 1-2 if possible. If I really did a lot of experimental shots or had some cool behavior, then I might keep 3-5 shots. That is, unless I was doing something like a week-long humpback whale photo trip – in those cases I will try to keep around 1-4 shots of each whale – I mean, it’s a whale! Whales are awesome and do lots of cool stuff!
Anyway, for each shot I want to get rid of (and the star ratings I did earlier help make this faster), I hit the X key to reject, and then click on the “x” in the bottom right of the photo to remove it from the survey view. As I get rid of photos from the survey view, Lightroom enlarges the remaining ones, making it easier to discriminate between photos of very similar quality. Any subjects where I am stuck, I remind myself that if I really can’t pick between them, then one is as good as the other. Sometimes, this is enough for me to arbitrarily pick one over the other. But if there are some photo groupings I can’t fully cull, rather than agonize about them for a lot of time, I save them for the next step.
One other note: if there are photos which require relatively large edits (like split shots) then I do some quick editing on them and then compare. It can be hard to tell just from RAW images which one edits best, but it’s easy to tell after you spend a couple of minutes on each of the shots.
5. Get Help from a Friend!
After I finish culling a batch of photos, I will typically be left with a few small groups I want to cull further. In this case, I get my fiancee to come and take a look. I show her each grouping and ask which are her favorites, or which ones I should get rid of. She is a lot less biased and less emotionally connected to the photos than me, so she can pick very objectively the ones she thinks are best, based on their merits as photos. With her help, it usually takes less than 15 minutes to clear out what would have taken me an hour or two to do on my own.
This does not have to be an underwater photographer or any kind of photographer at all. In fact, having a non-photographer can help with getting an unbiased opinion.
6. Go Through as a Whole Album
Now that I’ve completed my culling by subject, I should be down to maybe 10-15% of my original photos. I then look at them all in Survey or Grid view, to see how they look as an album. Sometimes, a couple of shots stand out as being lower quality than the rest of the album. Then I have to decide if keeping any of these shots is worth bringing down the overall quality of the album. If not, I will delete them as well.

7. Keep Your Recycle Bin Around Until You’re Done Editing
I delete rejected photos and send to my recycle bin, but I don’t get rid of my recycle bin until I am done editing the photos I kept. Sometimes when I get into editing, I will find an unexpected flaw with a photo and want to bring back an alternate. In this case, I can restore some from my recycle bin, and pick the next best alternative.
Anyway, that is my culling process in a nutshell. Now, the fun part begins…editing. But at least I only have 20 photos to edit, instead of 200!
I hope you find this useful. As always, you can drop me an email at bryan@uwphotographyguide.com if you have any questions!