Nikon D600 and Sea & Sea Housing Review
DSLRs with Full Frame (FX) sensors have been all the rage in the photography world, with no less than 4 new offerings from the 2 heavyweights (Canon and Nikon) in the past 18 months. Nikon stunned the world with its revolutionary 36-megapixel FX sensor in the D800, which has proven to be the tipping point for many underwater photographers who rationalize the D800 as a “future-proof” investment with a sensor on the verge of medium format image quality. The party did not end there, for in the same year that the D800 was launched Nikon came up with another FX offering: the D600. The D600 is essentially a D7000 on steroids, but with a FX sensor shoehorned in.

Nikon D600 Introduction
Billed as an “Enthusiast” instead of “Professional” camera, Nikon was betting that a hybrid of the ergonomics of the D7000 that proved so popular, coupled with a brand new FX senor would make an irresistible entry level FX offering. They were spot on, and in fact, may have been too successful. The technical tests and user reviews in the months after its launch proved that the D600 was so close to the D800 in image quality and noise levels that, at least on terra firma, serious hobbyists and pros who could live without some of the added features were migrating to the D600 as their primary body, utilizing the savings on possible lens investments instead. An analysis of the headline features of the D600 seems to support their choice:
24.3-megapixel sensor. This is 2/3 the pixel density of the D800, which translates to smaller RAW files. The D600 has the highest pixel density of all other FX models on the market (aside from the D800).
Great Video Output of 1080p at 30fps. Same as the D800, with its associated smaller output files.
2 SD Card Slots. SD cards are much cheaper than CF cards of similar memory size, and I have not experienced any card failures with SD. CF cards have died on me before.
Native ISO Range 100-6400. Identical to the D800, with tests proving that the D600 has a slight edge in noise levels at the higher spectrum.
5.5fps with buffer rate at 22 files at 12 bit. The D800 gives 4fps with the 21-file buffer. However the smaller output size of the D600 means a faster and more reliable write capability (at least on paper).
The last 2 aspects are significant, for they mean that it might be possible to achieve photographic results that were once the preserve of really expensive cameras like the D3S and D4: high ISOs at the camera’s maximum shooting speed – good for shooting fast-moving subjects in ambient light. I made a decision to get a FX setup for underwater wide angle photography and since I was already using a D600 for above water applications, in a moment of pure boyishness I decided to go for it.

The Sea & Sea D600 Housing
Once I decided to house my D600 it was time to select a housing. With a bewildering array of choices to suit every taste and budget, I tried as many housings as I could and it was down to either the Nauticam or Sea & Sea.
PROS: My ultimate choice in the Sea & Sea turned out to be user specific and personal:
I really liked the way I can easily reach both command dial gears with my Asian-sized fingers to adjust aperture and shutter speed.
I can still easily reach the ISO button at the bottom left of the housing with my left thumb.
I can still use my Sea & Sea L-type cables from my other setup, so I do not have to get new ones.
Should I choose to go into video there is a convenient bulkhead just to right of the flash enclosure to install a monitor screen
The multi-controller pad buttons are in their “classic” position directly on top of the camera’s, its buttons are very easy to operate and I can differentiate it by feel. The focal point is often positioned in the center of the frame for wide-angle photography, so its placement on the housing was not that significant for me. I may rue this when I use it for macro work.
The port locking system has been tried and tested and felt extremely secure. It turns out that it takes more effort to change ports in between dives as it gets really tight, but somehow it gave me a better sense of security.
I could get one almost brand new at a good price, and the bluish color looked really cool.
CONS: No housing is perfect however, and I found the housing lacking in some aspects:
As mentioned, certain buttons on the D600 cannot be accessed when using the housing, so if ever a need arises to change from FX to DX mode it would be changed through the menus.
There is no lever to actuate the lens release buttons on the camera, so changing lenses in between surface intervals requires at least a cotton bud to reach into the housing to release the lens. This also means that extra vigilance must be on hand to make sure hands are as dry as possible. I am glad to say Sea & Sea has solved this issue for newer housing models and I hope a retro-upgrade is available in the future.
There is no way to see the top screen showing the camera settings, which I have grown accustomed to with previous setups. This means pressing the info button more often or constantly peering through the viewfinder.
Sea & Sea recommends a plate be installed where the optical sockets are when using the pop-up flash, which prevents internal reflections from showing up in the photos. Using this plate means the pop-up flash will have to be constantly deployed throughout the dive, which would rob me of any ambient light shots, should the situation arise. I chose not to use the plate and so far have not encountered any of the issues Sea & Sea has forewarned.
Wide-Angle Settings
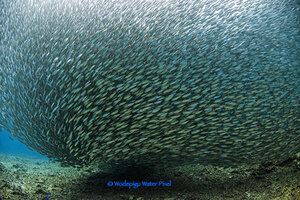
The sardine school has thankfully returned to Pescador Island (Philippines) and with hunting by pelagic fish already in full swing it was the perfect place to see if the D600’s capabilities would allow me capture good fish action. It was daunting yet exciting at the same time since I have not done this kind of shooting before, so I decided to place it safe and keep to certain settings:
Aperture between F7.1 to F9 as much as possible.
Stick to ISO settings at 800, 1600 and 3200. To be able to shoot at ISO3200 in non-pro cameras is revolutionary enough, so I set that as my limit. This is also when the U1 and U2 modes became handy.
Taking ambient light photos allows me to use shutter speeds as high as 1/1000 or higher to freeze action. This would really give the ISO capabilities of the D600 a good workout.
With my final choice set, it was time to bring my setup to where it belongs: underwater!
Out in the Field
Shooting Fast Action
Taking the housing underwater for the first time, with no strobes attached and with a Zen 200mm dome, I was slightly surprised by how neutrally buoyant this configuration was. Previous setups I have used, albeit with a 170mm dome and floats installed felt like they were striving to drag me down to the depths. One of the great joys of shooting FX is the bigger and brighter viewfinder, but the housing comes equipped with a viewfinder that actually reduces the view. I installed an Inon 45 degree viewfinder on the housing, and though claimed to only work on cropped sensor cameras, the resulting view was a complete picture end to end with the settings at the bottom seen clearly. No need to get another “FX compatible” viewfinder if you are upgrading!
The first 5 minutes of the first dive was spent familiarizing myself with the controls, and it soon became clear that assumptions made when handling the housing on land do not fully translate to use underwater. My extensive use of the D600 above water made for a shorter acclimatizing period but there were still a few hiccups, the primary one being the increased difficulty of accessing the ISO button. But after a few practice runs it became second nature. The command dial levers are large and the grooves deep enough to afford traction for the thickest of gloves, its operation so smooth that I have accidentally shifted the settings more than I intended. The shutter lever was a dream to use, its feedback so supple that you definitely know when you have achieve half-shutter position.
Before entering the thick of the action I elected to do a few test shots at ISO 800 and the results were very clean with no discernable noise penalty even when reviewing at pixel level. Being able to use higher shutter speeds also helps to freeze motion and mitigate any motion or camera blurs.


At this juncture I would like to say that the Tokina 10-17 fisheye lens works really well and produces crisp sharp images. However, because this lens is meant for cropped sensors it has to be vigilantly kept at the 15mm focal length and above to eliminate vignettes at the corners. This must be constantly reaffirmed during the dive, for the zoom knob may be inadvertently shifted during the dive. To be safe it may be best to start off the dive with the lens at 16mm, the difference in field of view not dramatic enough to be a hindrance. All in all the Tokina is a wonderful lens for wide-angle photography for FX without a doubt. Just be careful.
At ISO 1600 noise does start to creep in but still very respectable, and at the pixel level possibly equivalent to my trusty D300 at ISO 640! I would be hard pressed to see the noise on pictures posted on the web and that also means prints up to A3 are still definitely possible.


Photo Left: Taken at ISO 1600 in ambient light. Manual Mode at F8 and 1/800s. Tokina 10-17 Fisheye at 17mm.
Above: 100% Crop. All is still fine!
Shooting at ISO 3200, noise levels are predictably present at the pixel level but the amount of detail retained is still very impressive.


Photo Left: Recovering from the onslaught. Taken at ISO 3200 in ambient light. Manual Mode at F8 and 1/4000s. Tokina 10-17 Fisheye at 17mm.
Above: At 100%. Still very usable
Being able to shoot at a higher FPS means that the photographer may be able to capture unique school formations that one might not be able to capture otherwise. Photo opportunities occur in a blink of an eye with fast-moving subjects, and it’s often worth it to keep the camera facing the general direction of the action and shooting from the hip if there’s quick action, hoping for the best. This is where a camera like the D600 may help you capture a special moment that passed all too quickly. If the behaviors of the subject can be anticipated, frame up the shot and just pull back the shutter lever and leave the rest to the camera - chances are high that the shot you hoped is in the bag. To top it off, the autofocus was spot on almost on every shot, my single out of focus shot was when I somehow managed to switch the camera to manual focus, which is a testament to the frantic pace of the sardine school between six to twenty meters deep.


Photo Left: Its raining sardines. Taken at ISO 3200 in ambient light. Manual Mode at F10 and 1/4000s. Tokina 10-17 Fisheye at 17mm.
Photo Right: Doughnut Formation. Taken at ISO 800 in ambient light. Manual Mode at F8 and 1/500s. Tokina 10-17 Fisheye at 17mm.
Throughout my experience with the sardines there was a constant need to adjust settings, especially shutter speed and ISO sensitivity, and by the second dive I was able to feel around the housing and change the settings I desired while also trying to observe the unfolding action. This says a lot about the ergonomic design of the housing. All the controls were very responsive and easy to activate underwater. One control I always had trouble to find out of sight was the lever to close the pop-up flash and disengage the strobes, and I wished that Sea & Sea could have made the lever a little bigger to facilitate the change from flash to ambient light photography.

Using Strobes
Turning my attention to close focus wide-angle photography using strobes to light up the foreground, the sensor sensitivity was dialed down to ISO100. The images produced were simply superb. The Tokina fisheye had more than enough sharpness to do the image sensor justice. Just looking through the D600’s LCD screen upon playback the vast improvement over my previous setups in sharpness and detail is very obvious. In fact it seems that the LCD screen at times could not effectively display the sharpness and detail the sensor is capable of, and on first glance its seemed that the image was blurry and out of focus. Only upon zooming in does the splendor of the image become apparent, the amount of detail captured on a whole new level. Just that took me a while to fully comprehend and appreciate.


Photo Left: Hanging on. Taken with 2 Sea & Sea YS-D1 at ISO100 Manual Mode at F13 and 1/250s. Tokina 10-17 Fisheye at 16mm.
Photo Right: Reef Scene. Taken with 2 Sea & Sea YS-D1 at ISO100 Manual Mode at F18and 1/250s. Tokina 10-17 Fisheye at 17mm.
There were grumbles that the relatively slow maximum flash sync speed, at 1/200sec, would be a major flaw of the camera especially when taming sun balls. There is an option to bump that up to 1/250sec in line with most DSLRs, and although flash power is reduced it is more than adequate to activate your strobes optically. One quirk that happened was that the camera seemed to lag noticeably when shooting single stills, which left me in bewilderment as this lag was not present when shooting at high speed with the sardine school or topside.


Photo Left: Wonderful contrast and detail. Taken with 2 Sea & Sea YS-D1 at ISO100 Manual Mode at F7.1 and 1/250s. Tokina 10-17 Fisheye at 17mm.
Photo Right: Feather Star. Taken with 2 Sea & Sea YS-D1 at ISO100 Manual Mode at F7.1 and 1/250s. Tokina 10-17 Fisheye at 17mm.
Conclusion
The Nikon D600 is a phenomenal tool for wide-angle underwater photography. The images that it produces are simply breathtaking and would be more than ample for most photographers (except possibly for those that need the absolute highest resolution to make very large prints). All aspects of the camera work in tandem to ensure an enjoyable shooting experience.
A great camera is useless underwater unless there is a great housing system to complement it, and with the Sea & Sea D600 housing a very able partnership can be established. The ergonomics are well thought out, and with a depth rating of 100m the housing is robust enough for any dive plan you can throw at it. This is a combination that will give you many years of service churning out one great photo after the next.
Go to:
Part II: D600 & MDX D600 for Macro
Further Reading
RECOMMENDED ARTICLES


ALSO BY VICTOR TANG


SUPPORT THE UNDERWATER PHOTOGRAPHY GUIDE:
The Best Service & Prices on u/w Photo Gear
 Visit Bluewater Photo & Video for all your underwater photography and video gear. Click, or call the team at (310) 633-5052 for expert advice!
The Best Pricing, Service & Expert Advice to Book your Dive Trips
 Bluewater Travel is your full-service scuba travel agency. Let our expert advisers plan and book your next dive vacation. Run by divers, for divers.