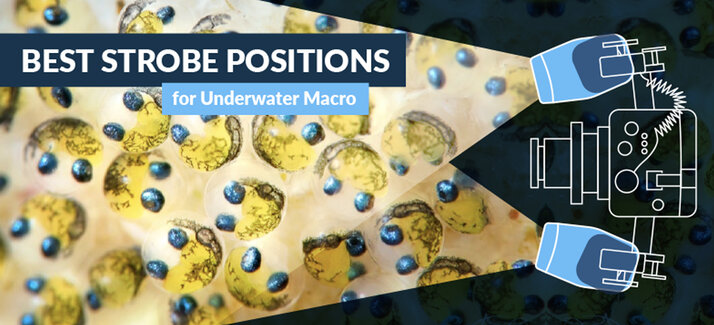
Best Strobe Positions for Underwater Macro Photography
Lighting is one of the most important keys to underwater macro photography. It brings out incredible detail from subjects and makes vibrant colors pop. Without it, underwater photos can look dull, flat and blue. Light also adds a great deal of visual interest - especially when we venture into the creative side of photography. Black backgrounds? Yes. Minimizing backscatter? Yes please! Correct lighting from the beginning minimizes post processing time. So, what are the best ways to place your strobes specifically for underwater macro subjects? Let’s take a look at the most popular go to positions. 
JUMP TO:
Basic Macro Strobe Positioning
Supermacro Strobe Positioning
Black Background Strobe Positioning
Creative Lighting
Strobe Positions Matter
Have you ever taken a photo that was filled with backscatter? Or how about a photo that you thought you nailed because the timing was perfect, but then the exposure turned out to be too dark? It happens to all of us. These scenarios have to do with lighting. Yes, every photo opportunity differs depending on water conditions, the size of the subject, the distance between your camera and the subject and even your photography equipment. Each one of these has a varying degree of effect, but having a few basic go-to positions to build from and a little bit of patience to accommodate for each scenario can go a long way.

The Three Best Strobe Positions For Underwater Macro Subjects
1) ANGLED-OUT (Best with Average Size Macro Subjects)
This is what I consider the most basic position. It is my go-to and absolute favorite for average size critters. I consider this ideal for the beginning of a dive or for when you are swimming around looking for subjects. It creates a POP of color with perfect contrast.
- Best used with average size macro critters
- Great if just swimming around not knowing what your next subject will be
- Creates a strong pop of color and contrast
- Minimizes backscatter and particulate between subject and lens
- Can create a black background with a fast shutter and if the scene is void of matter behind the subject


Note that the strobes are not facing straight but instead slightly angled out and close to the lens port. The beam angles will meet at a point approximately 10+ inches in front of the lens depending on exact angles. The theory behind creating the unlit area in front of the lens is that the light will not pick up on the particulate (backscatter) between the camera and the subject. Yes, you can avoid lighting up backscatter!
Tips for Larger Macro Subjects
Some critters that are larger, like anemone fish, need to be a bit further from the camera to fit in the frame. The same technique above applies. The strobes are slightly angled out, but in order to have the light meet further away simply extend the strobe arms out from the housing. Take a look at what that does to the point where the beams meet. Adjusting the camera settings might be necessary to bring in ambient light for the larger animals.


2) SUPER MACRO STROBE POSITION (Best with Close-Up Macro Wet Lenses/Diopters)
Strobes need to be repositioned when shooting very close to a subject - especially when using a wet diopter or supermacro lens. If you were to keep your strobes angled out - the beams would meet behind the subject, rather than on the subject. In order to light the subject, strobes should be turned in towards the lens for the beam to properly reach the subject. Since this illuminates the space between the lens and subject there is a chance it will catch backscatter. In theory, you’re so close to the subject that there is little chance of any significant debris being between the lens and the subject.
- Best for close image of nudibranchs and small macro subjects
- Minimizes light behind subject
- Great to use with a closeup macro wet lens
- Creates beautiful lighting in the foreground
- Can create a black background if the scene is void of matter behind the subject
Note: A super macro wet lens added to the front of the port shortens the working distance between the lens and the subject. It allows the subject to be within inches of your camera to fill the frame. Exposure settings on the camera will most often need to be changed when adding a super macro wet lens. Read more about best settings for macro subjects here.


3) BLACK BACKGROUND STROBE POSITION (Best with Small Macro Subjects)
Black backgrounds create gorgeous photos by isolating the subject from the background and drawing the viewer in. A fast shutter speed, small aperture, and negative space behind the subject are most important in achieving this effect - but strobe positioning plays an important role too. Read more in-depth content about camera settings for black backgrounds here.
The best strobe position for achieving a black background on super macro subjects like nudibranchs is angling your strobes in towards your housing. Light up your housing? Yes. The edge of light from your strobes will graze the subject and not reach behind it. This is a fine-tuned technique and like other situations may require very small adjustments to nail the precise meeting point of the light on the subject. It is still necessary to find a subject without reef behind it.
Single strobe users have an advantage for creating black backgrounds by positioning the strobe above the subject, pointing down at it. Try angling the strobe in slightly toward the port to minimize the light on the background.
Ever wonder how you sometimes get a black background but other times not? A black background is achievable with most strobe positions but only in very specific circumstances. The camera must be set to a fast shutter speed and, most importantly, there absolutely can not be anything behind your subject for the strobes to light. Open water, aka "negative space” cannot be lit by your strobes alone. Sometimes this means thinking outside of the box and getting lower than your subject to shoot upwards into the water column.


Creative Lighting Techniques and Snoots
Creative lighting adds visual effects that entice the viewer. Whether it adds mystery or simply directs attention, lighting helps tell a story. If you're shooting in manual mode with your strobes, try turning one strobe brighter than the other. Or one strobe inward compared to the other. By darkening one side, the viewer’s eye will automatically be attracted to the brighter side (which will often be your subject). If using only one strobe, raise the strobe as if you are shooting over the animal but instead of positioning it at 12 o'clock, place it at 10 or 2 o'clock - depending on which way the animal is facing. It will attract the viewer to look at the forward motion of the animal. And remember – creativity does not necessarily have rules.
Snoots are a great way to direct light. They almost always ensure a black background. Some snoots have inserts to shape the light into patterns or you could use two snoots (one on each strobe). Purchasing expensive equipment isn’t always necessary to get creative effects. My first snoot was an oil funnel with a large rubber band holding it onto my Ikelite strobe.
![]()
Check Out Bluewater Photo's Top Underwater Snoots
Applying Macro Strobe Techniques Underwater
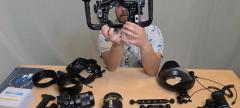
Practice on a stationary subject (e.g., a rock) and test the three basic strobe positions. Pay close attention to the distance between your camera and the subject. To brighten the subject, you may have to move closer to it or make a slight adjustment to the angle of your strobes. If it’s a matter of composition and you cannot change the distance, then try one of the other strobe positions. When considering macro photography, 12-15” away from the subject can be considered too far. Be sure to take a moment and look at your camera system from above and from the side. How far are you really from the subject? Are the strobes pointing in the intended direction? How far are the strobe arms from the housing? Slight changes can make huge impacts.

Summary
Basic strobe positions are ones to fall back on and are meant to be just the beginning of your own creativity. Camera settings play an important role in exposure. By taking some time to learn the keys to exposure and how to combine artificial lighting with ambient light, you’ll be off and running with visually stunning photos in no time!
![]()
Check Out Bluewater Photo's Top Underwater Strobes
RECOMMENDED ARTICLES


ABOUT THE AUTHOR

As a long-time Hawaii resident, Jenna moved to Maui in 2002 to pursue her interest in diving. Discovering the beauty of the islands and the desire to show it to the world led Jenna into her passion for nature photography. She pursued her education by attending hands-on workshops and conferences with respected educators mastering the camera topside before taking her photography underwater.
Jenna is a certified Hawaii Marine Naturalist and enjoys travel and adventure. Her images have been published in Forbes Magazine, Travel and Leisure, calendars and several other publications. She has been a professional contributor for Pacific Stock since 2012, the largest worldwide curated stock photography agency exclusive to the Hawaii and Asia Pacific Regions. You can find her images at www.jennaszerlag.com and on Instagram @seaofphotos.
SUPPORT THE UNDERWATER PHOTOGRAPHY GUIDE:
The Best Service & Prices on u/w Photo Gear
 Visit Bluewater Photo & Video for all your underwater photography and video gear. Click, or call the team at (310) 633-5052 for expert advice!
The Best Pricing, Service & Expert Advice to Book your Dive Trips
 Bluewater Travel is your full-service scuba travel agency. Let our expert advisers plan and book your next dive vacation. Run by divers, for divers.