Color Space, Color Profiles, and Color Management

Underwater Photographers have many choices when it comes to experimenting with color underwater - from lighting with strobes to white balance - but what happens “behind the scenes,” at a digital level, is just as important. Color profiles and bit depth are used during your workflow to essentially define the dimensions of color in each image. Having a basic understanding of them will help you make the best choices for your workflow.
Color Management
Image files need to be managed to obtain color consistency between each device in the digital workflow. Cameras, scanners, monitors and printers all read, display or print color differently. In order to break down the language barrier between them, a color profile must be assigned. Jpegs are given their profile by the camera as they are recorded but RAW files are not assigned a profile until post process when they are converted to a format such as tiff or jpeg.

Color Models
A color model is a system of various colors that are produced from a set of primary colors. Each color model can produce a slightly different representation of colors.
Examples of color models are CMYK (cyan, magenta, yellow and black) and RGB (red, green, blue). Photography and computer graphics primarily work within the RGB color model.

Color Space
Color space is probably the most familiar term we hear when it comes to color management. It determines the range of color known as “gamut”. Essentially, it is a virtual container of color.

Color Profiles
Profiles translate the numerical data between devices in a language each device can understand. The profiles that are assigned to images specify the range or gamut of RGB color. The most common color profiles in photography are called sRGB, Adobe RGB and ProPhoto RGB.
sRGB stands for standard red green blue and is the smallest of all three color spaces. It is the most commonly used color space today with the greatest consistency across the majority of platforms. Not only do popular commercial print labs use sRGB but it is required for web files to display properly online.
Adobe RGB, developed in 1998, consists of the same red green blue colors as sRGB but with a much larger gamut. It was developed to communicate with CMYK, or inkjet printers and is commonly used for printing on fine art papers. It is also the color space required by many pro labs and print professionals such as magazines publishers.
ProPhoto RGB is the largest color space. It offers an incredible amount of colors, much larger than that of Adobe RGB. It is gaining momentum in the photography world and with the technology advancing so fast it is becoming the standard with photographers and editing software today.
Bit Depth
It’s not all about color. Bit depth and color space have a very close working relationship. Bit depth refers to the color intensity or increments per color channel. Color space refers to the range of color and bit depth can be visualized as the ‘steps’ from one shade to the next within that range.
Color Space = Range of Color
Bit Depth = Gradation, or steps within the range of color

Photoshop and Lightroom work within 8-bit and 16-bit formats. 8-bit has 256 levels of information per color channel, meaning it offers 256 shades of said color. 16-bit however, has 65,536 levels per channel providing a much smoother gradient from one shade to the next.
8-bit = 256 levels of information per channel
16-bit = 65,536 levels of information per channel
Banding Effect
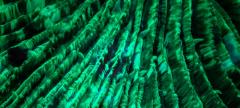
Banding is the obvious jump between shades most commonly apparent in underwater vast blue scenes or high contrast areas in shadows. It is caused by stretching the edit beyond the capabilities of the image file. As long as you're working with RAW files (or uncompressed 16-bit files such as tiff) this shouldn't be an issue but jpegs, due to their compression, may lack the information necessary for smooth gradient shades.
Tips To Avoid Banding:
Set Your Camera To Record The Highest Quality Images
Edit RAW, or Uncompressed Files Such As TIFF
Start Your Post Process Workflow In 16-bit Format
A high bit depth and narrow gamut combination provides the smoothest gradient of colors. The steps between shades increase when working within a wide gamut such as ProPhoto RGB. By starting your post process workflow in 16-bit format it will assure the best quality end result.

Master Files
More than likely we don’t know the destination of our photos at the time of taking them so it is important to work with and preserve the file with the most information. This is your master file. Most digital cameras are recording RAW files in 12 to 14-bit format and some high end cameras as 16-bit. Jpegs are recorded in 8-bit format. For maximum quality it's advisable to edit in 16-bit format and then downsize to 8-bit after editing. Why? Because when you convert 16-bit to 8-bit there isn’t much visual change. But if you start with an 8-bit image you could see the quality degrade when applying simple edits such as contrast and curves.
Most publishers require Adobe RGB* images. What if in the future an opportunity to sell your image or a request for a large print arises and the only copy you have is too small to meet the required specs? You can always downsize a copy of your master file to suit certain requirements but you cannot go from a smaller file size or color space to a larger one. Sure, you’ll find you can change the profiles to a larger color space without losing any information but the program cannot add the missing information if it is not there to begin with.
*Disclaimer: For internet use, make sure your file is not in Adobe RGB or it will often appear washed out when you post it somewhere. If you seem to consistently have washed out photos, check your colorspace.

Why Are My Instagram Photos So Dull?
Bigger is not always better. Let’s not forget about when 8-bit sRGB is important. Do you post your photos on social media? The internet works with the sRGB profile. If a photo is uploaded in Adobe RGB format it will be compressed and look dull. No one wants dull Instagram photos. While keeping your master file, convert a smaller web version to sRGB first before sharing it online.
Side Note: Many photography hosting websites will convert your images automatically to sRGB during the uploading process. Be sure to check the specs of what your webhost requires first. I have found a handful of them that insist it is the photographer’s responsibility to convert the images prior to uploading them. If you feel your images look dull, this could be the cause.
How to Set Default Color Space In Lightroom Classic
Lightroom is set up with ProPhoto RGB. In Lightroom Classic you are able to choose options for color management of external edits. You can choose the custom default color space for all exported images. On the top, left side menu of your main screen, click on Edit > Preferences. Once the chart like the one below pops up, choose “External Editing”. Here you will have a series of dropdown menus to customize. If you choose ProPhoto RGB you will see a message from Lightroom stating “16-bit ProPhoto RGB is the recommended choice for best preserving color details from Lightroom”.

How to Set Default Color Space In Photoshop
You can also set the default color space in Photoshop CC. On the top, left side menu of your main screen, click on Edit > Color Settings. A chart like the one below will open. Every time an image is imported, Photoshop will assign the color space you have chosen. I have the Profile Mismatch box checked as well (at the bottom of the chart) so a warning will pop up if a photo with a different color space is imported. This way I can choose to keep its assigned color space or work with the default color space.

How to Convert Color Space for Individual Images
The easiest way I have found to convert the color space for an individual image is during export in Lightroom Classic (and older desktop Lightroom versions). Once you’re finished editing you can choose your custom color space before saving. Right click on the image to find the export option. A dialog box will pop up with several sections of custom settings that you can alter before the final export. Scroll half way down to File Settings where you will see the drop down menu titled Color Space. Once you have chosen your custom settings click on the final Export button to save the image. Note that at the top of the dialog box it asks you to specify where you would like the image saved.

Isn’t it easier to just stick with sRGB?
Sure! IF the purpose of your images is for online use only and/or going to popular commercial print labs for small prints then you might not want them to pass through larger color spaces. It’d be a lot less work and much less room for error if you stuck with sRGB. And you can conserve a lot of hard drive space with 8-bit jpegs too! But editing a 16-bit file with the most information produces a far better quality end result.
Do You Shoot RAW?
Uncompressed RAW files retain all of the information the camera originally captured. It gives you, the photographer, the best quality image to edit. Compressed images such as lossy formats or jpegs are much smaller files that save hard drive space and allow for easy file handling. They are immediately compressed in camera by sacrificing a portion of the original information. If the file is lacking information from the beginning then the capabilities of editing are limited, and the final size and resolution are impacted.
Conclusion
Proper color management is necessary for predictable and consistent color output across multiple devices. Without it, your images may be device dependent. Image files need to be managed to obtain color consistency between each device in the digital workflow. You will allow the broadest range of opportunity for your work by preserving a quality master file first and adjusting for its intended use in the future with additional files.
RECOMMENDED ARTICLES


ABOUT THE AUTHOR

As a long-time Hawaii resident, Jenna moved to Maui in 2002 to pursue her interest in diving. Discovering the beauty of the islands and the desire to show it to the world led Jenna into her passion for nature photography. She pursued her education by attending hands-on workshops and conferences with respected educators mastering the camera topside before taking her photography underwater.
Jenna is a certified Hawaii Marine Naturalist and enjoys travel and adventure. Her images have been published in Forbes Magazine, Travel and Leisure, calendars and several other publications. She has been a professional contributor for Pacific Stock since 2012, the largest worldwide curated stock photography agency exclusive to the Hawaii and Asia Pacific Regions. You can find her images at www.jennaszerlag.com and on Instagram @seaofphotos.
SUPPORT THE UNDERWATER PHOTOGRAPHY GUIDE:
The Best Service & Prices on u/w Photo Gear
 Visit Bluewater Photo & Video for all your underwater photography and video gear. Click, or call the team at (310) 633-5052 for expert advice!
The Best Pricing, Service & Expert Advice to Book your Dive Trips
 Bluewater Travel is your full-service scuba travel agency. Let our expert advisers plan and book your next dive vacation. Run by divers, for divers.