Tips for Lighting Quick Critters with a Snoot
As with any art form, trends come and go in underwater photography. But perhaps one trend that is here to stay is the use of snoots. Snoots are devices used to reduce the wide output of a strobe into a small ring of light - usually only a few inches in diameter. This smaller output enables a photographer to control the lighting of their image better, and introduce much more contrast and direction. Most often, snoots are the prized tool of macro photographers as they are the most foolproof way of achieving the coveted black background.
Snoots can be homemade contraptions that simply reduce the area of output by blocking parts of the strobe, or professional devices that use flexible fiber optic cables to achieve the same goals. But the one thing that unites every snoot photographer is frustration. Controlling such a small beam of light can be difficult at best. In rugged underwater environments it can seem downright impossible. Snoot photographers must deal with current, surge, moving subjects, slow shutters, and a large host of other obstacles. Trying to position a two-inch beam of light over a two inch moving fish and actually getting the photo is like trying to make a half-court shot at the last second of the game. Take a look at the SD card of a snoot photographer and all you might see is a bunch of black slides and perhaps one or two unidentifiable blurry spots. But the rare success makes all the sweat, pain, and tears well worth it.

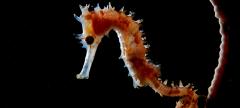
The difficulty of taking snoot photos often limits the subjects available to a snoot photographer. Many only attempt snoot photos on still or very slow-moving subjects such as nudibranchs, corals, frogfish, and shrimp. Attempts at anything quicker only yield more frustration. However, with enough practice and the right technique, a snoot photographer can expand their selection of subjects to include even the quickest of critters. Here are our top tips for doing so:
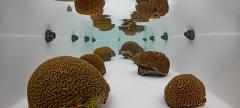
1. Start with a Rock

I never begin a snoot dive without a few nice photos of rocks. When photographing quick subjects, planning is everything. It is essential to anticipate the size and shape of the subject you intend to shoot before finding it. After this determination, find stationary substrate with a similar shape and practice lighting it. Rocks are good subjects as they tend not to diffuse light, so you can see exactly what on the subject the snoot is illuminating. After getting a feel for the distance needed between the snoot and the subject as well as camera angle and output strength, I maintain my settings until I find the desired subject. Even if the subject is speeding by, usually the preset snoot will perform quite well when “calibrated” with a rock.
2. Use Your Finger to Evaluate Distance

One of the hardest things about snooting quick subjects is maintaining appropriate distance. If I’m busy swimming after the subject, the quickest way to determine how to position my camera and snoot is to place my finger where I want the subject to be and imagine the light from the snoot hitting it. Then, when approaching the subject, I try to position the subject to be where my finger was. This can be a particularly useful technique for small reef fish.
3. Only Move the Snoot’s Position After You Illuminate the Subject

Unless the snoot is wildly misaligned, I find that moving the snoot after failing to light a subject is more detrimental than repositioning the whole rig. Often you get stuck moving the snoot all over the place without once getting light in the photo. It is better to first find the light in the frame, even if the photo does not have good composition. After that, the snoot can be moved incrementally along with the full rig in order to create better composition and lighting with micro adjustments.
4. Anticipate Where the Subject Lands in the Frame

This tip is especially useful for wide-angle snoot photography. Fish are often predictable in their movements. One of the best ways to capture a quick fish with proper lighting is to guess where in the frame the fish will end up, light that area, and finally wait for the fish to swim to that part of the frame. Sometimes this technique fails if you misinterpret the fish’s movements. But when it works, it works quite well.
5. Let the Critter Come to You

It is nearly impossible to try to catch a fast-moving critter with a two-inch beam of light. Therefore, it is often better to station yourself along the path of the animal and wait for the animal to cross your path. This can be easier said than done.
Many fish also have the tendency to find protection when they see a diver. This can be used to your advantage. A fish that hides in a cave or overhang eventually feels the need to leave the protection. I find that the best moment to photograph small reef fish is when they emerge from protection.

6. Snoot at an Angle

It is clearly a popular technique to shoot macro snoot photos with the snoot directly above the subject, forming a nice ring of light. Often this is not possible when photographing quick subjects. If you point the snoot at a bit of an angle when shooting from above, you are more likely to illuminate the subject as the beam will cover more area.
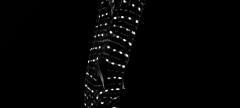
7. When in Doubt, Point the Snoot Forward

Perhaps my favorite way to shoot a quick-moving snoot subject is by pointing the snoot directly forward from the camera. Pointing a snoot directly forward yields much more successful results lighting a subject than pointing a snoot from above. Often, the snoot will not need to be adjusted at all throughout the dive. The largest concern when lighting your subject this way is that the snoot may light some of the background as well. Though this can be a problem, quick subjects are often photographed slightly up in the water column. If there is negative space behind the subject when you are photographing it, the coveted black background should be within reach.
Conclusion:
This is by no means a comprehensive or complete guide to photographing moving subjects with a snoot. Snoot photography, more than any other kind of underwater photography, is often intertwined with equipment and diving style. As with diving style, what may work for one underwater photographer may not work for another. Snoot photography is very much an artform of circumstance. One can only be successful by making micro adjustments of their technique as circumstance requires.

RECOMMENDED ARTICLES


ABOUT THE AUTHOR

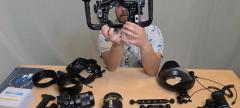
Nirupam Nigam is the Editor-in-Chief of the Underwater Photography Guide and the President of Bluewater Photo - the world's top underwater photo & video retailer. While growing up in Los Angeles he fell in love with the ocean and pursued underwater photography in the local Channel Islands. After receiving degrees in Aquatic and Fisheries Science and General Biology, as well as a minor in Arctic Studies, Nirupam worked as a fisheries observer on vessels in the Bering Sea and North Pacific. Since then, Nirupam has been a full time underwater photographer and photo gear head. Check out more of his photography at www.photosfromthesea.com!
ALSO BY NIRUPAM NIGAM


SUPPORT THE UNDERWATER PHOTOGRAPHY GUIDE:
The Best Service & Prices on u/w Photo Gear
 Visit Bluewater Photo & Video for all your underwater photography and video gear. Click, or call the team at (310) 633-5052 for expert advice!
The Best Pricing, Service & Expert Advice to Book your Dive Trips
 Bluewater Travel is your full-service scuba travel agency. Let our expert advisers plan and book your next dive vacation. Run by divers, for divers.