Lightroom Tips & Tricks: Crop Image Overlay Tool

In this article and others to follow I plan to share some of the tricks and tips I use in my Lightroom workflow, and hope that some of them will help you in yours. If you have any interesting tips or tools that you use, please leave a comment at the end of the article.
Lightroom Feature: The Crop Overlay
I am always looking to expand upon my Lightroom skills, so I love to share and exchange tips and tricks I have picked up with other photographers. Today I wanted to share a Lightroom feature that lives within the “Crop” tool of the Develop Module. The feature is the “Crop Guide Overlay”, which as the name implies, overlays one of seven different patterns on the image. I was surprised to find that most people really didn’t know about this tool, so I thought I would share how I use it here for Underwater Photography Guide readers.
I use a Mac, so the keyboard shortcuts and my descriptions apply for Mac users. To enable the tool, simply go into the Develop Module (or press D on the keyboard). From there go into the Crop tool (click on the Crop tool icon or press R on the keyboard). I have my system set up to show the “Rule of Thirds” grid by default, as seen below.

The options are: Grid, Thirds, Diagonal (photo below left), Triangle, Golden Ratio, Golden Spiral, and finally Aspect Ratios (photo below right). Pressing the letter O key will toggle through all of them.
Bonus Tip: Speaking of the O key, did you know that in several of Lightroom’s editing tools, the O key will toggle additional, helpful overlays? Want to see the areas of an image where you have made certain edits...try it in the Adjustment Brush (K on the keyboard), Gradient Filter (M on the keyboard), and others.


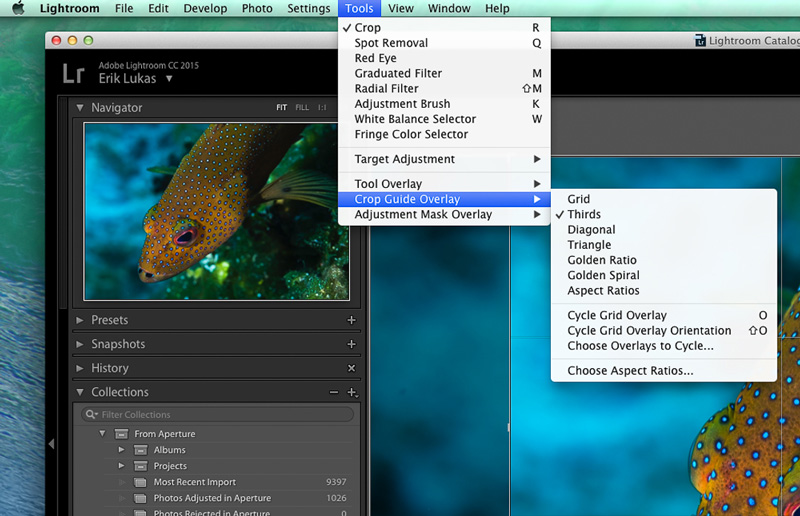
Once in the Crop tool, you can select a few different options for how the overlay tool behaves. Go to the Tools menu and select Tool Overlay:

This will give you the options to “Auto Show”, “Always Show” or “Never Show” the overlays. I leave mine set to always show.
Also in the Tools menu, select Crop Tool Overlay to show even more options, such as selecting only those overlays that you would like to have cycle through.

One option I use frequently is the “Cycle Grid Overlay Orientation” (Shift + O) which alters the orientation of the grids. This is most useful on the Diagonals for me, but try them on all of the overlays to see which helps you the most on any given image.
In Use: Improve the Composition In Post
When I am in the process of editing my images, I look for ways to help increase the aesthetic appeal of the final image. In some cases this involves cropping the image to improve upon the overall composition. I try to use the Rule of Thirds when I frame an image while I am diving; placing important elements of the image on intersecting lines. Here the eye of the juvenile Garibaldi falls roughly on the intersection of the lower left third.

Looking for diagonal lines is another long standing “rule” to composing a photograph, and the diagonal crop overlay is great in helping to find those compositions. Below is an example of where I framed an image with the diagonal in mind. The overlay is simply shown here to reinforce that, but this overlay is very helpful for those images where a slight shift in any direction will help align the important elements. Notice the fish's eye falls on an intersection of the two diagonals (which happen to be very close to where the lines would intersect using the Rule of Thirds overlay), and the body falls directly upon the diagonal that intersects the image.

Here is another example where I composed the image to have the important elements: the eye of the Damselfish falls onto an intersecting third, and the body on the diagonal.

While the crop overlay tool is not necessarily something that will speed up your workflow, or automagically enhance the final results of your editing, it has become a useful tool for me in helping to visualize compositional rules.
For anyone who was unaware of this overlay tool, I hope I showed you something new that you can use in your workflow. If you have suggestions or tips with regard to Lightroom or any other editing suite, please leave a comment at the end of the article, as it’s always great to pick up a new trick.
RECOMMENDED ARTICLES
SUPPORT THE UNDERWATER PHOTOGRAPHY GUIDE:
The Best Service & Prices on u/w Photo Gear
 Visit Bluewater Photo & Video for all your underwater photography and video gear. Click, or call the team at (310) 633-5052 for expert advice!
The Best Pricing, Service & Expert Advice to Book your Dive Trips
 Bluewater Travel is your full-service scuba travel agency. Let our expert advisers plan and book your next dive vacation. Run by divers, for divers.


