From Compact To dSLR: Preparing For The Switch
This is the first article in a series of three chronicling the switch from diving with a compact camera to a dSLR. For me, this journey was several years in the making. In these articles I describe some of the dilemmas, tips, pitfalls and lessons learned from the transition, and hopefully provide some useful info for photographers in the same situation.
The Beginning
When I first got into underwater photography, I didn’t know much about it. I just stopped at B&H in New York City and bought the first reasonable package that they recommended to me. That was a big mistake. Regular camera retailers know very little, if anything, about underwater photography. I started out with a Sony Cybershot DSC-P9 with a Sony Marine Housing. When I saw the results of my pictures, they came up with the familiar blueish/greenish color:
“What’s going on? This doesn’t look like the pictures in NatGeo,” I said to myself. So I set out to learn as much I could about underwater photography in order to improve my pictures. I went to conferences like Beneath the Sea (in NJ) and Boston Sea Rovers. I attended many underwater photo seminars by known underwater photographers like Cathy Church, Jack and Sue Drafahl, Larry and Denise Tackett, Marty Snyderman among others. The seminars only got me to a certain point, I needed a more experimental approach. At one of those seminars, I learned that Cathy Church ran a store and training facility in the Cayman Islands. It happened that one year I had the chance to go on a liveaboard around the Cayman Islands. So I took the opportunity to stay a bit longer at Grand Cayman and take a couple of lessons.
The lessons were well worth it. It is a shame that regularly you cannot “test drive” the underwater photo equipment you want to buy. By test driving, I really mean by diving with it. Here in the Caymans, I was able to rent equipment and dive with it. I learned about using manual mode and about a neat little camera: the Olympus SP-350 (today’s equivalent of a Canon G12, more or less). This camera was an “advanced” point-and-shoot with manual mode and a hot shoe. The Olympus housing that goes with it had an electrical bulkhead, a rarity at that time. So you could have a setup very similar to an underwater dSLR with a fraction of the money. I liked the setup so much that I ended up buying it. Suddenly, I was the new owner of the Olympus SP-350 with a Heinrichs-Weikamp electrical bulkhead capable of doing TTL, just like a dSLR.
Should I’ve Gone Straight for a dSLR?
While at Cayman, I saw that they rented and sold dSLRs and dSLR housings. If you asked anybody in the underwater photo business, of course they would point you to getting a dSLR, especially if you had the money. At the time, I was not ready. I wasn’t ready to go on to the expense and having to deal with the number of buttons, knobs, handles, port changes and parts. I didn’t even have a dSLR for land shooting! I said to myself that one day I will go for a dSLR, but prepare for it over time and not get everything in one single swoop. My plan was to use the SP-350 as “training wheels” and have fun in the meantime.
Buying Equipment that is Transferable
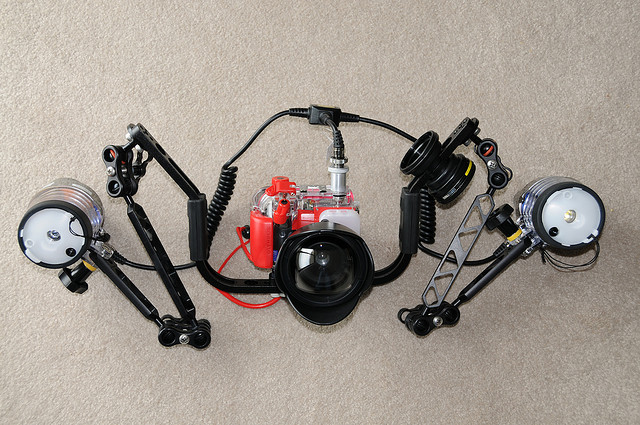
I made a conscious decision to buy equipment that would be transferable to a dSLR set-up. My tendency was to buy a new piece of equipment every time I went on a scuba trip. Over time, I got a second strobe (Sea & Sea YS-110a), the corresponding “Y” cable for two strobes, Ultralight arms, and a Sola Photo 600 focus light. Eventually my set-up looked almost as big as a dSLR setup and very similar as well. In fact, some fellow divers didn’t even notice that I was using a compact camera. This is what my setup looked like:
Getting Comfortable with Manual Mode
I got very comfortable with shooting in manual mode underwater. I had custom settings programmed in my camera for wide-angle, macro and night shooting. I also understood the relationship of ISO/f-stop/shutter speed underwater and how the positioning of the camera and strobes around the subject improved the results on an image. I was becoming good enough with my camera to the point of reaching top places at photo contests, but I was running into a wall with my camera. In particular:
-
Shutter Lag – This is a drawback that most compact cameras have: when you press the shutter the camera does not respond immediately. It might take some time to autofocus. Fast moving subjects like sharks, rays or other fish can be difficult to shoot. The trick is to half-press the shutter for quicker response, but then you are locked to a particular focus distance.
-
Focal Length – The range of the apertures is comparatively small. You only get a range of f2.8 to f8 in the case of the SP-350. This limits your creativity range for depth of field in a macro scenario. In general, it was very difficult to get an image with shallow depth of field with my camera, almost everything on the image was in focus.
-
ISO Sensitivity – Any ISO setting higher than 100 resulted in noisy pictures. So for murky water situations or fast moving subjects (sharks) where you are using quite a bit of ambient light, I was limited. Resulting images tended to come out either too noisy or too dark.
-
Image Quality – The sensor inside a compact camera is rather small (compared to the one in a dSLR), so if your image has lots of contrasting details, that information has to be packed in a smaller area, causing some information to be lost. This is the case in sunburst images or manta rays with backlighting. This drawback combined with the ISO sensitivity made my camera very limited for big animal images in which ambient light is prevalent.
Taking the Plunge with a dSLR
I knew the limitations of my camera and knew that no matter how much I tweaked the settings, I was not going to get a better images, in particular, in some high contrast situations or big animal situations. It was time to move to the next level. In following my approach of “upgrading gradually” I decided to get a dSLR, but only for land use. I got a Nikon D300. I was already a Nikon shooter from the days of film (I had a Nikon FG SLR) and I was really impressed with the D300 sensor capabilities, in particular the quality of the color and low-light sensitivity. When the D300 came out, it was also a generational shift, in terms of its sensor.
At the time, I did get not an underwater housing for the D300, but kept shooting with it on land to become more familiar with it. These are some of the activities that helped me learn about my DSLR:
-
Participate in photography meetups (meetup.com) – This was a way to meet other like-minded camera enthusiasts and also have peer feedback on your images. We would get together and go to different places to shoot skylines, night scenes, close-ups, sporting events, and fireworks. At these different occasions I became more aware of when to use (A)perture, (S)hutter and (M)anual modes, as well as auto-ISO.
-
Buy lenses that you might need underwater – I made a conscious decision to get dSLR lenses that are useful underwater. I first got the Nikon 105mm and used it on land for macro pictures of flowers, butterflies and food. For these kinds of shots, I also used the Nikon SB-800 flash off-camera with a hot shoe cable. Later on, I got the Tokina 10-17 (fisheye) and the Tokina 11-16 (rectilinear wide angle). I used them mostly for landscapes and architectonic pictures.
-
Play with rear curtain sync – At parties and family events, I played with rear curtain sync with an external flash on the camera. A rear curtain sync picture gives you a well-defined subject on the foreground (lit by the flash) with some trails that give you an impression of motion and a blurry background. I’ve seen pictures of sharks using this technique and I thought that shooting people dancing would be a good way to practice.
-
Take flash photography classes – One summer I signed up for a flash photography course at the New England School of Photography (nesop.com) and guess what, the instructor taught us to use manual mode with a flash during day time, just like you do underwater. I also went to one-day workshops on portrait photography and table-top photography (testoftimephoto.com). In both workshops, we dealt with multiple sources and kinds of light. The tips and knowledge from these classes translated to many situations underwater.
Going for the Housing
On a recent trip scuba diving in St. Kitts and Saba, my venerable SP-350 got flooded. It was time to upgrade to a dSLR. I knew that I was eventually going to reach this point, but now I was ready for it. I could not squeeze better pictures from a camera like the SP-350 and I’ve been “training” myself with the D300 for several years now. My entire strobe and arm setup was transferable as well as my focus light. I was not going to be shocked by having to tweak 10 different things all at the same time. Some of these, like using manual mode and repositioning the camera and strobes, had already become muscle memory.
The Shopping Dilemma
It had been a couple of years since I bought my D300 and I was faced with the dilemma of buying a housing for this camera or getting a new camera altogether. These are some of the decisions that I had to make:
-
Consider mirrorless cameras – There was a new class of cameras coming on the market, the “mirrorless” or “micro four thirds.” They were similar to dSLRs in terms of the interchangeable lenses and sensor size, but had the body of a compact, ie no moving mirror. Many underwater housing vendors had come out with housings for these cameras. The price point was attractive, usually between a high-end compact and low-end dSLR. The mirrorless camera also “fixed” or improved all the drawbacks that I had with compacts such as shutter lag, focal length, image quality and ISO sensitivity. For me, I had already gone the dSLR route to shoot on land, so the prospect of traveling with two sets of lenses, batteries and chargers was a non-starter. The “dream” situation would have been if camera manufacturers came up with a mirrorless body that is compatible with dSLR lenses! The options to consider for mirrorless cameras are Sony NEX, the Olympus Pen and the Nikon 1. If I had not started on the dSLR path, I would have considered a mirrorless camera very seriously.
-
Canon vs. Nikon – For me this was a moot decision, since I had already gone the Nikon route. However, considering the Canon EOS 7d would have been a wise choice if I wasn’t already familiar with Nikon. If you do go for the dSLR underwater, you should restrict your choice to either Canon or Nikon. They are the two vendors that are well supported by underwater manufacturers.
-
New camera (D7000) vs. old camera (D300) – The D300 had a couple of drawbacks that I did not like for an underwater camera. It did not have video and the live mode was not very usable (autofocus was limited). A new Nikon camera had come out by then, the D7000. It had rave reviews and its electronics were a generation better than the D300. In addition, it had HD video and improved autofocus in live mode. The price was right as well, much lower than the D300.
-
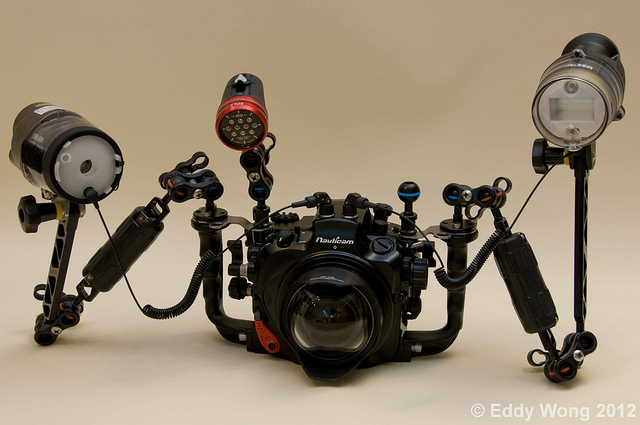
Ergonomics – In deciding on a housing, I went for middle of the road and observed what other divers had been buying in recent years. I also observed what housings had poor designs as I witnessed many dSLR floods on my dive trips. I was really impressed with Nauticam. Even though they were a new company, they reacted very quickly to changes and with many innovations that made their housings easier to use.
And so … I decided for the Nauticam housing for the Nikon D7000!
Here’s what my new dSLR set-up looks like. I was able to “reuse” the Ultralight arms, strobes and Sola light:
Look out for my next article, in which I will talk about my experience taking my new camera for a spin!


