Best GoPro Hero 7 and 8 Underwater Settings
GoPro has added several manual and customizable settings to their latest Hero 7 and Hero 8 action cameras. Producing professional quality underwater videos with a cinematic feel is now at our fingertips. The 4k 60fps resolution along with the incredible HyperSmooth 2.0 image stabilization features an unsurpassed stable, smooth result. GoPro also added a new twist to the popular Time Lapse option with TimeWarp, a feature which essentially creates a super fast, condensed version of your video.
Which settings should you use? I took the Hero 8 to the ocean on Maui, Hawaii to find out which combination produced the best quality results.
GoPro Hero 8 Available Now At Bluewater Photo!
U.S. MSRP $399.99

Jump To Sections
Video Settings I Time Lapse I TimeWarp
Photo Settings I Pro Tune Settings
Best GoPro Underwater Video Settings
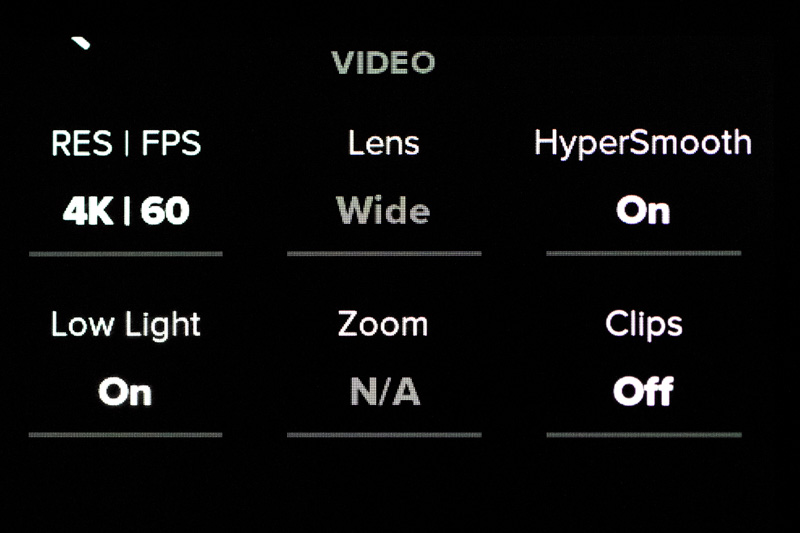
GoPro’s incredible HyperSmooth 2.0 stabilization minimizes any kind of shake and creates a cinematic look to the videos. To further add to the feel of a professional quality, I highly recommend 60 fps at 4k resolution. Be sure to test your editing system with a sample video first to be sure it can process the 60fps. You may need to drop it down to 2.7k @ 60p, 4k at 30fps or even 1080p to view it on your laptop. If this happens, and you’d strongly prefer the 4k 60fps, GoPro recommends downloading the free Handbrake software program that converts the video to a user friendly file.
- Resolution: 4k
- Frames per Second: 60fps
- Lens: Wide
- HyperSmooth: On
- Lowlight: On
- Zoom: 1x
- Clips: Off
Best GoPro Underwater TimeWarp Settings
Speed your video up to 30x and create an ultra fast version of your dive with TimeWarp. It takes 5 minutes of straight recording time to create a final 10 second video with the 30x option or get 20 seconds of video with 5 minutes of recording time with the 15x option. Keep your battery life in mind when it comes to recording long segments.
- Resolution: 4k
- Lens: Wide
- Speed: 15x or 30x
- Zoom: 1x
Best GoPro Underwater Time Lapse Settings
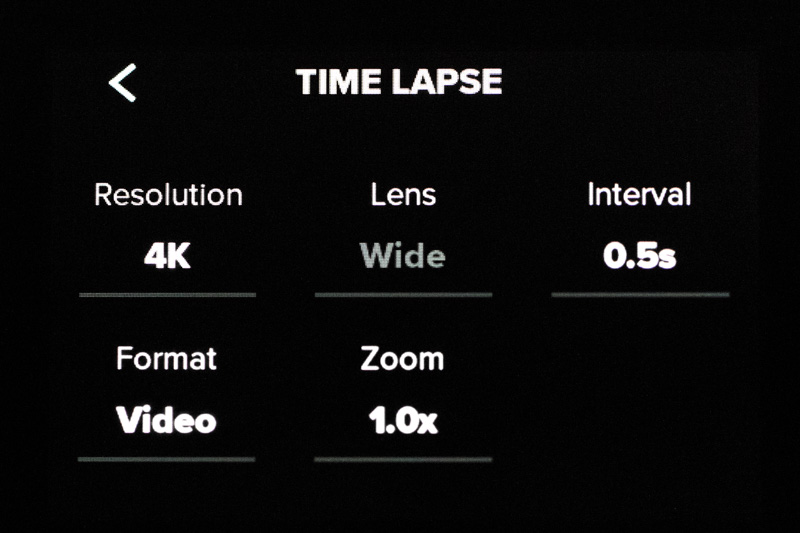
Time Lapse takes photos at predesignated intervals and ultimately stitches them together to create a video playback. For the smoothest rendition of underwater scenes, I’d suggest the .5 or 1 second selection for fast moving subjects. If you have a very slow moving subject like a sea star cruising across the sand you can get away with 2 or maybe 5 second intervals but be aware that the camera would need to be held very steady for a decent turn out. It's always best to take more photos (.5 second intervals) for the smoothest playback. If not, then the fish swimming by will have only been partly recorded and will end up making the video appear a bit "skippy".
Topside scenes can be a different story. Chances are that we have more options to shoot slower moving subjects like the clouds or a sunset. A 10 second interval works well for a smooth playback of rolling clouds. But be aware, two hours of recording time at the 10 second interval will only render a 20 second final clip!
- Resolution: 4k
- Lens: Wide
- Interval: .5 or 1 second for quick videos
- Format: Video
- Zoom: 1x
What Is The Difference Between GoPro Time Lapse, TimeWarp and Video?
The difference between video vs. TimeWarp is essentially just speed. TimeWarp condenses your video at a faster rate to pack the entire clip into a shorter time. It's basically like watching it in "fast forward". You can choose how fast to speed it up in the settings menu.
Time Lapse however, is a series of images stiched together to create a video. How many images the GoPro will take in a given time is decided by setting the interval starting at every .5 seconds.
The following video demonstrates the differences between Video, Time lapse and TimeWarp. I chose to shoot this topside to keep the GoPro Hero 8 on a tripod and shoot the EXACT same scene so that the differences can be as distinct as possible.
Best GoPro Underwater Photo Settings
When it comes to shooting photos with your GoPro, a number of settings could be labeled as 'best' depending on your preferences. Do you prefer the camera to call the shots? Would you like to have a file ready to share without having to edit it first?
The newer GoPro models offer RAW plus jpeg which is incredible to have both the RAW file and a ‘no editing needed’ jpeg that is ready to share.
Superphoto allows the camera to choose the best settings to create an image that is enhanced with color, contrast and sharpening for the best detailed final jpeg.
HDR (high dynamic range) blends a series of images taken with what’s called ‘bracketing’. Bracketing is where the camera shoots a series of images with various exposures each meant for their own shadows or highlights and then blends them together for one final image. It’s not a setting that I’d recommend with the movement involved in underwater photography.
If you’re up for the challenge, GoPro now has an option to manually set your shutter speed. This could potentially make or break your images. We all love to have the option to fine tune our content but keep in mind that one setting will not suit all especially if you plan on switching from video to photo during the same dive or if your dive site consists of bright light AND dark nooks and crannies . Having an external video or focus light could greatly improve your images not only for this specifically but all around with any setting on the GoPro. Check out the fun and ultra compact Sidekick light for GoPro.
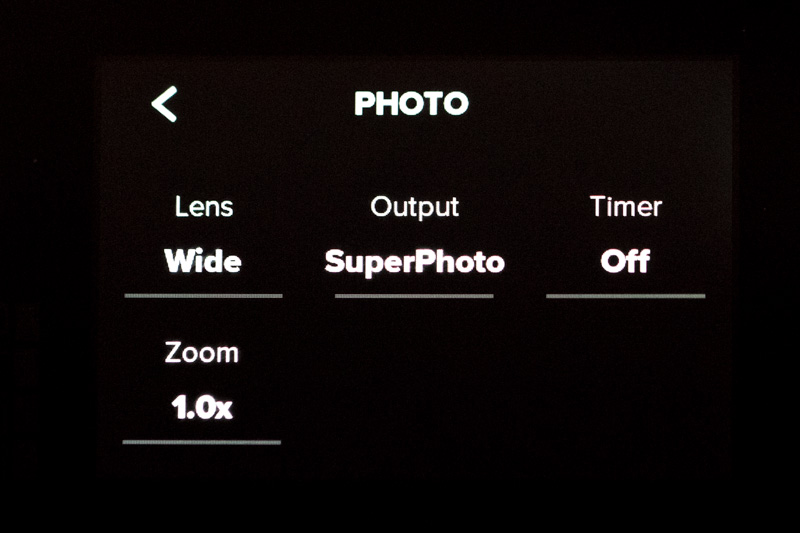
- Lens: Wide
- Output: RAW or SuperPhoto
- Timer: Off
- Zoom: 1x
ProTune Settings for GoPro Underwater Content
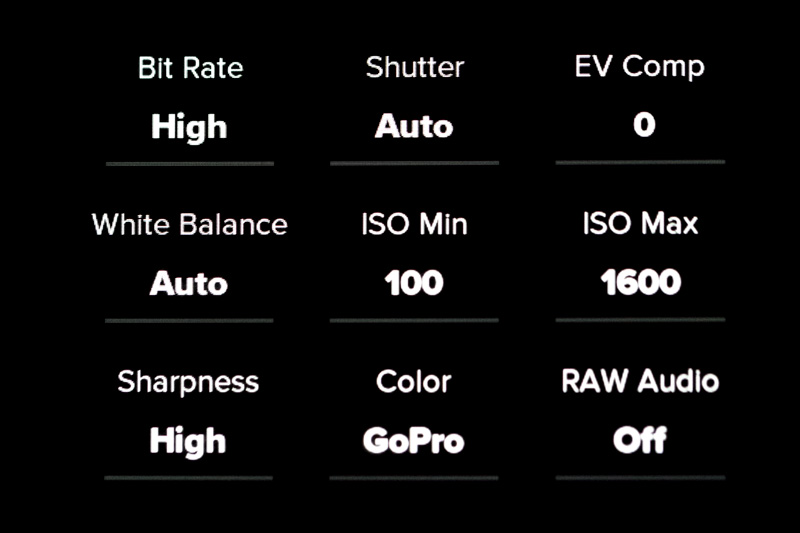
ProTune allows for further customizations beyond the resolution settings. I recommend a number of these to be either on auto or off because of the limitations with touch screen controls underwater. If your GoPro is a waterproof model and you are staying within its required shallow depths, then you may be able to get away with manual settings since you’ll have the ability to change them without a dive housing but for the rest of us, playing it safe for all lighting scenarios is the best.
It is always recommended to shoot on a low ISO to avoid grain, or noise, in the final image but if your not diving with video lights and your dive site consists of dark caves or even if it’s a cloudy day, a higher ISO is necessary. I find that GoPro’s option to set a range is incredible and can really be customized to one’s preference.
Custom white balance is a tool that I use in underwater photography on every dive but this is 1) on a system where I can change the white balance underwater if needed and 2) this is for RAW photos. RAW images are stored as 14bit files which allows for much further editing than 8 bit jpegs. It might not seem like much but if you want to change the white balance in post process then RAW is necessary. Please note: You will need certain software to to view the .GPR files. I recommend the latest version of Adobe Lightroom or Adobe Bridge with Camera RAW.
The variation of natural, ambient light penetrating the water column changes with your depth underwater. If the GoPro white balance is set too warm, then your shallow content will appear too red. This will be most visible in the bright highlight areas. You should also consider manual white balance only if you can edit your video’s white balance in post production software. It could be fun to experiment with especially if your dive plan is to spend the majority of your dive around the same depth but at the same time could be a nightmare if you don’t realize that the color is completely wrong when it’s too late. A good option to avoid this would be shoot on auto white balance and use a red filter that can be removed underwater in shallow depths.
- Bit Rate: High
- Shutter: Auto
- EV Comp: 0
- White Balance: Auto
- ISO Min: 100
- ISO Max: 1600
- Mics: Auto
- Sharpness: High
- Color: GoPro
- RAW Audio: Off
GoPro Preference Settings for Underwater Content
GoPro Preferences is comprised of the general settings for items like your Wifi, time, date, etc. It also contains a few key settings that will affect underwater video and photos. Access this menu by swiping down from the top of the screen. Most of it is self explanatory but a there are few options that can make your underwater experience more enjoyable such as keeping the screensaver on so that you can actually see what your recording and keeping the default mode to what you last used so that your settings stay the same every time the camera shuts off.
I am not one to use a camera's audio 'beeps' when shooting underwater or topside but for GoPro I prefer to have the camera beeps on as loud as possible. The sound is not as loud underwater in the housing as it is on the surface out of the housing. 1) It gives confirmation that the camera is on or off when operating it underwater. The GoPro's battery certainly isn't known for longevity so making sure the camera is actually off when I need it to be is important. 2) With only a couple of buttons controling everything it's just a second confirmation that the button was actually pushed. Sometimes things get overly exciting underwater and I'm sure we've all been there where we thought we hit record as that manta ray swam by only later to find out that was not the case.
- Camera Beeps: On High
- Default Mode: Last Used
- Auto Power Off: 5 min
- LEDs: All On
- Brightness: 100%
- Screensaver: Never
Conclusion
Remember to familiarize yourself with your GoPro first before bringing it on a dive. Take a few test shots and play around with the TimeWarp and Time Lapse settings to see the difference. Be sure that if you go for the 4k video and/or RAW stills that your laptop and editing system are up for the heavy processing load. It's always nice to get the highest quality content possible but there are times when smaller, shareable files are best.
RECOMMENDED ARTICLES
SUPPORT THE UNDERWATER PHOTOGRAPHY GUIDE:
The Best Service & Prices on u/w Photo Gear
 Visit Bluewater Photo & Video for all your underwater photography and video gear. Click, or call the team at (310) 633-5052 for expert advice!
The Best Pricing, Service & Expert Advice to Book your Dive Trips
 Bluewater Travel is your full-service scuba travel agency. Let our expert advisers plan and book your next dive vacation. Run by divers, for divers.


