Top 5 Shooting Tips for Underwater Snoots

Unlike some of my warm water counterparts, my diving patch is located in Victoria, Australia. It rarely cracks 20 degrees Celsius, 20m visibility is astonishing and the vast majority of our ocean floor is a messy and complicated mix of weeds, sponges, broken shell and sand. Luckily, this visually puzzling bottom composition camouflages a treasure trove of macro life that surrounds our piers, and it can all be found in just a few meters of water.
The challenge faced by underwater photographers is this: how do you photograph such a small critter amongst its camouflaged home without all of your images becoming bland scientific identification shots? How do you take a photograph with an artistic spin that is more suited to an art gallery than a textbook?
When you consider that photography is simply the art of creatively capturing light, it makes sense that as an underwater photographer you should have the ability to actually control your light beyond the standard intensity dial. With the exception of some strobes such as the ‘zoomable’ Olympus UFL-2, you are usually limited to a 100-degree light output flooding your entire scene; weeds, critter and all.
The Snoot in Underwater Photography
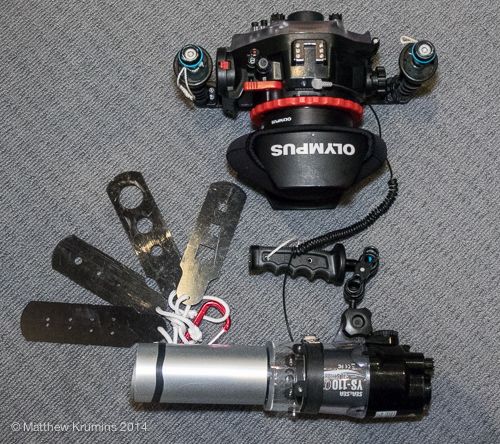
For those who don’t know, a snoot is a device that affixes to the end of your strobe and narrows the 100-degree beam down to a fine point or ‘spotlight’. Some strobes do this via a series of plastic tubes representing a kind of funnel, but quite new to the market is the RetraUWT LSD (Light Shaping Device). This device allows different aperture discs to be used, projecting a variety of light patterns in a number of shapes. The beauty of this is that you have more control than ever, it’s quick to change apertures, it’s custom built for your strobe’s model and (importantly) it’s neutrally buoyant.
The concept of the snoot is easy enough to understand, so straight out of the box I had some high expectations on what I was going to achieve on my first dive; but as per usual with new toys, there was a whole new learning curve. So after a number of practice dives and snoot-shooting dives, I want to share with you my top 5 tips to help you skip the hardships and get straight to the results.
1. The Right Snoot with the Right Strobe
This tip is short and sweet. When you are trying to aim your snoot at your subject, the only thing that can accurately show you where it is pointing is the strobe’s focus/modeling light (which is also being focused down through the snoot). I have seen people try to line it up visually without a focus light guiding them, and I have seen every one of them leave the water cursing their gear. Keep in mind that focus lights can become extremely dull due to light loss within the snoot itself if the light and snoot aperture do not line up. Strobes with a focus light in the center work best, however there are snoots designed for off-center lights as well. It is always best to check compatibility with your supplier.
2. The Right Conditions
As you’re aware, dive conditions like visibility don’t generally affect macro photography. The same goes for macro snoot photography, however there are some condition considerations when taking the snoot down. First, you need to accept that with snoot photography you are generally photographing very small critters with a very small beam of light, which means that you are going to want to choose dive conditions with very little surge, helping you to stay steady without destroying a dive site.
The other less obvious consideration is to choose days where the lighting conditions are a little darker; overcast days, early morning, late afternoon or (ideally) taking your snoot out on night dives. The reason for this is that your camera settings are likely limited to a max shutter speed of 1/250th, which in bright sunlight means you will need to stop your aperture down to extreme levels in order to darken out your surroundings (f/16-22). This can cause a loss of sharpness and also limits your ability to maintain shallow depth of field. Having naturally dark or dim conditions makes it easy to achieve black backgrounds as well as helping to see the focus light beam when aiming your snoot (believe me, there is nothing more frustrating than trying to see your focus light with a snoot when the sun is beaming above you).
3. Snoot Placement
When you see most snoot shots, they are taken with the snoot placed directly above the critter. This is usually done with a series of arms, clamps and a few minutes of set-up to align the snoot’s ‘spotlight’ to the center of your frame. My issue with this is that for every different subject you want to photograph, you will find yourself loosening clamps, moving your snoot, and realigning the ‘spotlight’ only to realized that your critter has moved along to a more interesting and daring photographer. Experience has taught me that it is actually much simpler to live on the edge and hand-hold the snoot in your left hand, freeing up your right hand to operate the shutter release. After all, your arm is far quicker and more flexible than a ball and clamp system.
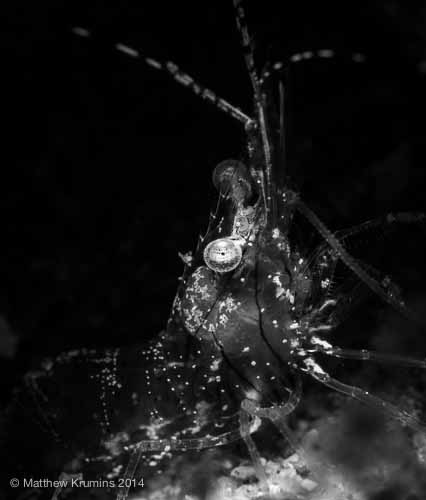
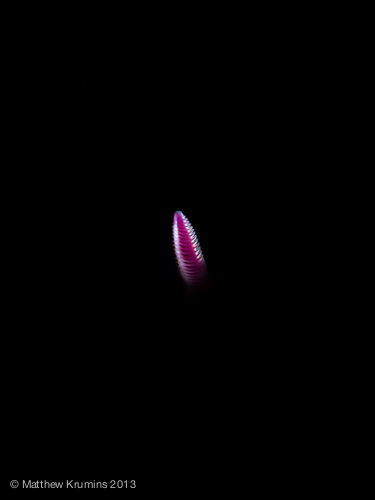
The other advantage of hand-holding your snoot is that you are not limited in your lighting creativity. Spot lighting subjects is one creative approach, but how about playing with selective lighting with different snoot angles? You will be surprised at how many photographic opportunities this will open up if it is quick and easy to reposition your light. Take my nudibranch rhinophore shot (below) as an example! The only thing you need to ensure is that you are using the optimal working distance for the snoot. This is the distance from your snoot to the point of the subject where the beam of light is in focus. If it is too close or far away it becomes a soft beam with little definition. You can find the working distance for your snoot by looking at the snooted light beam from your focus light and moving the strobe in and out from your subject.
4. Controlling Strobe Power
Once you have maxed our your shutter speed and stopped your aperture down to create black backgrounds, you will find that most prosumer strobes will need to be cranked to high power to illuminate your subject. However if your strobe is too bright when being focused down to a precise dot of light, you tend to get light spill onto the surrounding areas, leaving you with beautifully spot-lit subjects but no defined spotlight. Finding the balance between the power required to light your subject subtly and not blowing out the exposure can be a bit tricky, but practice makes perfect. The important thing to remember is that from an eco-diving point of view, you are best starting dimmer and working your way up to the perfect balance. Your strobes are very powerful and many critters are very sensitive to light; fried fish are not my cup-of-tea. Once you have your level set you will only make minor adjustments throughout the dive.
5. Processing the Blacks
All RAW files require some form of post production, especially snoot images. Light spill from strobes, slightly off-center subjects and imperfectly shaped ‘spotlights’ are just a few of the common problems faced when snoot-shooting. Using tools in Adobe Lightroom such as the crop tool and the Radial Filter allow you to clean up any of these slight imperfections and really make your subjects ‘pop’. The other particularly helpful tool is your ‘Blacks Slider,’ which allows you to crush the blacks in your image. When editing, be sure to monitor your histogram and sample your subject surroundings to make sure that the blacks are in fact pure black.
Ultimately, practice makes perfect when using a snoot and like everything in life, some things will work for some and not for others. To me, the most important thing is to never limit your creativity and always dare to try something different.


