Get a Handle on your Housing
Fun fact #324: This hobby is expensive. Protecting my invesment is of utmost importance to me, and at the same time I like to help the boat crews that I frequent make handling my rig as easy as possible.
Handing a rig (large or small) to a crew member near the swim-step of a swaying vessel can, at times, be less than easy. After too many close calls of a dropped rig, or a rig grabbed by a sync cord (only takes once), I decided to look into getting a lanyard handle for my housing.
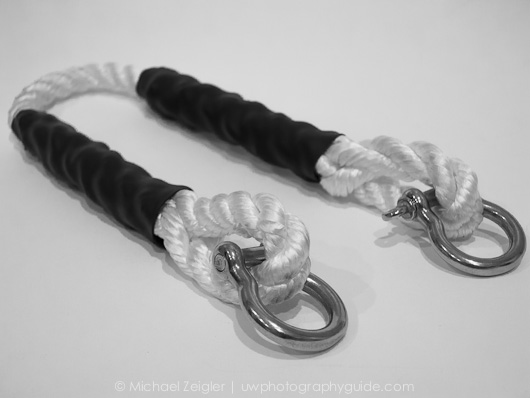
The finished product.
I know that Nauticam makes one, but a Google search for purchasing one basically came up empty. I have seen many DIY handles on various rigs that include a series of knots, but I wanted one that avoided knots, since these are weak points in the rope.
The DIY Rope Handle Project
After some research, I determined that creating an eye-splice would be one of the strongest and “cleanest” ways of creating the loop for the handle. After searching the internet for an easy-to-follow tutorial for how to make an eye-splice without the use of tools, I finally found one here. Then I bought all of the materials below at my local hardware store (rope, shackles, and shrink tubing) for a whopping grand total of $11.50.
Materials needed
-
3/8″ nylon rope (see below for estimating length needed)
-
2 stainless steel anchor shackles (3/16″ size)
-
these have a working load limit of 530 lbs…each
-
-
Package of 3/4″ Polyolefin Heat Shrink Tubing (2 in a pack)
-
these shrink down to 3/8″ when heated with a hair dryer
-
this will typically be found in the electrical section of the store
-
-
Tape for the ends of the rope strands
-
Lighter to melt the ends of the nylon rope
-
Scissors for, well, you know
-
Copper wire (optional)
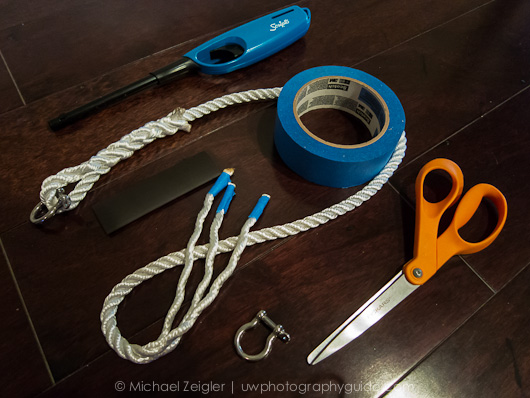
The only ingredient not shown here is a “can-do” attitude.
The steps
-
Determine the length of rope you’ll need. In my case, I decided to attach the handle to the base of my ULCS arms. After setting them to their widest position, I took a measurement, taking into consideration the shackles.
-
For the purposes of this project, and for the strength of the handle, I chose to back-splice 6″ on each side. So, for my 16″ handle (finished length), I purchased 36″ of rope. Obviously I had a bit left over for wiggle room and unforseen errors, but at 27¢ per foot, why not?
-
Unravel ~6″ of one end of your rope, then singe the ends with the lighter, and wrap with tape. The tape makes the splicing process a lot easier.
-
Follow the step-by-step eye-splice directions here. Helpful hint: on that tutorial, you can move your cursor over each numbered step manually, so you can move at your own pace.
-
Once you’ve finished creating your first loop, roll the splice between your two palms to help smooth out the splice. Nice work!
-
Measure and mark where you want the middle of your next loop, and splice the other end.
-
Once you’re done with other end, take a step back and admire your work. Job well done.
-
Now comes the fun part. Slip one of the 3/4″ Polyolefin Heat Shrink Tubing sleeves over one of your splices. These sleeves are ~6″ long, so they’ll cover the splice nicely. Grab the nearest hair dryer, set it to high heat, and watch the magic happen. Once sufficiently “shrunk,” this acts to protect the splice.
-
Repeat previous step with the other shrink tubing sleeve on the other end, check the bond length.
-
Attach your new, awesome rope handle to your rig with the two anchor shackles.
-
You’re done!
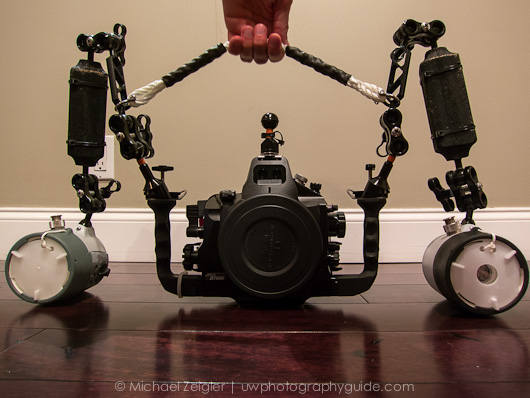
Now handling my rig is easier than ever, especially for the crew, when I’m entering and exiting the water.
Although there are many versions of handles out there, this happens to be one of the strongest, most customizable, and cost efficient. Enjoy, and have fun with it!


