Pushing the Limits of Macro with a Compact Camera
I started diving 20 years ago while on holiday in the Dominican Republic, and fell in love with it immediately. Then, I tried my first muck diving, and found I love that too. It was like playing in the mud and reminded me of my childhood! But my big passion for underwater macro photography only started two years ago with a holiday in Lembeh Strait.
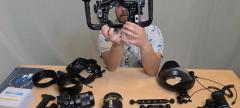
By accident I had a compact Canon G16 at home and decided to buy a Fantasea underwater housing for it. It was really fun taking pictures, but soon I realized that for underwater macro photography I needed more than just a housing. So, I bought a strobe (Sea&Sea YS-03) and a +5 macro lens (H2O tools) and took my new rig to Lembeh. I was lucky with the guide I got, who showed me so many critters I had never seen before. Taking pictures of them was really fun, and I quickly became hooked. Since then, my great passion for underwater photography has only grown!


Time to Upgrade (Again)
Soon I realized that for the super tiny underwater critters I wanted to photograph, my setup was not sufficient. So I upgraded again, adding a second strobe (Sea&Sea YS-D2), a focus light (X-Adventurer Nexgen 1300WUL), and a +15 super macro lens (Saga Wet Lens +15 Makro Achromatic). While upgrading and discussing photography with a lot of people, I found that the Canon G16 is especially well-suited for macro photography. Lucky me! (Editor's note: the Canon G16 was released in 2013. For the newest model check out the Canon G7X Mark II)
![]()
The Canon G7X Mark II is available now at Bluewater Photo!
Focusing was initially the most challenging aspect of shooting with a diopter. You don’t have a huge depth of field with this setup, especially when zooming in to photograph the super tiny critters. So you have to focus really well. I remember one occasion during my first dive with this setup.... I was trying to get a picture of one of my favourite critters, a tiny Shaun the Sheep nudibranch. There was quite a surge and it was pushing me back and forth continuously… it was almost impossible to get this tiny critter into focus. My dive guide had a slate with him and wrote onto it ‘RELAX’! I laughed so hard that my mask flooded. I handed over my camera to let him try himself. And he had the same problems…. After the dive he told me that is was so difficult to get the tiny sheep nudibranch into focus because of the surge. But with enough practice I got better and became more relaxed with shooting super tiny critters. Sometimes you just have to be a bit patient!


Getting Up Close and Personal
Nowadays, it sometimes happens where the critter itself is not that photogenic or a bit boring…. either too large, not in a good position, not easily discernible from the background, etc. When this happens, it can be really fun to concentrate on just one feature of this critter with a close-up shot. This is especially great with supermacro photography.
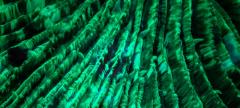
Here are two examples for this. The first one is a close-up shot of the eyes of a Carpet Sole we spotted during a night dive in Lembeh Strait. Carpet soles are well camouflaged and really hard to separate from the background, especially when you are an amateur photographer and not that experienced with strobe positioning and light settings. That may also be the reason why I thought they and other flatfishes are boring and not so good for photos. After trying to get some “whole fish shots” of this one, I decided to go only for the eyes because they are special… really huge compared to the size of the fish, and with a blue tint in them. I loved the result, with all the details clearly visible!

Another example is a close-up shot of only one eye of a huge Conch snail we spotted while diving in Pemuteran, Bali. Many people take good “both eyes shots” of conch snails. However, this Conch snail was so huge that this shot was nearly impossible – even without macro lenses - because the eyes were coming out of the huge shell on different sides. So I concentrated on only one eye of the snail instead. The biggest challenge with this shot was having to be really, really patient. The Conch snail was very cautious and moved its eye out of its shell very slowly. So, I set my focus and strobes up, and then had to wait a bit for the eye to move into the right position. The result was a Conch snail eye reminding me of a telescope, with only the upper part in focus.

Playing with Snoots
Sometimes it can be fun to play around a bit and get experimental in order to make the photo more special. A helpful tool for such shots is a snoot - either in the form of a snoot torch or one you can mount on a strobe. Both work well with a compact camera setup. (Editor’s note: if you want to learn more about snoots, check out our Ultimate Guide to Snoot Photography).
My first snoot dive was in Lembeh. My guide insisted that I try something new, and he brought his Do-It-Yourself snoot which we mounted on one of my strobes. I was totally inexperienced in shooting snoot pictures. However, I soon had a lot of fun with it because you can highlight a critter in a very nice way. This is done by adjusting the strength of the flash of the strobe in conjunction with the camera settings. You can create a “spotlight” effect on the critter, while also getting a dark background. From my experience, it is best to start with the highest f-stop that your camera allows, which is f/8 with the setup I am using. Then you can play around with the shutter speed and/or the ISO to adjust the lighting of the picture. If the picture is too bright you can increase the shutter speed, lower the ISO, or both.
For snoot pictures, I usually want a bright object with a dark background. Depending on the snoot you are using, this works both for macro and super macro critters. On my first diving day with a snoot, I took my favorite snoot photo – A Red Devil Scorpionfish – I called it Darth Vader. Actually, it earned an Honourable Mention in the Through Your Lens photo contest of Scubadiving Magazine in 2018.


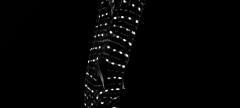
Some of my experimental shots also happened accidentally at first, providing me with new ideas for photo composition. I took a shot of a Goniobranchus kuniei with my super macro camera setup, but without zooming in. The pic was taken in Menjangan Island, Bali in a place with quite strong current and I was just too lazy to screw off the 15+ super macro lens. But it turns out that I really liked the “porthole” effect - as some people called it - and I sometimes shoot like this on purpose now.

My passion is to not only document critters but to impart images with a feeling, a special atmosphere, and to show these animals to the world in order to raise awareness for our oceans. Each of my photos has a title, which mostly expresses my thoughts or feelings when I look at it. Originally, ideas for photo titles mostly occurred to me when checking the photos on my computer. But this is slowly changing and the idea for the photo title is often already in my head when I am shooting a critter. But perhaps the biggest challenge is to transfer the feeling I have in mind to the shot in terms of composition, light, and atmosphere…. but I am still learning a lot and working on it!!!


A Big Thank You
Finally, many of my photos would not exist without my guides. And I want to say Thank You to them for always trying to find the critters I love most. The pictures included in this article were taken in two locations, Lembeh Strait, Sulawesi and Pemuteran, Bali. A very big THANK YOU to Yap Katumbal and Gede Karma, and all the people at Bastianos Lembeh Dive Resort and Ocean Dreams Pemuteran!
My Top Tips for Compact Camera Underwater Macro Photography
In conclusion, I wanted to leave you with my top tips for underwater macro photography.
- Choose the right setup depending on the size of critters you want to photograph.
- Play around with strobe position and camera adjustments.
- Experiment and try new things like using a snoot or different picture compositions, for example close-up shots.
- And most important: Be patient and always keep trying!
Thank you for reading and I hope you find these useful!
Articles on Compact Camera Photography
- Underwater Photography with a compact camera
- From Compact To dSLR: Preparing For The Switch
- Underwater Housings
- Underwater Photography for Beginners
Gear Links
- Canon G7X MK II Review
- Fantasea Canon G16 Ultimate Package
- Fantasea G16 Housing & Camera Bundle
- Fantasea G16 Underwater Housing
- Sea & Sea YS-D2J Strobe
- Sea & Sea YS-03 Strobe
- Bluewater +7 Macro Lens
Join One of Our Macro Underwater Photography Workshops!

Want to get in some world-class macro diving on an underwater photography workshop with our sister companies, Bluewater Photo and Travel? Check out some of our upcoming offerings for world-class macro shooting:
RECOMMENDED ARTICLES


ABOUT THE AUTHOR

Kathrin Landgraf-Kluge grew up in a village in East Germany. She was fascinated by nature and wildlife from her early childhood onwards. Not surprisingly, keeping with her fascination she went on to study biology. She fell in love with diving when she was 20 years old, and has not let go since then. She loves travelling, especially in Indonesia. Her big love for underwater macro photography started there about 2 years ago. Since then she has done her best to share her passion for the tiny and super tiny underwater critters with the world. Follow her on Instagram @kathrin_underwater if you would like to see more.
SUPPORT THE UNDERWATER PHOTOGRAPHY GUIDE:
The Best Service & Prices on u/w Photo Gear
 Visit Bluewater Photo & Video for all your underwater photography and video gear. Click, or call the team at (310) 633-5052 for expert advice!
The Best Pricing, Service & Expert Advice to Book your Dive Trips
 Bluewater Travel is your full-service scuba travel agency. Let our expert advisers plan and book your next dive vacation. Run by divers, for divers.