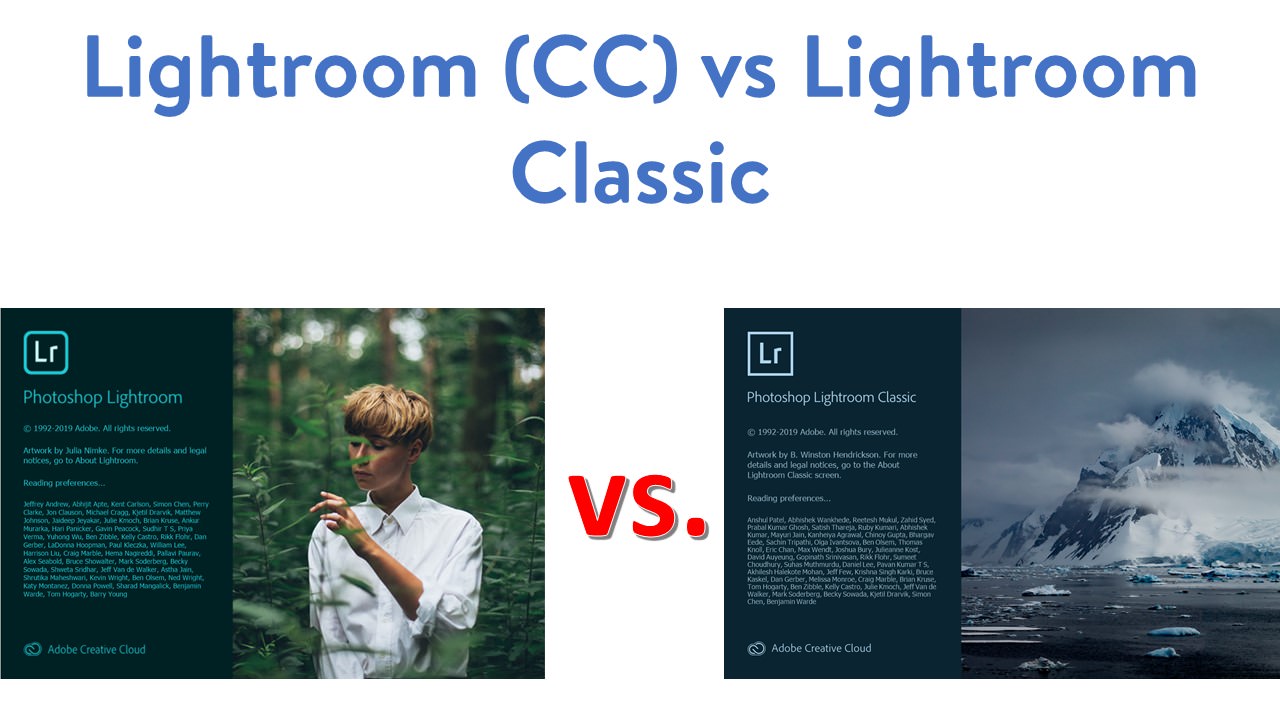
Lightroom CC vs Lightroom Classic
Adobe Lightroom is the go-to program for editing underwater photos, and for good reason. But the question is, which version to use? Plain old Lightroom (formerly Lightroom CC) or Lightroom Classic?
Lightroom (formerly Lightroom CC): Lightroom is the latest name for Adobe's cloud-based version of Lightroom. It used to be called Lightroom CC, up until a very recent update where the CC was dropped. Basically, this is a "light" version of Lightroom, designed to be cloud-based, with a simple user interface and simpler functionality.
Lightroom Classic: Lightroom Classic is the new name for the latest iteration of the old Lightroom 6 (and previous models). It is designed for desktop-based editing (as opposed to cloud-based) and contains all the original Lightroom functionality.
Lightroom vs Lightroom Classic
To start this comparison, let's compare the core functionality offered by these two programs. I've tried to cover everything I use when editing my underwater photos in the below table.
Function | Lightroom (formerly CC) | Lightroom Classic |
Create separate catalogs | No | Yes |
Flag photos as rejected or picked | Yes | Yes |
Give photos star ratings | Yes | Yes |
Survey View (photo comparison) | No | Yes |
Collections | Yes (called Albums and Folders) | Yes |
Color flags | No | Yes |
Delete rejected photos | Can filter for and delete, but only removes from album and cloud, not hard drive. This is a big pain when you have no internet (ie on a dive trip) and want to delete unwanted photos | Simple menu option to delete all from catalog only, or from catalog and hard drive |
Automatic uploading to cloud | Yes | No |
Multi-person album collaboration | Yes | No |
Metadata | Limited | More functions than you'll ever need |
Histogram for editing | Yes | Yes |
See camera settings | Can pull it up separately from editing | At top of develop pane, easy to see while editing |
Crop & rotate | Yes | Yes |
Custom white balance | Yes, nicer organization | Yes |
Adjust levels, contrast, presence | Yes, nicer organization | Yes |
Auto levels | Yes, very similar to Classic | Yes, very similar to cloud |
Tone Curve | Yes | Yes |
Brush, gradient filter, radial filter | Yes | Yes |
Hue/Saturation/Luminance | Yes | Yes |
Sharpening/Noise Reduction | Yes, easier to access | Yes, but easy to miss/forget |
Chromatic aberration/defringing | Yes | Yes |
History panel/functionality | None, can only go back and forward using undo/redo | Walk back and forth through every editing step taken |
Integration with Photoshop | Yes | Yes |
Create virtual copy | Yes (“duplicate”) | Yes |
Copy settings to multiple photos | Yes | Yes |
Add Watermark | No | Yes |
Custom file type and file size for exports | No. Can only output as jpeg or original file type, and set the max resolution of the long edge | Set file size/quality, resolution, file type (including jpeg and TIF) |
File Handling & Sorting
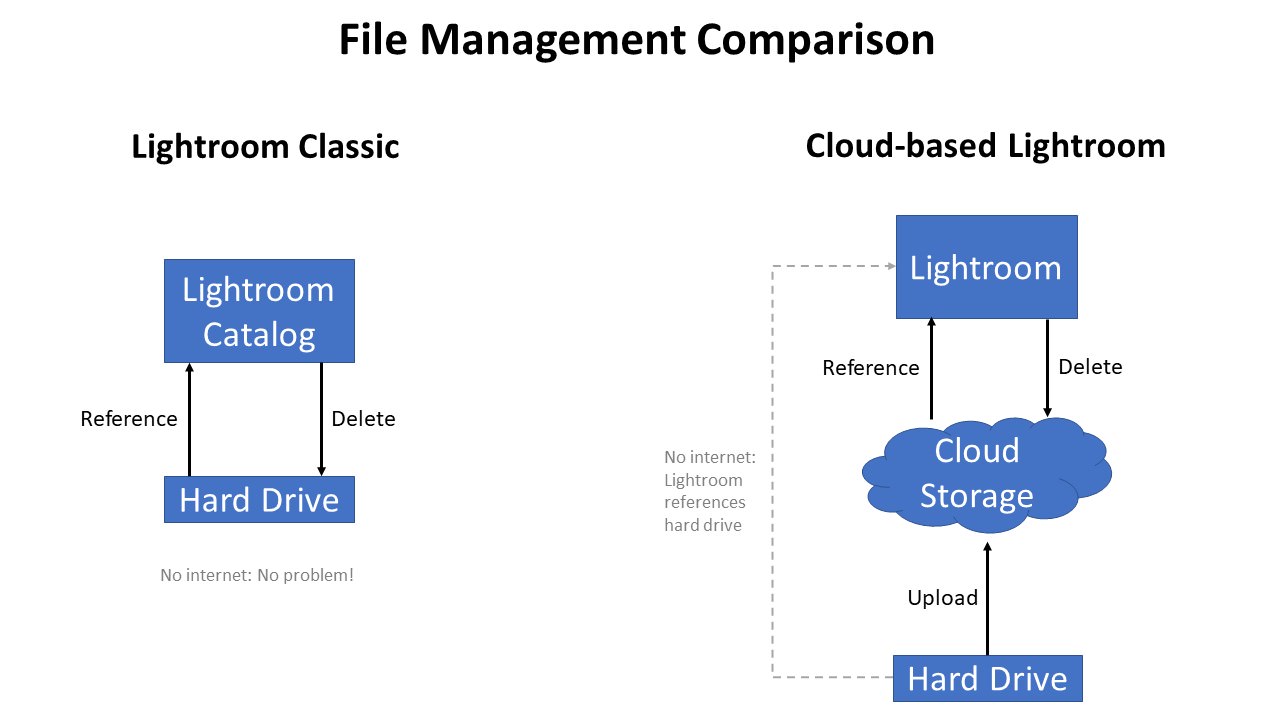
The two versions of Lightroom have very different philosophies for handling files, catalogs, and so on. Lightroom Classic handles everything through the hard drive. You import files from your hard drive, and manage them on the hard drive.
With cloud-based Lightroom, once you add files, they automatically get synced and backed up to the cloud. At this point, you don’t need your hard drive versions any more, and can just delete them while continuing to process your photos from the cloud. Then, you can sort through and reject your unneeded photos as you normally would with Lightroom Classic, and then bulk delete them from the cloud.
With cloud-based Lightroom, after uploading you can now access your cloud-based images from any device – your computer, your phone, your tablet, whatever. You can do cool things like making edits on your phone while you’re waiting in line at the post office, or waiting for your meal at a restaurant – talk about efficiency gains!
On one hand this cloud functionality could be very convenient, but for divers, it may actually cause an insurmountable issue. If you’re out shooting tons of photos on a liveaboard, or at a dive resort with poor internet (as most are prone to have), with Lightroom Classic you can transfer them all to your hard drive, and easily sort through and get rid of the rejects, using Lightroom’s efficient sorting functions and the option to remove them directly from your hard drive when you delete rejected photos.
However, with cloud-based Lightroom, since there is no internet connection, you have to keep your RAW files on the hard drive, rather than uploading to the cloud and then deleting. Cloud-based Lightroom has no way to bulk delete your rejected files from your hard drive; you can only reject them and delete them from Lightroom. This means that you cannot use Lightroom to sort through your photos, flag the rejects, and then clear them off your hard drive to make space for more photos. Instead, you have to go through them one-by-one, deleting them individually off your hard drive through windows explorer. I have seen people run into this issue with cloud-based Lightroom on a liveaboard, and it is extremely frustrating, with no way to get around it.
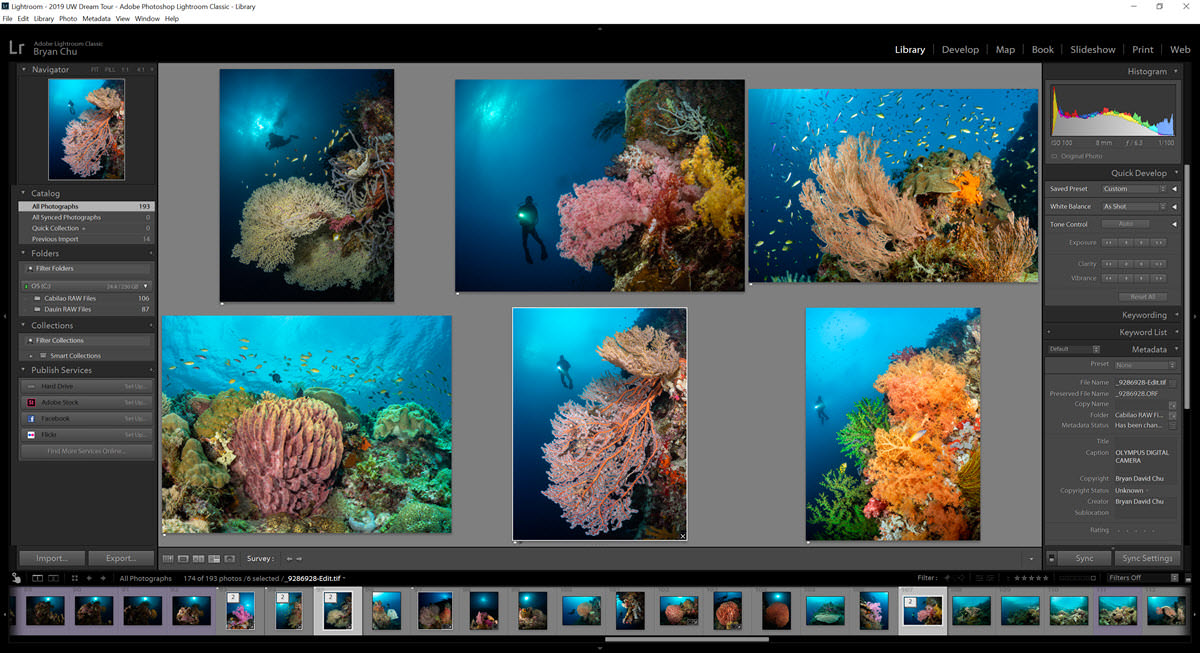
Additionally, Lightroom Classic has much better functionality for sorting and comparing photos. The biggest advantage is survey view, which lets you compare photos head-to-head, and then automatically reorganizes and zooms as required when you add or remove photos to your selection. To learn more about how to quickly and efficiently sort through your photos, check out our detailed tutorial article and video.
Along with rating and rejecting, you can also apply color labels, which I have found very useful on jobs where I need to separate out different photo types (ie topside vs room photos vs underwater). This may be a relatively a minor thing, but cloud-based Lightroom is also lacking this function.
Catalogs, Albums and Metadata
Cloud-based Lightroom uploads everything to one big cloud repository. You can break the photos up into albums, but all of your photos will always be up there. There is no option, like in Lightroom Classic, to just make a catalog for an individual trip or project, and then clear it out when you’re finished. Other than this though, the album and folder functions of cloud-based Lightroom are similar to Lightroom Classic’s folder and collection functionality.
As far as metadata goes, anyone who uses it in Lightroom Classic knows that there are a dizzying array of options and functions. In cloud-based Lightroom, you can change Title, Caption, Copyright, and add any keywords you want. You can add keywords to multiple files at one time by typing them in, but more complex functions like painting metadata across images are not available. I don’t use metadata much, so I can’t comment a whole lot, but basically cloud-based Lightroom is much simpler and more limited in functionality.
Photo Editing
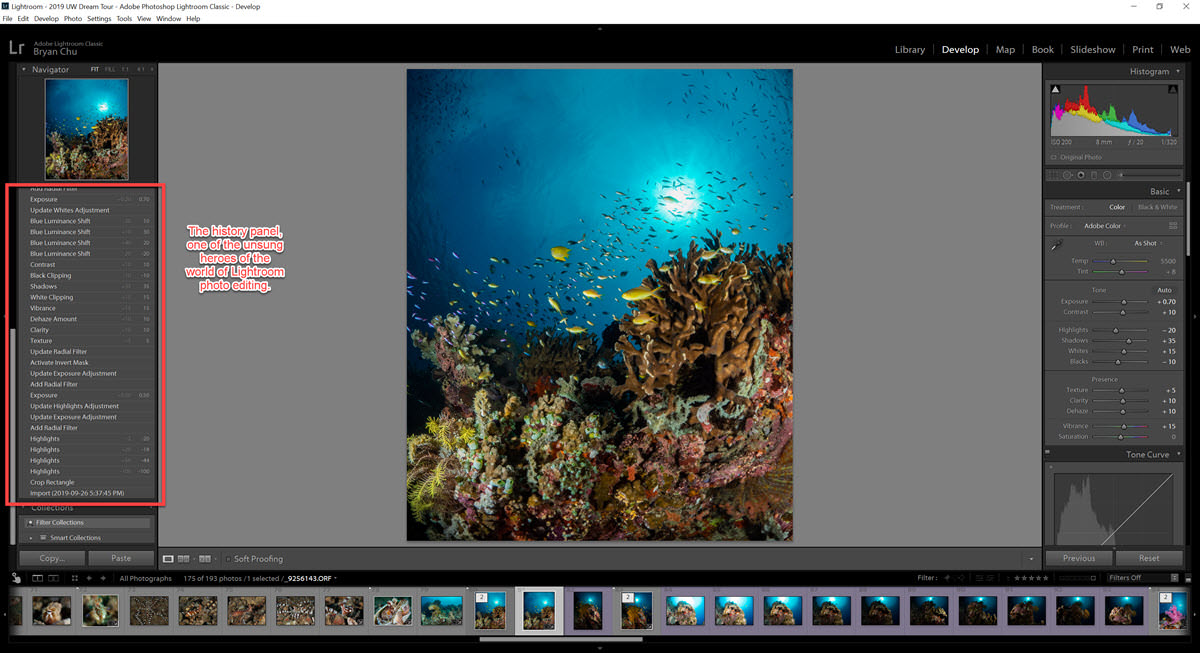
The main editing functions between the two programs are basically the same, though cloud-based Lightroom does have a simpler, more intuitive interface. Unfortunately, cloud-based Lightroom is missing one very, very important function that Lightroom Classic has; the history panel. The history panel in Lightroom Classic allows you to step through every edit you have made to a photo. This is especially useful when editing underwater photos, as there are so many changes to be made that it is very useful to go back and compare before/after.
For example, to get the right color scheme in your photo, you may need to do a combination of custom white balance and some hue/saturation/luminance adjustments (especially to get nice blue water). With Lightroom Classic, you can walk back and forth through each step, to easily compare how things look with each major step. With cloud-based Lightroom, you are stuck having to undo and then redo steps, over and over, but you can’t jump around your edits to easily see before and after. I cannot imagine getting my colors right using cloud-based Lightroom – it would be a complete nightmare.
This may sound like it’s not a big deal, but for anyone who edits a lot of underwater photos, it is a huge deal. It is especially important for you if you are just getting started, since there are so many different edits to try out, and you need to be able to see how different combinations look, and compare them easily.
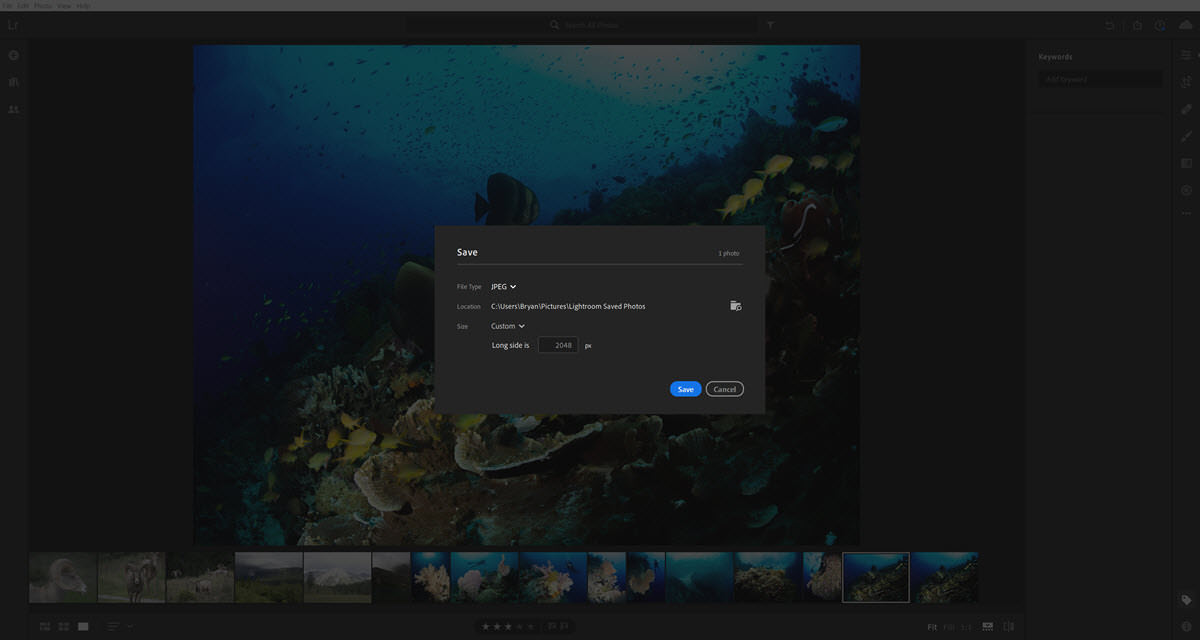
Exporting Files
The other place where cloud-based Lightroom really falls down is exporting files. If you want to print your photos, it is best to export as full-sized TIFF files, which can only be done by Lightroom Classic, or Photoshop (adding extra steps). Even just for social media sharing, it is useful to be able to downsize image resolution and quality for faster uploading, and to add a watermark (this is done much more commonly for underwater photography than land photography). Again, you could use Photoshop, but that takes up a whole lot more time.
What About the Cloud?
Cloud-based editing is a very nice function. However, that’s not to say that Lightroom Classic can’t also be used in conjunction with the cloud. As I have a small, old laptop without much hard drive space, I use Google Drive to backup all of my files to the cloud. The way I do this is:
- Copy all RAW files from my SD card to my Google Drive folder on my hard drive
- The RAW files are automatically synced to the Google Drive cloud
- Edit all of my files using Lightroom Classic
- Output my final jpegs for social media use, upload them as an album to Facebook
- Then, once I am all done with editing the album, I move the RAW and finished files to a location on my Google Drive which does not sync with my hard drive. This keeps them on the cloud but takes them off my hard drive, freeing up space for more photos
- Now if I want to do future edits, I have to download the files back to my hard drive from the cloud…but with a good internet connection, it is really not a big deal…and there aren’t a whole lot of images I find myself going back to for later
Whether you use Google Drive, Dropbox, or some other cloud service, you can use this same workflow, which in my opinion gets you the best of both worlds. It’s really just not worth it, at least for me, to make the jump to cloud-based Lightroom. Although it would potentially be a bit easier, the drawbacks are many, and would add much more time to my typical post processing workflow than the ease of use and convenience would save.
Subscription Plans and Costs
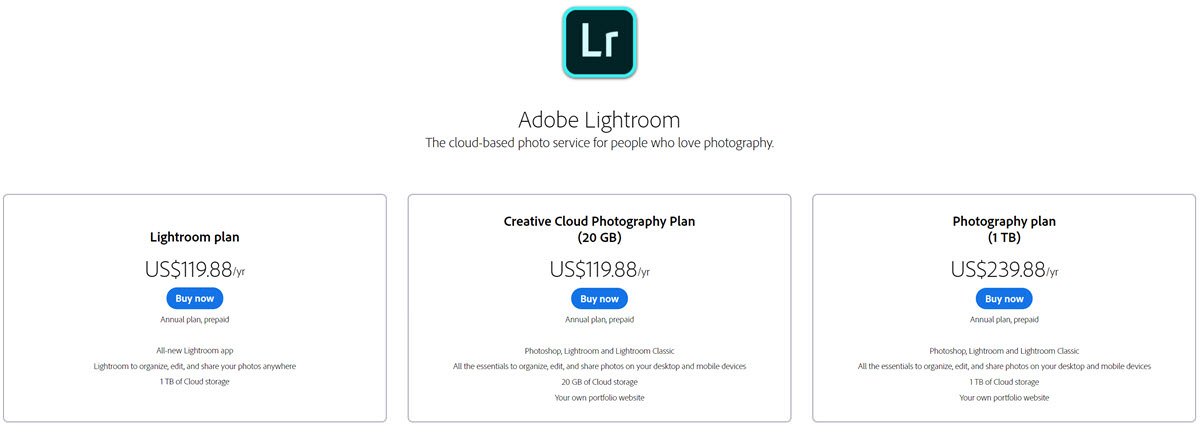
Adobe offers three main Lightroom plans:
- Creative Cloud Photography Plan: $120/yr for Lightroom (with 20 GB cloud storage), Photoshop, and Lightroom Classic
- Lightroom Plan: $120/yr for Lightroom with 1 TB cloud storage
- Photography Plan: $240/yr for Lightroom (with 1 TB cloud storage), Photoshop, and Lightroom Classic
20 GB is only enough for maybe 3-4 dive trips, so if you want to go cloud-based, you’ll eventually need the 1 TB cloud storage. This means you either need to just use Lightroom (no Photoshop or Lightroom Classic) or shell out an extra $10/month for the Photography Plan. To add additional cloud storage costs $10/month per TB.
Compare this to Google Drive, where $10/month gets you 2 TB. Yes, it is fairly similar, but with my file management system I end up paying $10/month for the Creative Cloud Photography Plan, and $10/month for 2 TB of storage, so basically the same prices as the Photography Plan, but with double the cloud storage. And all of my files sync automatically as well.
Conclusion
Lightroom Classic is the only real option for any serious underwater photographers. It is also by far the best option for beginning underwater photographers who want to be able to get the most out of their RAW files, want to print their photos, and want to be able to sort through their photos quickly and efficiently on trips outside of good internet range.
Cloud-based Lightroom is a good option for casual underwater photographers who:
- Want to easily, quickly and conveniently make minor edits to their photos
- Are not so concerned about getting everything they can out of their RAW files
- Do not want to make high quality prints of their photos
- Do not need to be able to sort through and cull large amounts of photos while out of good internet range (ie on week-long liveaboard or dive resort trips)
- Plan to stay as casual underwater photographers in the future (and there's nothing wrong with that!)
Hopefully you found this article useful. Feel free to send me any questions at bryan@uwphotographyguide.com. Thanks for reading!
RECOMMENDED ARTICLES


ABOUT THE AUTHOR

Bryan is an editor and writer for the Underwater Photography Guide. He loves any activity that takes him out into nature, and is especially fond of multi-day hiking trips, road trips to National Parks, and diving. Any kind of diving. He discovered the joy of underwater photography on a Bluewater trip to the Sea of Cortez and has been hooked ever since. He recently finished a 1-year "radical sabbatical" with his partner Lisa (both of them quit their jobs), which included over 120 dives, mostly in Indonesia and the Philippines. His very favourite underwater experiences include swimming with humpbacks in Moorea, being smashed against the rocks next to marine iguanas in the Galapagos, marvelling at the riotously colourful reefs of Komodo, freezing his hands off under the ice in Greenland, and exploring the never-ending wonders of muck diving in Tulamben and Anilao (where he was a Bluewater photo workshop co-trip leader).
Fortunately, Bryan and Lisa managed to avoid killing each other during their year of traveling together (though at times it came close). Now they are back home in Canada, planning their wedding and doing their best to figure out what they want to be when they grow up. Their main concern at this point is finding a way to not run out of money, while avoiding returning back to their old 9-5 jobs (oil & gas, government). Oh, and also continuing to support their diving and underwater photo/video habits...
You can find more of Bryan's underwater photos on Instagram at @bryan_chu_photography and on his website at www.bryanchu.ca.
ALSO BY BRYAN CHU


SUPPORT THE UNDERWATER PHOTOGRAPHY GUIDE:
The Best Service & Prices on u/w Photo Gear
 Visit Bluewater Photo & Video for all your underwater photography and video gear. Click, or call the team at (310) 633-5052 for expert advice!
The Best Pricing, Service & Expert Advice to Book your Dive Trips
 Bluewater Travel is your full-service scuba travel agency. Let our expert advisers plan and book your next dive vacation. Run by divers, for divers.