Enhancing your Images with Photoshop
I'm very old-school in my approach to photography, striving to get every photo just right in-camera. Each year as I study the work of hundreds of photographers around the world, I'm seeing that heavy post-processing is playing a more and more critical role in turning RAW files into the final images that are published in magazines, on websites and winning photo contests. The bar is being set higher, to the delight of all of us who publish images and work hard to share the best photos possible from the underwater world.
So with that in mind, I decided to introduce Adobe Photoshop into my Lightroom-only photo workflow. And maybe it's because I log more hours at the desk in a day than diving in the last 9 months, or maybe just have a crazy imagination lusting over opportunities to create new underwater images, but my photos seem to have taken on a surrealness that borders on fantasy... or simply the combination of two different images!
Here's a quick tutorial on creating split-shot composite images.

Making Photo Composite Images
The trick to making a good composite image is to find two photos that work together - often two photos that were too boring and un-interesting to share on their own, but given a new life through Photoshop.
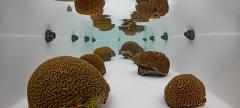
I spent 21 minutes last Sunday combining the two photos below into one scene. The split-shot is pretty standard but has no interest below the surface. The color/lighting below the surface is pretty even, which makes adding the second image much easier. I have tons of whale shark photos just sitting in Lightroom, so I picked one that complemented the wave in the water of the split-shot, gives the image a chance to live outside of Lightroom.


Step 1
Export both of your images at the same pixel width from Adobe Lightroom. I chose 2500 pixels wide. Next, open both images in Adobe Photoshop. Select the split-shot as your main image, and simply extend the canvas to provide room below it for the whale shark photo. Do this by clicking IMAGE -> CANVAS SIZE and then setting the canvas to 3000 pixels in length.

Step 2
Obviously, this white canvas layer color will not suit our very organic-looking split-shot, so we add a new solid color layer and then sample the dark water color to replace the white. Do this by clicking the Create New Layer icon (half-shaded circle) in the bottom of the layers panel and choosing SOLID COLOR. Next, double-click the white square in the new Color Fill layer and the eyedropper tool will open. Just click the water under the split-shot and the white will be replaced by that color, as you see below.

Step 3
You'll notice that we have some shadows from the reef under the split-shot that are a dead giveaway of the composite. You can remove them easily by making sure you have clicked on the topmost layer (the split-shot photo layer) and then selecting the eraser tool. Simply pass the eraser tool over these areas to erase them, leaving the solid water color from the layer we sampled in step 2. Be sure to experiment with the opacity, flow and hardness of the tool in order to blend the erase marks and create a smooth transition between layers.

Step 4
This is where we insert the whale shark. Like anything with Photoshop, there are many, many ways to remove this whale shark from the background and place it into our split-shot. Because the whale shark doesn't have a clear border around it, I chose to lasso it and then paste it onto the split-shot with a rough blue border. To remove that border, we go back to the trusty eraser tool and slowly erase all of the whale shark background so that you can only see the whale shark's body. I also used a lighter opacity to take away some of the detail around the tail, as it was just too obviously fake if I didn't do that. (It still looks very fake, but hey, this is a fun experiment).


Step 5
Now that our whale shark looks like it (somewhat) belongs, we can make some final changes to finish the composite. First, I thought the whale shark was a bit too bright. I chose the burn tool with a light exposure and slightly darkened the whale shark's head to blend in with the dark sunset water.
Second, I moved the entire whale shark to the right, giving it more swim space into the frame (a fundamental composition technique I discuss in photo seminars). Now you just have to click FILE -> SAVE AS and save the file as a .jpg to share on Facebook.


Final Thoughts
Creating underwater composite photos with Photoshop can be a lot of fun. There's really no limit to your creativity, so next time you're on a very long surface interval and dreaming of creating new underwater images, send a couple to Photoshop and start experimenting!
Do you have any comments / thoughts on using photoshop to artificially manipulate your images? Feel free to email me at brent@uwphotographyguide.com or send me a message via Facebook - I'd love to hear your feedback.
Sign Up for a Photo Class!
You can sign up to learn more about post-processing through Bluewater Photo. Based in Los Angeles, California, Bluewater also offers classes through Skype.
Bluewater Photo Class Schedule and Private Lessons

RECOMMENDED ARTICLES


ABOUT THE AUTHOR

Brent Durand is a weekend wanderer and story teller from California.
Brent is an avid diver and adventure photographer, and shoots underwater any time he can get hands on a camera system. He can be reached at brent@uwphotographyguide.com.
Follow Underwater Photography Guide on Facebook or Instagram.
ALSO BY BRENT DURAND


SUPPORT THE UNDERWATER PHOTOGRAPHY GUIDE:
The Best Service & Prices on u/w Photo Gear
 Visit Bluewater Photo & Video for all your underwater photography and video gear. Click, or call the team at (310) 633-5052 for expert advice!
The Best Pricing, Service & Expert Advice to Book your Dive Trips
 Bluewater Travel is your full-service scuba travel agency. Let our expert advisers plan and book your next dive vacation. Run by divers, for divers.