How to Capture Stunning Splits
Ever since picking up a camera and taking underwater photos, I have been mesmerized by over-under or split shots. After all, people cannot naturally see both above and below the surface at the same time, so splits really catch your eye. I quickly wondered how these striking and unique images were taken – and what I could do to get some myself!
Equipment for Split-Shots
First off, splits are easiest with the right equipment. You will need to obtain a wide-angle lens, either fisheye or rectilinear. These types of lenses will yield a wider angle of view and pull more scenery into your frame, both above and below the water line. The Tokina 10-17mm f/3.5-4.5 fisheye is a fantastic choice and works perfectly with both cropped sensor DSLRs and full frame sensors (from 15-17mm). In addition to having a wide-angle lens, you also will greatly benefit from a super large dome port. In fact, as the saying goes, “the bigger, the better!” A 9-inch dome port or larger is ideal, but under the right conditions, splits can still work well with 7-8 inch ports and are even possible with smaller diameters. Keep in mind that the smaller the port, the calmer the water will need to be in order to have a thinner meniscus (curve of water against the dome port) and the less surface area you will have available. Furthermore, larger dome ports focus better since the virtual image is further away than with smaller domes. With regard to glass versus acrylic dome ports, my preference is certainly glass. From my personal experience, they really do shed water droplets so much better, but glass is more expensive.
Sony A6000, Sony 10-18mm, Nauticam 7” dome. f/16, 1/200, ISO 320
Composition and Shooting Technique
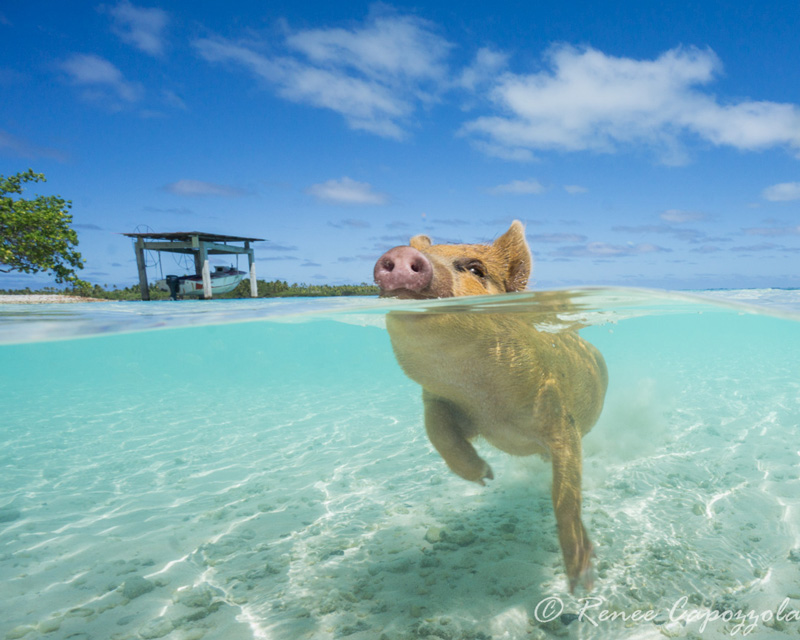
Next, you will have to think about composition. Of course, splits are always possible on the fly, but pre-planning your shot can make all the difference as to whether you nail it or not. Choose interesting subject matter not just underwater but above the water line as well, if possible. For example, above the surface you could have a boat, an island or beach in the background, cool clouds in the sky, or the subject itself if it is breaking the surface. Be sure to focus on the subject that is underwater.
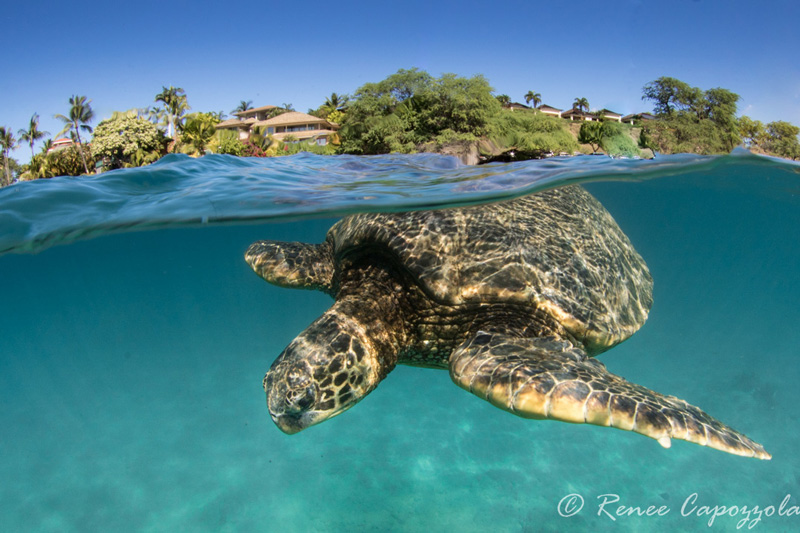
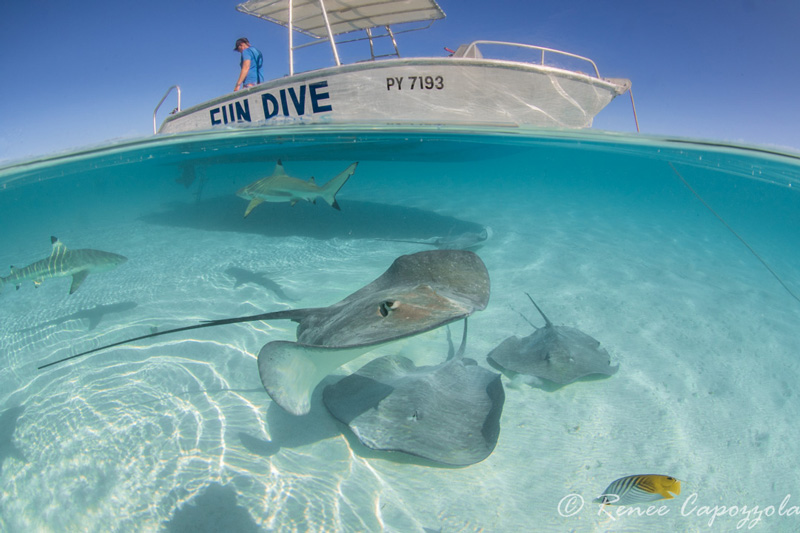
 Canon 7D Mark II, Canon 18-22mm, Nauticam 8″ dome. f/18, 1/160, ISO 320
Ideally, the water should be calm so that you capture all of your subject matter cleanly, since waves and water movement can cut off some of your image. However, if you can get the timing right, it can be fun to incorporate some of the water movement into your image (see below).
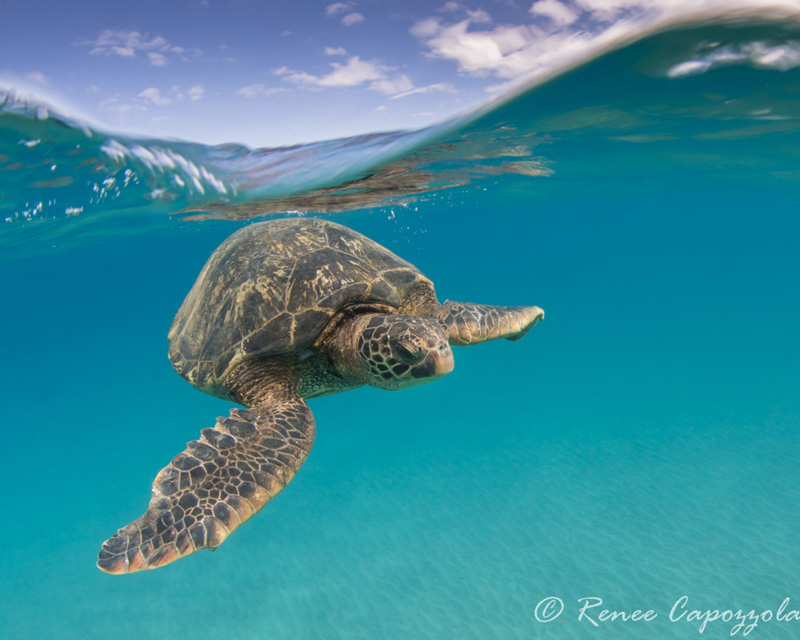 Canon 7D Mark II, Tokina 10-17mm, Nauticam 8″ dome. f/16, 1/100, ISO 400
In my opinion, splits are easiest to do when snorkeling since you don’t have to worry about running out of air and can stay in the water as long as you want, waiting for the right moment. Of course, I have popped to the surface while scuba diving to follow a marine creature such as a sea turtle going up for air, but most of the time I don’t get what I want because there isn’t enough time to plan my shot. If you can change your settings quickly, then you may be successful with these impromptu shots.
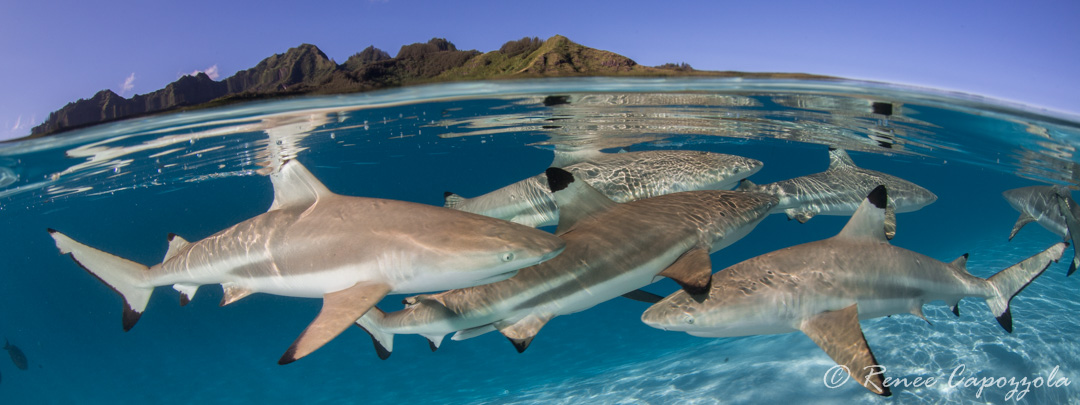
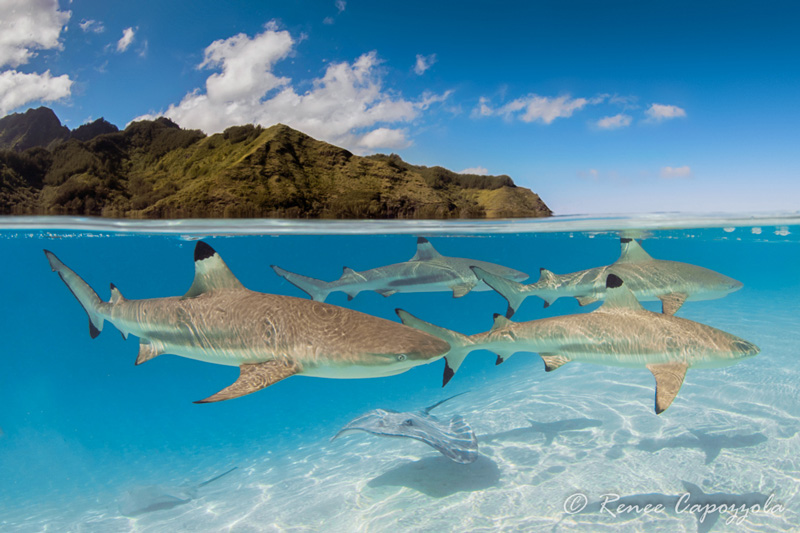
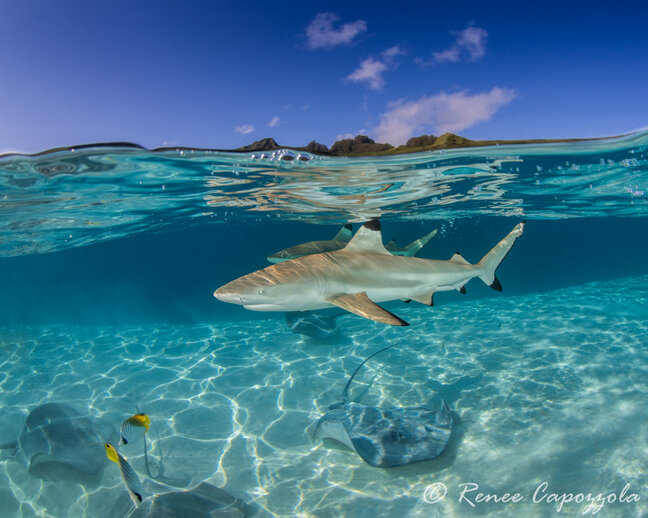
 Canon 7D Mark II, Tokina 10-17mm, Nauticam 8″ dome. f/18, 1/125, ISO 320
Best Settings for Split-Shots
Speaking of settings, knowing how to use your camera in manual mode is crucial. First, you will want to use a small aperture in order to get everything in focus, including the background. Generally speaking, an aperture of f14-f18 works well in most situations provided the sun is out. If it isn’t very bright, you can widen the aperture but keep in mind that the wider the aperture, the less sharp your background will be. Note that the underwater portion of your image will be underexposed as compared to the topside portion, but that’s easy to adjust in Adobe Lightroom with the graduated filter.
Next, you will need to bump up your ISO to compensate for the small aperture so your image isn’t too dark and enough light hits the sensor. Provided the sun is out, I like to start with ISO 320 on mirrorless and cropped DSLRs. On full frame DSLRs I can increase the ISO much more without added noise, which allows me to use a smaller aperture. As mentioned, it needs to be sunny to capture well exposed splits. The sun shouldn’t be too low in the sky and ideally be behind you (or directly above you) to achieve the most color saturation and to minimize the exposure difference above and below the water line.
Canon 7D Mark II, Tokina 10-17mm, Nauticam 8″ dome. f/16, 1/200, ISO 320
Lastly, you will have to set the shutter speed. For slow moving subjects like turtles, I usually use 1/125, and for faster moving subjects like sharks, I use 1/200 or higher. Strobes can help to lighten and freeze the underwater subject as well, but I generally prefer to not use strobes with splits if it is bright and sunny because they are cumbersome, often get in the way, and can make the lighting look somewhat artificial. However, if lighting is not ideal or it is sunset, then strobes can be really helpful to brighten the underwater section of your image.
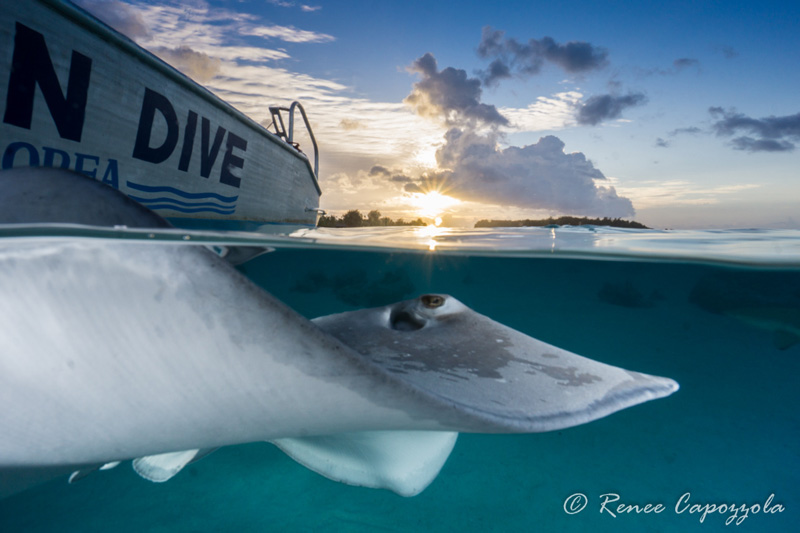 Sony A6000, Sony 10-18mm, Nauticam 7” dome. f/16, 1/160, ISO 320, dual Sea&Sea YS-D1 strobes
If your camera can be set to back-button focus, you will certainly want to set your camera so that the shutter and focus are separate. Normally, when you press the shutter halfway, the camera focuses, and then you press the shutter all the way to take the shot. However, when trying to shoot a quickly moving subject, it is advantageous to activate the focus independent of the shutter button. In other words, you want to manipulate your camera so that the shutter button doesn’t control the focus. Most mirrorless and DSLRs have the ability to program a button on the back of your camera to perform this back-button focus. On most of these cameras, it is the AF-ON button that needs to be programmed. You can read UWPG’s complete back-button focus tutorial for more info.
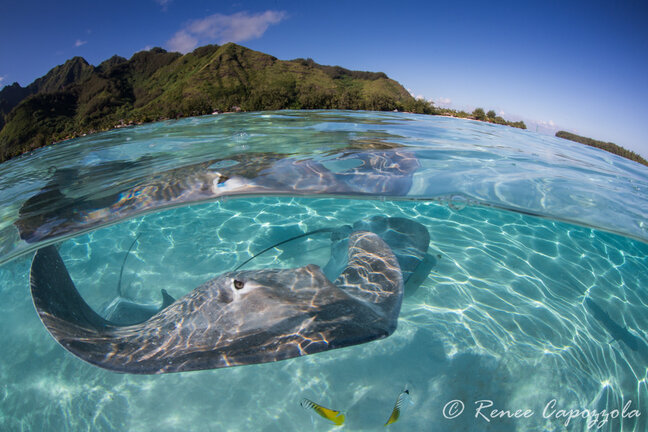 Canon 5D Mark III, Tokina 10-17mm, Nauticam 9″ dome. f/18, 1/200, ISO 320
One other thing to consider is getting a camera that has an optical viewfinder. I learned the hard way that using the LCD under bright, sunny conditions made splits almost impossible. With a viewfinder, you can see what you are looking at and will be able to compose a nice shot. With splits, the LCD is basically useless when it is really bright outside.
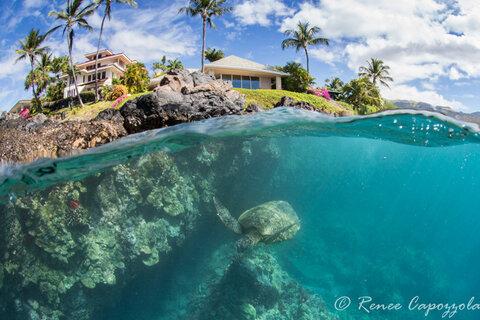
Canon 5D Mark III, Tokina 10-17mm@15mm, Nauticam 9″ dome, f16, 1/200, ISO 640
Lastly, people always want to know how to minimize water droplets on their dome port. In my opinion, the most helpful thing you can do is use a glass dome port. However, if that isn’t possible, then there are some other strategies to employ. First off, when you raise your camera out of the water, it takes a few seconds for most of the water to drain off the port. It’s been my experience that waiting a few more seconds for more of the water to drain off the port yields better results. Also, if you swim around with the upper half of your dome port out of the water, most of the remaining water droplets will dry pretty quickly. You can also try rubbing shampoo on the outside of your dome port and then let it dry before submersing it into the water. If this strategy is effective, it will have to be repeated every so often. Last but not least, you can always remove those pesky water droplets with Lightroom or Photoshop.
Canon 5D Mark III, Tokina 10-17mm, Nauticam 9″ dome. f/18, 1/200, ISO 320
With a little practice and the proper equipment, anyone can be successful with taking striking split images. It is a good idea to practice your splits in a pool or calm lagoon at first if possible. Of course, ideal conditions including calm water, clear visibility, bright sun, and an interesting subject matter really help, but splits certainly give you the opportunity to use your imagination and creativity!
Canon 7D Mark II, Tokina 10-17mm, Nauticam 8″ dome. f/16, 1/200, ISO 320
I’d like to thank Scott Gietler for first introducing me to splits during an amazing Bluewater Photo group trip to French Polynesia in 2014, which I believe is one of the absolute best places to capture these types of images. With Scott’s help and expertise on techniques and proper equipment, I was able to start shooting over-unders with good results. I’d also like to thank Mark Strickland for introducing me to back button focus and Ron Watkins for his camera and Lightroom expertise.
About the Author
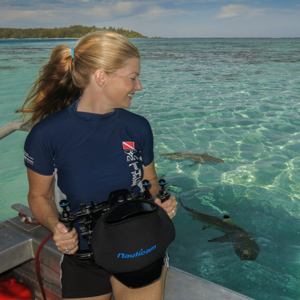 Renee Grinnell Capozzola is an avid underwater photographer from Southern California who is passionate about marine organisms and hopes her pictures, along with those from other underwater photographers, will help bring about positive change. “I believe underwater photographers help employ constructive change for our deteriorating seas through the use of striking images. With my pictures, I hope to increase the awareness of our fragile marine ecosystems and encourage others to help protect our oceans.” More of her photography can be found on her website: www.beneaththesurfaceimaging.com


