Nikon ZR Underwater Settings
The Nikon ZR is the hottest new cinema camera in 2026 . It is also the first product of the marriage between Nikon and RED as Nikon pivots towards video. It blends Nikon’s familiar ergonomics and menu structure with serious cinema-oriented video capabilities, all at a surprisingly accessible price point of around $2,200 for the body.
On paper, the ZR is impressive: 6K video up to 60 frames per second, RED RAW recording, 8.5 stops of in-body image stabilization, and stills capability with a 1/60s flash sync. In practice, it’s a deceptively simple camera— with a clean, stripped back, and immediately comfortable for Nikon shooters. The standard Nikon menu system is intact, though we do wish some aspects were more explicitly optimized for video workflows.
This underwater settings guide is based on weeks of real-world use, diving the Nikon ZR in challenging conditions—specifically the cold, low-visibility waters of the Pacific Northwest. These are not theoretical or spec-driven recommendations. The settings that follow reflect what actually works underwater, both for cinema-style video shooting and, to a lesser extent, still photography.
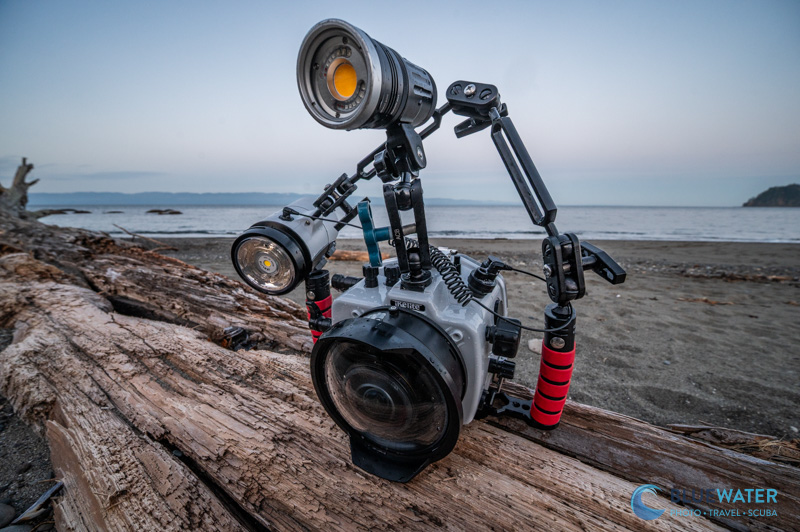
If you are looking for your first underwater housing for the Nikon ZR – look no further than this comprehensive guide from Bluewater Photo! Bluewater has the world’s leading experts who have used the Nikon ZR underwater – email them with any questions at sales@bluewaterphotostore.com or give them a call at 310-633-5052.
Understanding the ZR’s Buttons, Dials, and Switches
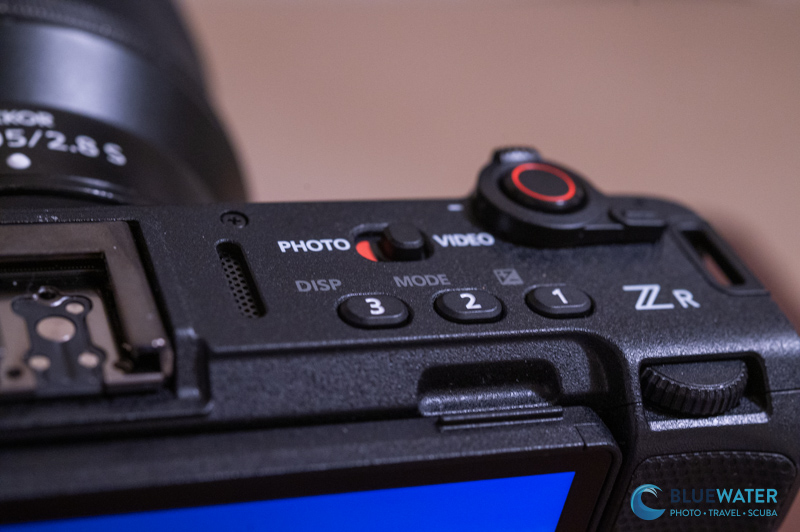
As we mentioned previously, the Nikon ZR has a physically deceptive layout. The top three buttons are custom button that can be customized in the main menu. Directly above that there is a photo to video switch that easily switches you between the photo and video mode in the camera. The camera will remember photo and video settings separately by default which is an extremely useful feature for hybrid shooters. There is a rear and forward dial on the top of the camera for controlling shutter speed and aperture (though I personally would customize the front shutter speed dial to control ISO instead. The shutter/record button is surrounded by a zoom toggle switch which is useful for power zoom lenses.
Finally there are just three buttons on the back panel. The top is a joystick. This will be the primary tool that you use to navigate their camera. It is so essential to the camera’s operation that Ikelite decided to add a joystick control for the first time to its housing. Beneath that there is an “i” menu which is a quick menu that has been relabeled with three parallel horizontal lines. I use this menu to adjust most of the settings that I will change during a dive as it makes it easy to select these settings with just one button push away. Below that menu there is a play back button for viewing your clips. That’s it! The layout is quite simple.
Customizing Your Quick “i” Menus
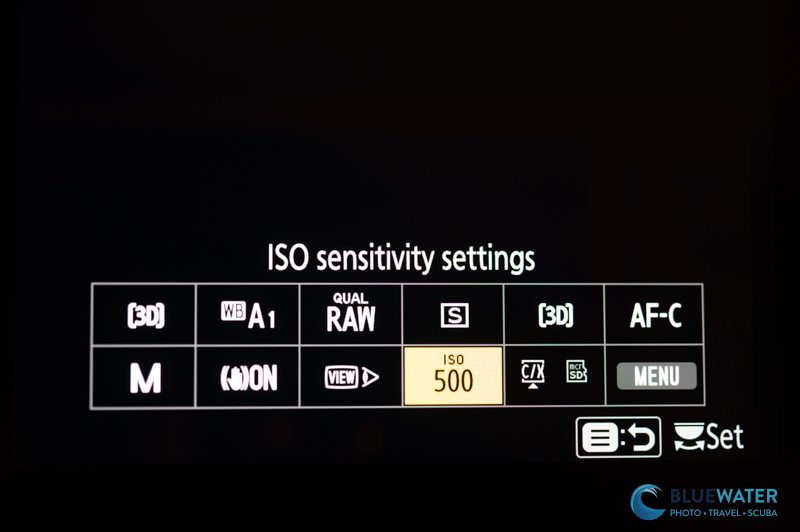
Because the layout of the camera is so simple, most settings adjusted on a day to day will be adjusted through the quick menu. Therefor, it’s important to properly customize the quick menu for photography as well as video. In order to do this, first click on the quick menu button with the three parallel horizontal lines on the back of the camera. Then use the joystick to scroll to the “menu”. Hover over the pencil icon (custom settings menu) and scroll to the right so that you select them menu options. Scroll down to “f controls” and select “f1 customize i menu”. This will give you options for customizing the photo menu. Select one of the icons and scroll through your menu of options to select useful settings that you want quick access to. I select the following for my photo “i” menu:
- flash mode – select fill flash if using strobes or turn off
- white balance – select auto if using strobes
- shooting mode options – manual (of course!)
- vibration reduction – on
- view mode (photo LV) – Adjust for ease of viewing with strobes and show effects of settings without strobes
- ISO – 100-400 typically
- Exposure compensation – 0, but this is a helpful setting for adjusting your flash power if you are using TTL
- Menu – accesses the main menu
- Metering – spot metering with TTL
- Release Mode – you can select your drive mode here – with strobes I choose low continuous
- AF-area mode/subj detection – I prefer 3D autofocus area mode with animal subject detection
- Focus Mode – AF-C for quick subjects, AF-S for macro or slow subjects
Customizing the Quick “i” Menu in Video Mode
After customizing your photo “i” menu, do the same process for video mode. Click on the quick menu button -> Menu -> Customize Settings Menu (pencil icon) -> G Video -> select “g1 Customize i menu”. In video mode, I use the following settings in my “i” menu:
- Set picture control – select a creative picture profile
- White Balance – select you white balance. With video lights I select auto – with no video lights, I’ll do a manual white balance
- Vibration Reduction – keep it on
- Zebra Pattern – set this on high threshold 235 for filming in RED RAW
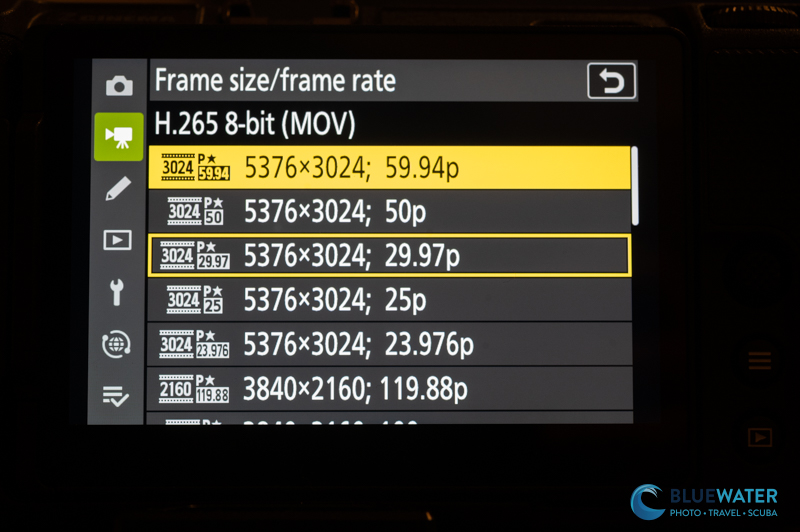
- Frame size/frame rate – I like to film in 6K/60p but more on that later
- Shooting mode options – Allows you to switch to program mode or aperture priority if you get overwhelmed by manual at first. Otherwise shoot manual!
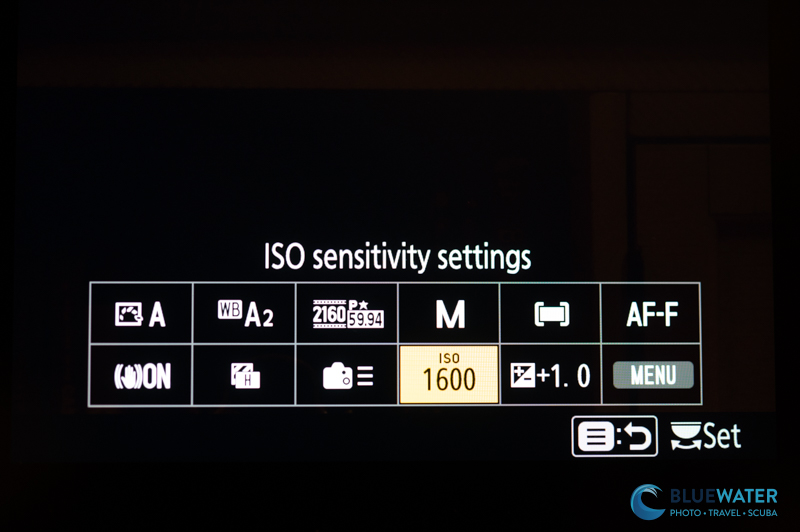
- ISO sensitivity – I will set to auto for easy shooting or adjust this after I adjust my aperture.
- AF area mod/subject detection – for video I like to choose a wide autofocus area with animal subject detection
- exposure compensation – set to +1 for filming LOG
- Focus Mode – typically I use AF-F
- Menu – access the main menu
Customizing Your Buttons
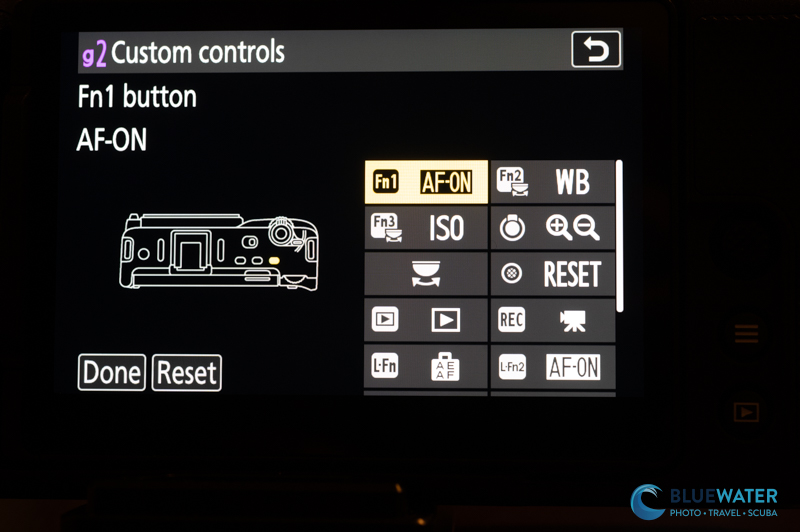
As we mentioned, there are very few buttons on the ZR. However, there are three top buttons that can be useful if you want to quickly access certain settings. To customize these buttons go to Quick Menu -> Menu -> Customize Settings Menu (pencil icon) -> F Controls/G Video -> select “f2/g2 Custom Controls (Shooting)”. You can then select any custom button and change the setting. In the Ikelite housing, I select my FN1 button as the AF-ON button. FN3 is ISO and FN2 is white balance. But you can look through the menu of options and decide what works for you.
Setting a Custom White Balance
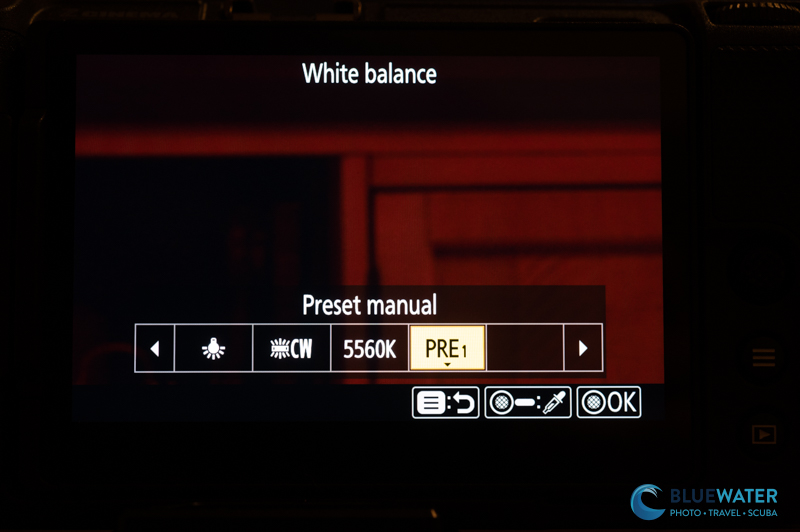
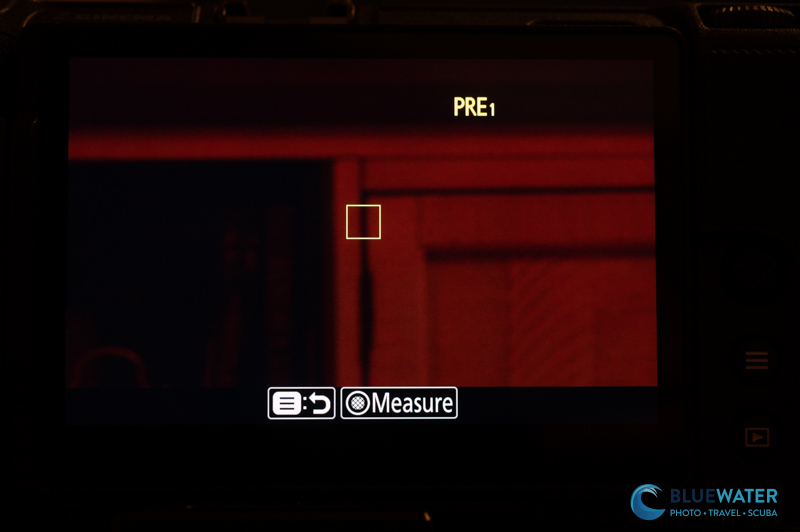
Setting a custom white balance is an essential part of underwater cinematography. It’s important that you can do this quickly – so I have white balance as both my Fn2 button as well as in my quick menu. In order to set a custom white balance, select the quick menu button -> White Balance -> PRE1 -> hold the joystick. A screen with a yellow box in the center will appear. Line the yellow box up with a white fin or slate underwater about arm’s distance from the camera. Hit the joystick button again to measure white balance. That’s it! It’s that simple.
Important Settings in the Video Recording Menu
The video recording menu is quite extensive in the Nikon ZR. Some settings are redundant, others are not. The access this menu hit your quick menu button -> menu -> video recording menu. Here are the most important settings that you need to understand:
- Shooting mode options – keep this on manual
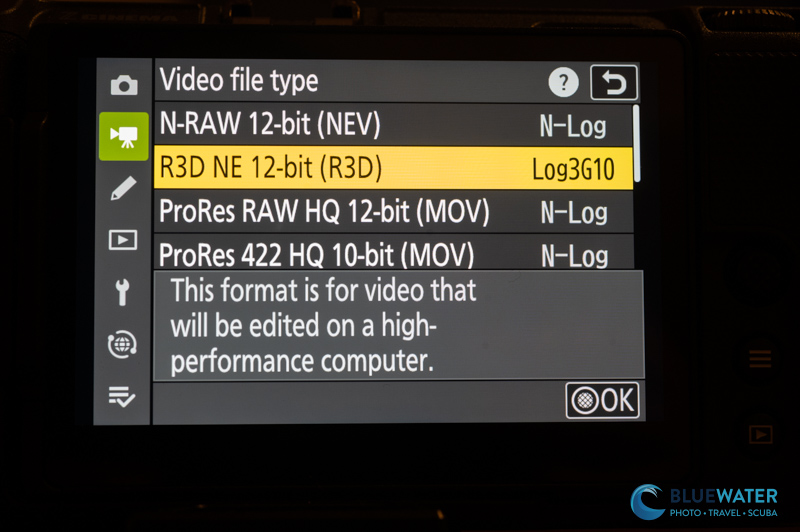
- Video file type – This is where you can choose your video codec (compression type) and whether or not you are shooting RED RAW, N-Log, or ProRES RAW. For new shooters, I recommend selecting H.264 if you don’t want to do much color editing. Most every day, serious cinema shooters will choose H.265 10-bit (MOV) with N-Log. This will require a nice computer for editing, but you won’t have to go overboard. True cinema shooters that want motion picture quality should choose R3D NE 12-bit. These will require a lot of processing power and eat up space on your hardrive. But you will have true control over your color and white balance.
- Frame size/frame rate – choose your frame rate and resolution based on your use case. I typically like to film in 6K/60p (5376×3024; 59.94P). This allows me to slow down my footage and crop with a target video of 4k/30p. If you have a really quick moving subject it can be worth choosing 4K/120p.
- Video Quality (N-RAW) – keep on High
- Diffraction compensation – on
- Auto distortion control – on
- Breathing compensation – I turn this on if my lens breaths a lot which is did not
The rest of the settings are either addressed in the quick menu, are not important for underwater shooting, or can be left on default.
Important Custom Settings Menu Settings
The Custom Settings Menu (pencil menu) has some important settings that we have already talked about. However, there are some additional settings to make a note of for both photography and video:
- a6 Half-press AF activation – this lets you focus if you half press the shutter button. I keep this on.
- a11 Focus Peaking – this is a useful setting for underwater video as it will show you what part of your image is in focus if you are using a manual lens. I turn it on, keep the sensitivity at 2 and set the highlight color to red.
- d9 View Mode (photo LV) – I keep this on “show effects of settings” when I’m not shooting with strobes and “adjust for ease of viewing” when I am shooting with strobes. For video lights I keep it on “show effects of settings”
- e1 Flash shutter speed – 1/60 – It’s really important to know that the Nikon ZR is a subpar underwater photography camera because the flash sync speed is only 1/60. This makes it hard to capture steady photos at higher shutter speeds with strobes. That said, we managed to capture some nice images.
- g6 AF speed – you can adjust how snappy the AF speed is. I keep it at the default of 0 but it can be a little slow for the Nikon Z 105mm macro so I bump it up a bit more
- g7 AF tracking sensitivity – I keep this at 4. If it increase it, the camera is going to try to find a subject and switch to it quicker
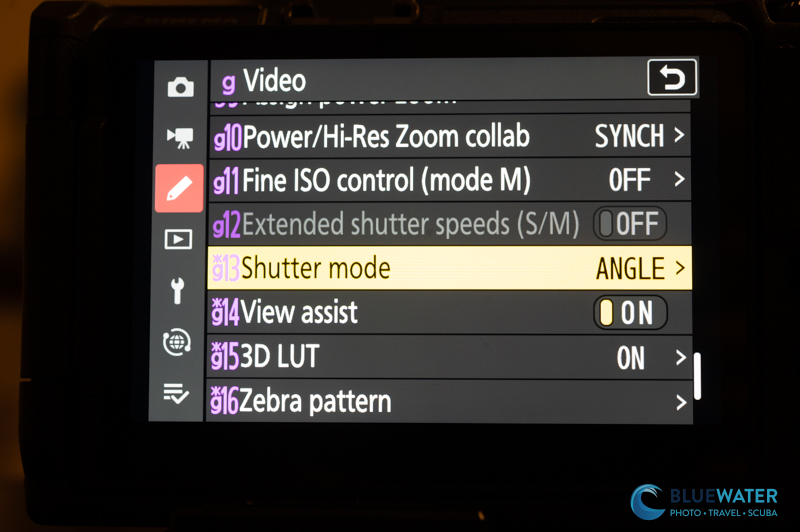
- g13 shutter mode – Select “Angle” and keep your shutter speed at 180 degrees
- g14 View assist – On
- g16 – Zebra pattern (please see the note above on how to set it)
- g22 – Red REC frame indicator
The rest of the settings are either addressed in the quick menu, are not important for underwater shooting, or can be left on default.
Setup Menu
The setup menu (wrench) has a few important settings to keep note of:
- Format memory card – this lets you delete everything from your card but it cannot be undone. I do this after each day of diving and uploading my photos
- Auto temperature cutout – keep this on high so that you get maximum recording time with the camera before it overheats
- Battery info – this will tell you exactly how much battery life is left which is useful considering how bad the battery life of the ZR is.
- Firmware version – reset your firmware here
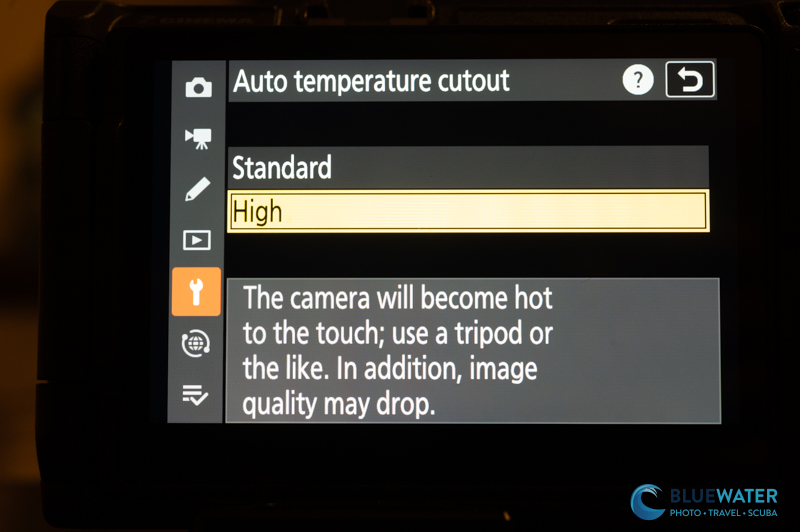
Photo Shooting Menu
Let’s backtrack a bit and talk about the photo shooting menu if you do intend to take photos with the ZR. It actually has a nice sensor and can handle photography quite well if you ignore the slow 1/60 of a second flash synch speed. Keep your hands steady – even with strobes!
Here are some important settings to note:
- Shooting mode options – keep on manual
- Image quality – RAW for the best editing capability
- RAW recording – I like to use lossless compression but you can also use High efficiency with a star
- Color space – sRGB
Keep everything else on default or follow my instruction in the quick menu for photo settings.
Quick Jump-To Underwater Video Settings
Shooting underwater video in manual mode can be quite daunting at first. However, you’ll find that in most cases it’s as easy as “point and shoot”. Here are some quick “jump to” settings for underwater video that really helped us out when shooting the Nikon ZR
- Shoot manual mode!
- Use a 180 angle shutter speed. Keep it there.
- Set your aperture to f/10-f/16 for wide angle and f/16 – f/22 for macro. Or use f/5.6 – f/16 for background blur with macro
- Set your ISO to auto, or adjust it after you adjust your shutter speed
- White balance auto for video lights and set a custom white balance as described above for ambient light
- Metering mode – use spot metering for video lights, ESP for ambient light
- Generally I shooting in 6K/60p or 4K/60p and slow the footage down in post
- Keep your hands steady like a tripod
- Plan on shooting multiple 3-4 second clips – people don’t have an attention span for much more
And that’s it!